Version T
User Guide
For iPad and Mac
5 September 2026
Contents
Getting Started
- Introduction
- Installation & First Launch
- On Mac (Catalyst)
Interface
- The Hub
- The Dock
- Panel Layout
- Macros
Panels
- Overview
- Routing Sets
- Spatial Panner
- Ensemble
- Show
- Project
Reference
- Limits & Capacities
- Automation Data Model
- Macro Command Language
- BroadwayOSC
Getting Started
Introduction
What Version T is, who it's for, and the two roles it plays alongside the console you already own.
Version T turns your mixing console into a theatre instrument. It sits alongside the desk you already own and adds the workflows a musical demands — fast routing changes, spatial panning, automatic chorus levelling, and show-driven cue control — without asking you to relearn your console or abandon it mid-run.
It is built for everyone involved in the show — the designer who sets the system up before opening, the operator at the desk night after night, and the stage hand keeping it all moving. If you work in live theatre, Version T is meant to disappear into how you already work.
Two roles: expanded control, and a portable show
Version T works with your console in two roles.
One — it expands the console into panels you can work in. Version T reads the desk’s live parameters and brings them into purpose-built screens. Some simply mirror the console; most go further, letting you interact with those parameters in ways the console’s own hardware often can’t — reading and writing the live desk in real time. Think of it as control surfaces the console never had.
Two — it builds a show that isn’t tied to one desk. Version T captures the show as console-agnostic parameter sets: what should change, described in Version T’s own terms rather than one console’s snapshot format. Your preferences — which channels are tracked and how they map — are the bridge that lets the same show recall onto any console Version T connects to. Build the show once, and run it on whatever desk you’re patched into.
In short: role one gives you control the console lacks; role two gives you a show the console can’t hold on its own.
What’s inside
Everything is reached from the Hub, the home screen you land on once you connect. Six panels cover the show:
- Overview — every channel and mix at a glance, with live meters and quick actions for muting, alt-source and PAFL.
- Routing Sets — pre-wired signal paths. Define a mic’s full routing once, then assign it per cue with a single tap.
- Spatial Panner — place sources in space on an editable mesh, driven live from the console’s send levels.
- Ensemble — automatic chorus levelling. A Vocal Rider–style engine rides the group so the ensemble stays even without a hand on every fader.
- Show — the console’s scene list beside your own cue list, with Prev / Next / GO transport always to hand.
- Project — show details, connection status, and import/export of your Version T setup.
Each panel shares the same frame: the Hub button and title up top, the panel’s own controls, and a persistent dock along the bottom for connection, scene and transport. Learn the shell once and every panel feels familiar.
Works with your console
Version T speaks to your console over its native network. When it starts, it searches for every compatible device on the network at once — Allen & Heath dLive, Behringer WING and more — and shows them in a single list. Pick one, tap connect, and you are in. If you have connected before, it reconnects to your last desk automatically.
Using this manual
The manual follows the app. Getting Started gets you installed and connected. Interface covers the Hub, the dock and the shared panel layout — the furniture every screen is built on. Panels documents each feature screen in turn. Reference collects the technical detail — data models and control addresses — for when you need to go deeper.
If you are new, read Getting Started and Interface first, then dip into whichever panel you are setting up.
Getting Started
Installation & First Launch
What you need to run Version T, how to install it, and how to connect — to a live console, a software console, or offline in Author Mode.
Before you start
Version T runs on iPad and on Mac, and connects to your console over the network. This page covers the iPad; for the Mac build see On Mac (Catalyst). On iPad you’ll need:
- iPadOS 26 or later — the minimum supported OS.
- An iPad new enough to run it: effectively any iPad with an A12 chip or newer (2018 and later). Oldest supported model in each line:
| Line | Oldest supported | Year | Chip |
|---|
| iPad | 8th gen | 2020 | A12 |
| iPad Air | 3rd gen | 2019 | A12 |
| iPad mini | 5th gen | 2019 | A12 |
| iPad Pro 11” | 1st gen | 2018 | A12X |
| iPad Pro 12.9” | 3rd gen | 2018 | A12X |
- Your iPad and console on the same network — the console’s control network. Connect over Wi‑Fi, or wired through a USB‑C–to–Ethernet adapter for a more reliable link. Wired is recommended under show conditions, where Wi‑Fi can be congested.
- A supported console powered up and reachable (see the connection badges below).
For large systems: live metering across 128+ channels is demanding. An M1 iPad or later gives the smoothest performance. A12-class iPads meet the floor and run fine, but work hardest on big channel counts.
Installing Version T
Version T is coming to the App Store, pending Apple review. Once it’s listed, installing is the same as any other app: on your iPad, open the App Store, search for Version T, and tap Get. Updates then arrive automatically through the App Store.
The first time you open the app, iPadOS may ask for Local Network permission. Version T needs this to find consoles on your network, so allow it — without it, discovery can’t see your console.
First launch: choosing how to connect
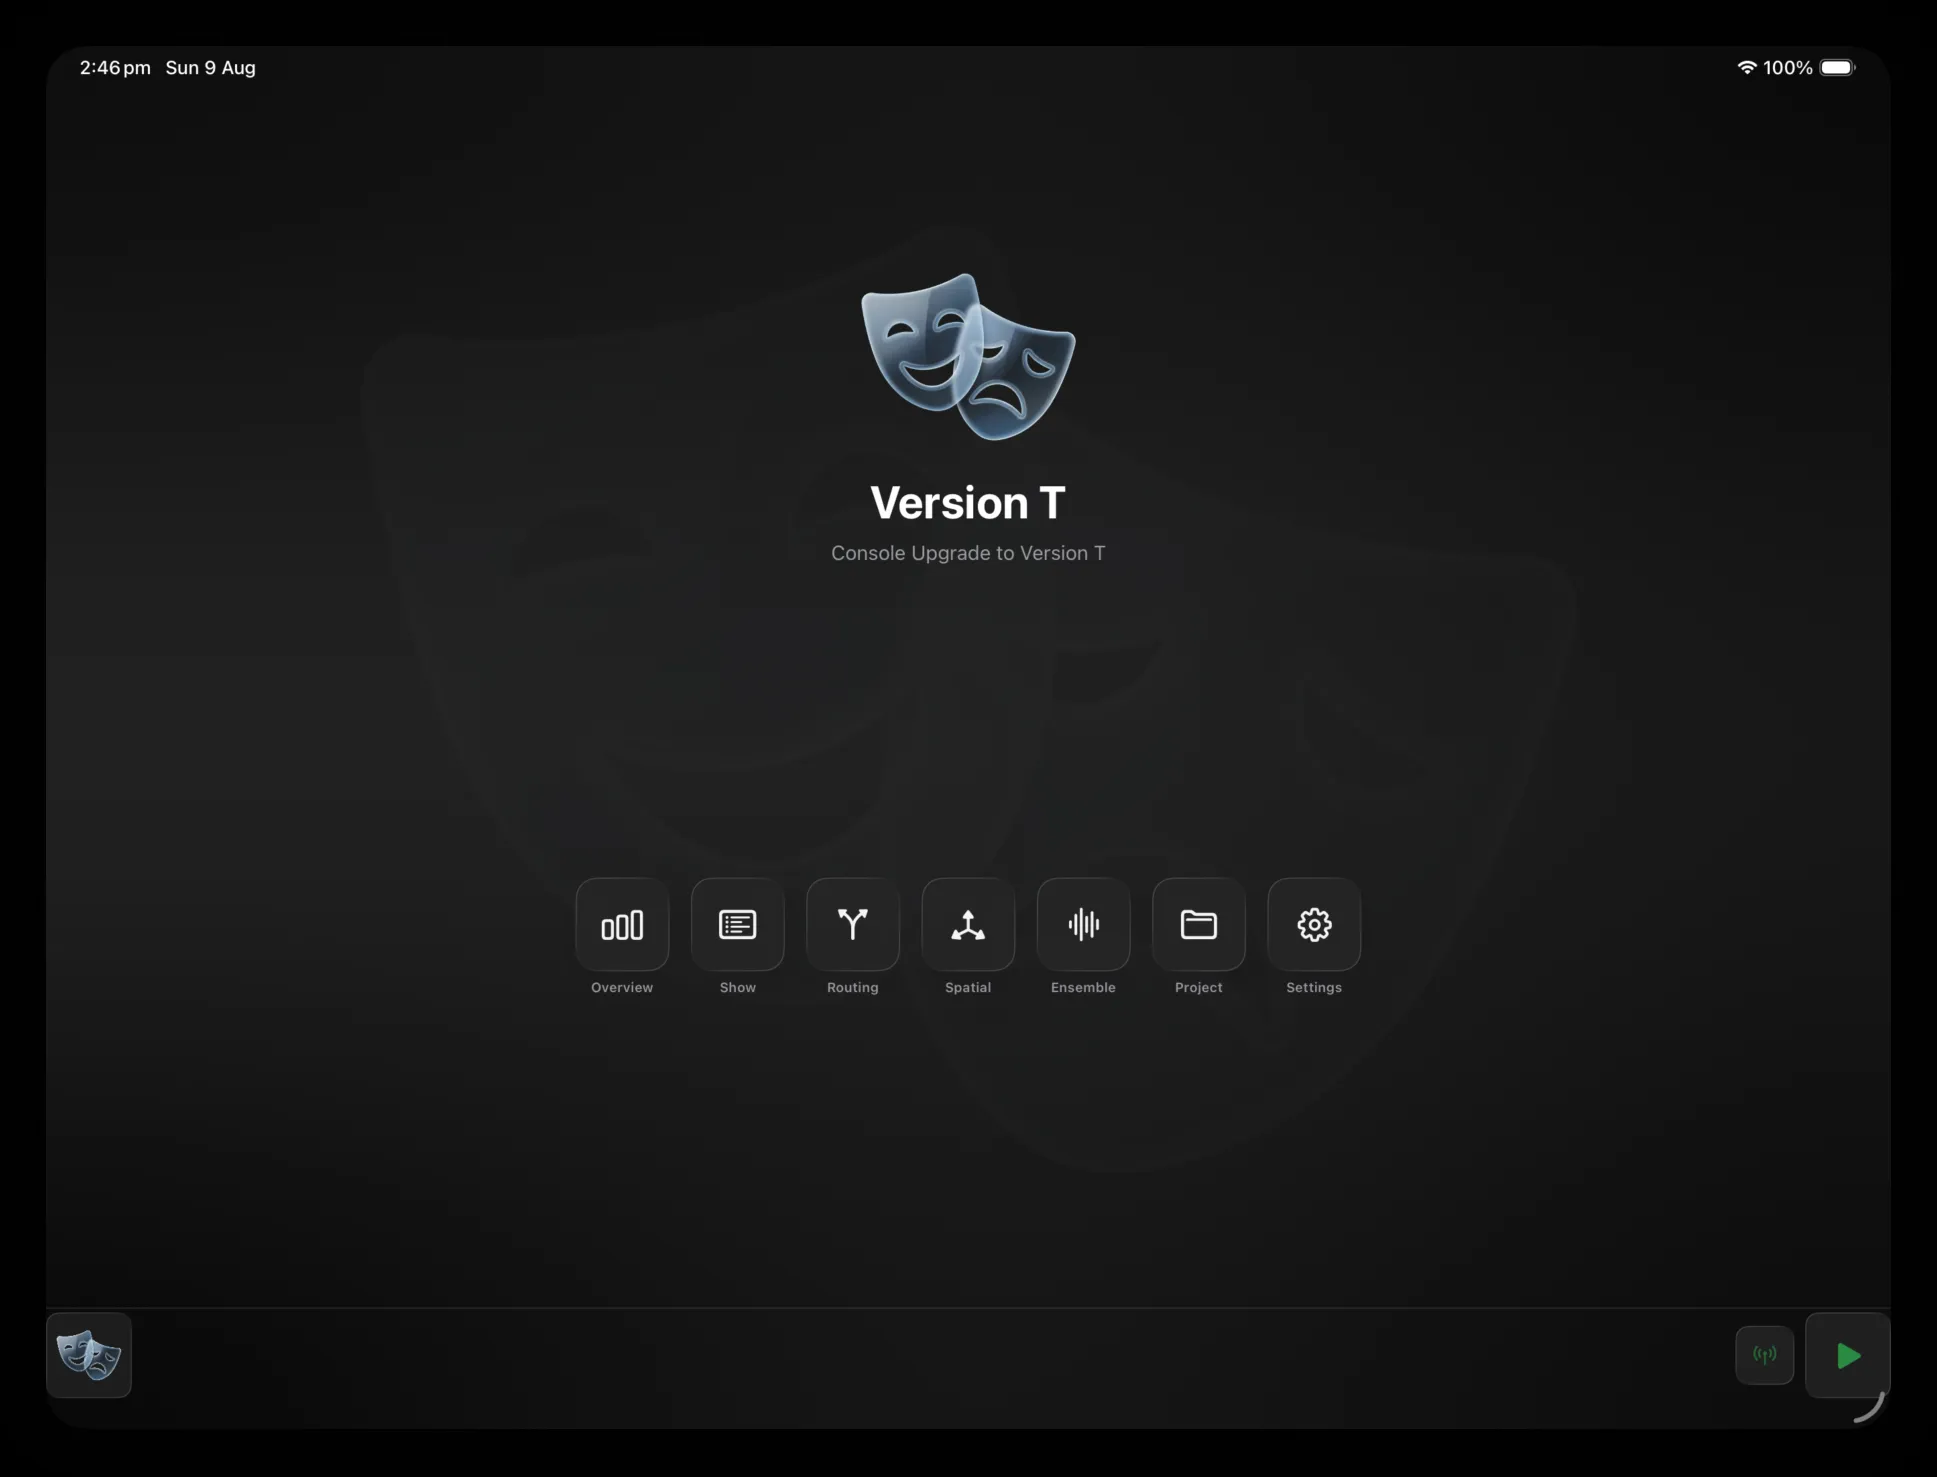
Open Version T and you land on the connection screen — the theatre masks, the name Version T, and the line “Firmware for that missing feature,” above the connections available to you. They fall into two groups: online connections to a live console, and offline editing.
Online connections
An online connection is a live, two-way link: Version T mirrors the target in real time and writes changes straight to it. There are three ways to reach one.
Consoles found through discovery. Version T scans the network and lists every compatible console it finds — each with a protocol badge, its IP address, and a detail line (firmware or server version). Supported consoles:
| Manufacturer | Consoles | Badge |
|---|
| Allen & Heath | dLive MixRack | AH-BIN |
| Behringer | WING — Fullsize, Compact, Rack | WING |
| Behringer / Midas | X32 family, M32 family | OSC32 |
dLive Director. Allen & Heath’s software console, running on a machine on your network — or on localhost, the same machine as Version T. Connect to it by its IP address (badge AH-BIN).
Virtual32. An X32 / M32 console emulator that hosts the full parameter set — around 30,000 parameters. Run it on a machine and connect to build or rehearse a show against a realistic X32/M32 with no hardware in the room (badge OSC32).
Offline connection
Author Mode. The green AUTHOR entry doesn’t connect to anything. It opens Version T as an offline editor so you can build and edit a show with no console on hand, then pick up where you left off the next time you connect.
Connecting
Tap an entry to select it — a green outline marks your choice — then tap the green Connect tick below the list. For an online connection the status moves from “Connecting…” to “Loading system config…” as Version T reads the console’s channel and mix layout, and then you land on the Hub. If only one console is found, Version T selects it for you.
Coming back. Once you’ve connected, Version T remembers the target and tries to reconnect automatically on the next launch — about ten seconds before it falls back to the list — so on a show day you usually open the app and you’re straight back in.
Getting Started
On Mac (Catalyst)
Version T on Mac — one window for the Hub and the connection list, panels as separate windows, and how each one sizes.
Version T runs on Mac as well as iPad, through Mac Catalyst — the same app, the same project, the same console connections. Almost everything works exactly as it does on iPad; this page collects the differences worth knowing.
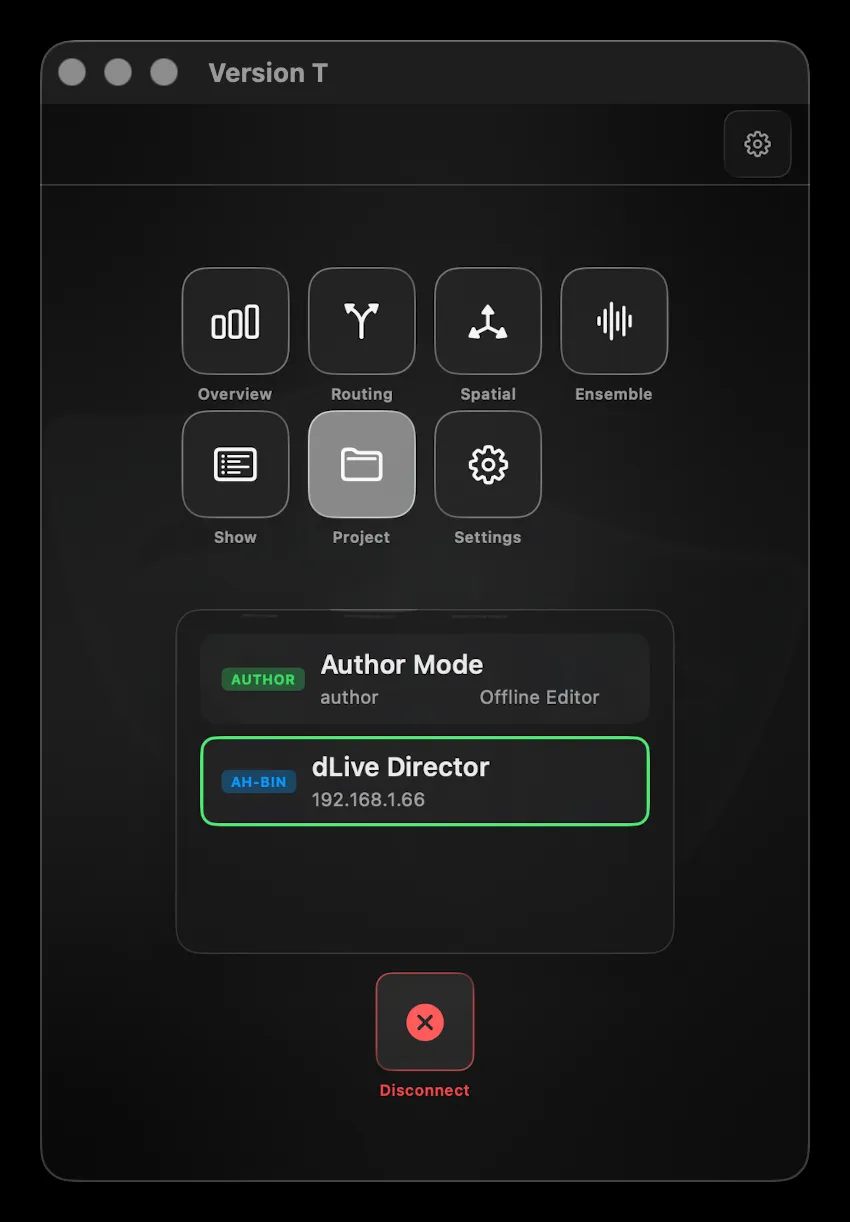
The main window is the Hub and the connection list in one
On iPad, Discovery (choosing a console) and the Hub (launching panels) are separate screens. On Mac they’re the same window: the panel launcher — Overview, Routing, Spatial, Ensemble, Show, Project, Settings — sits above the connection list (Author Mode, and any console such as dLive Director), with a Disconnect button and the App-settings gear. Connect and launch from one place; the discovery screen is the hub.
Panels open as their own windows — as many as you like
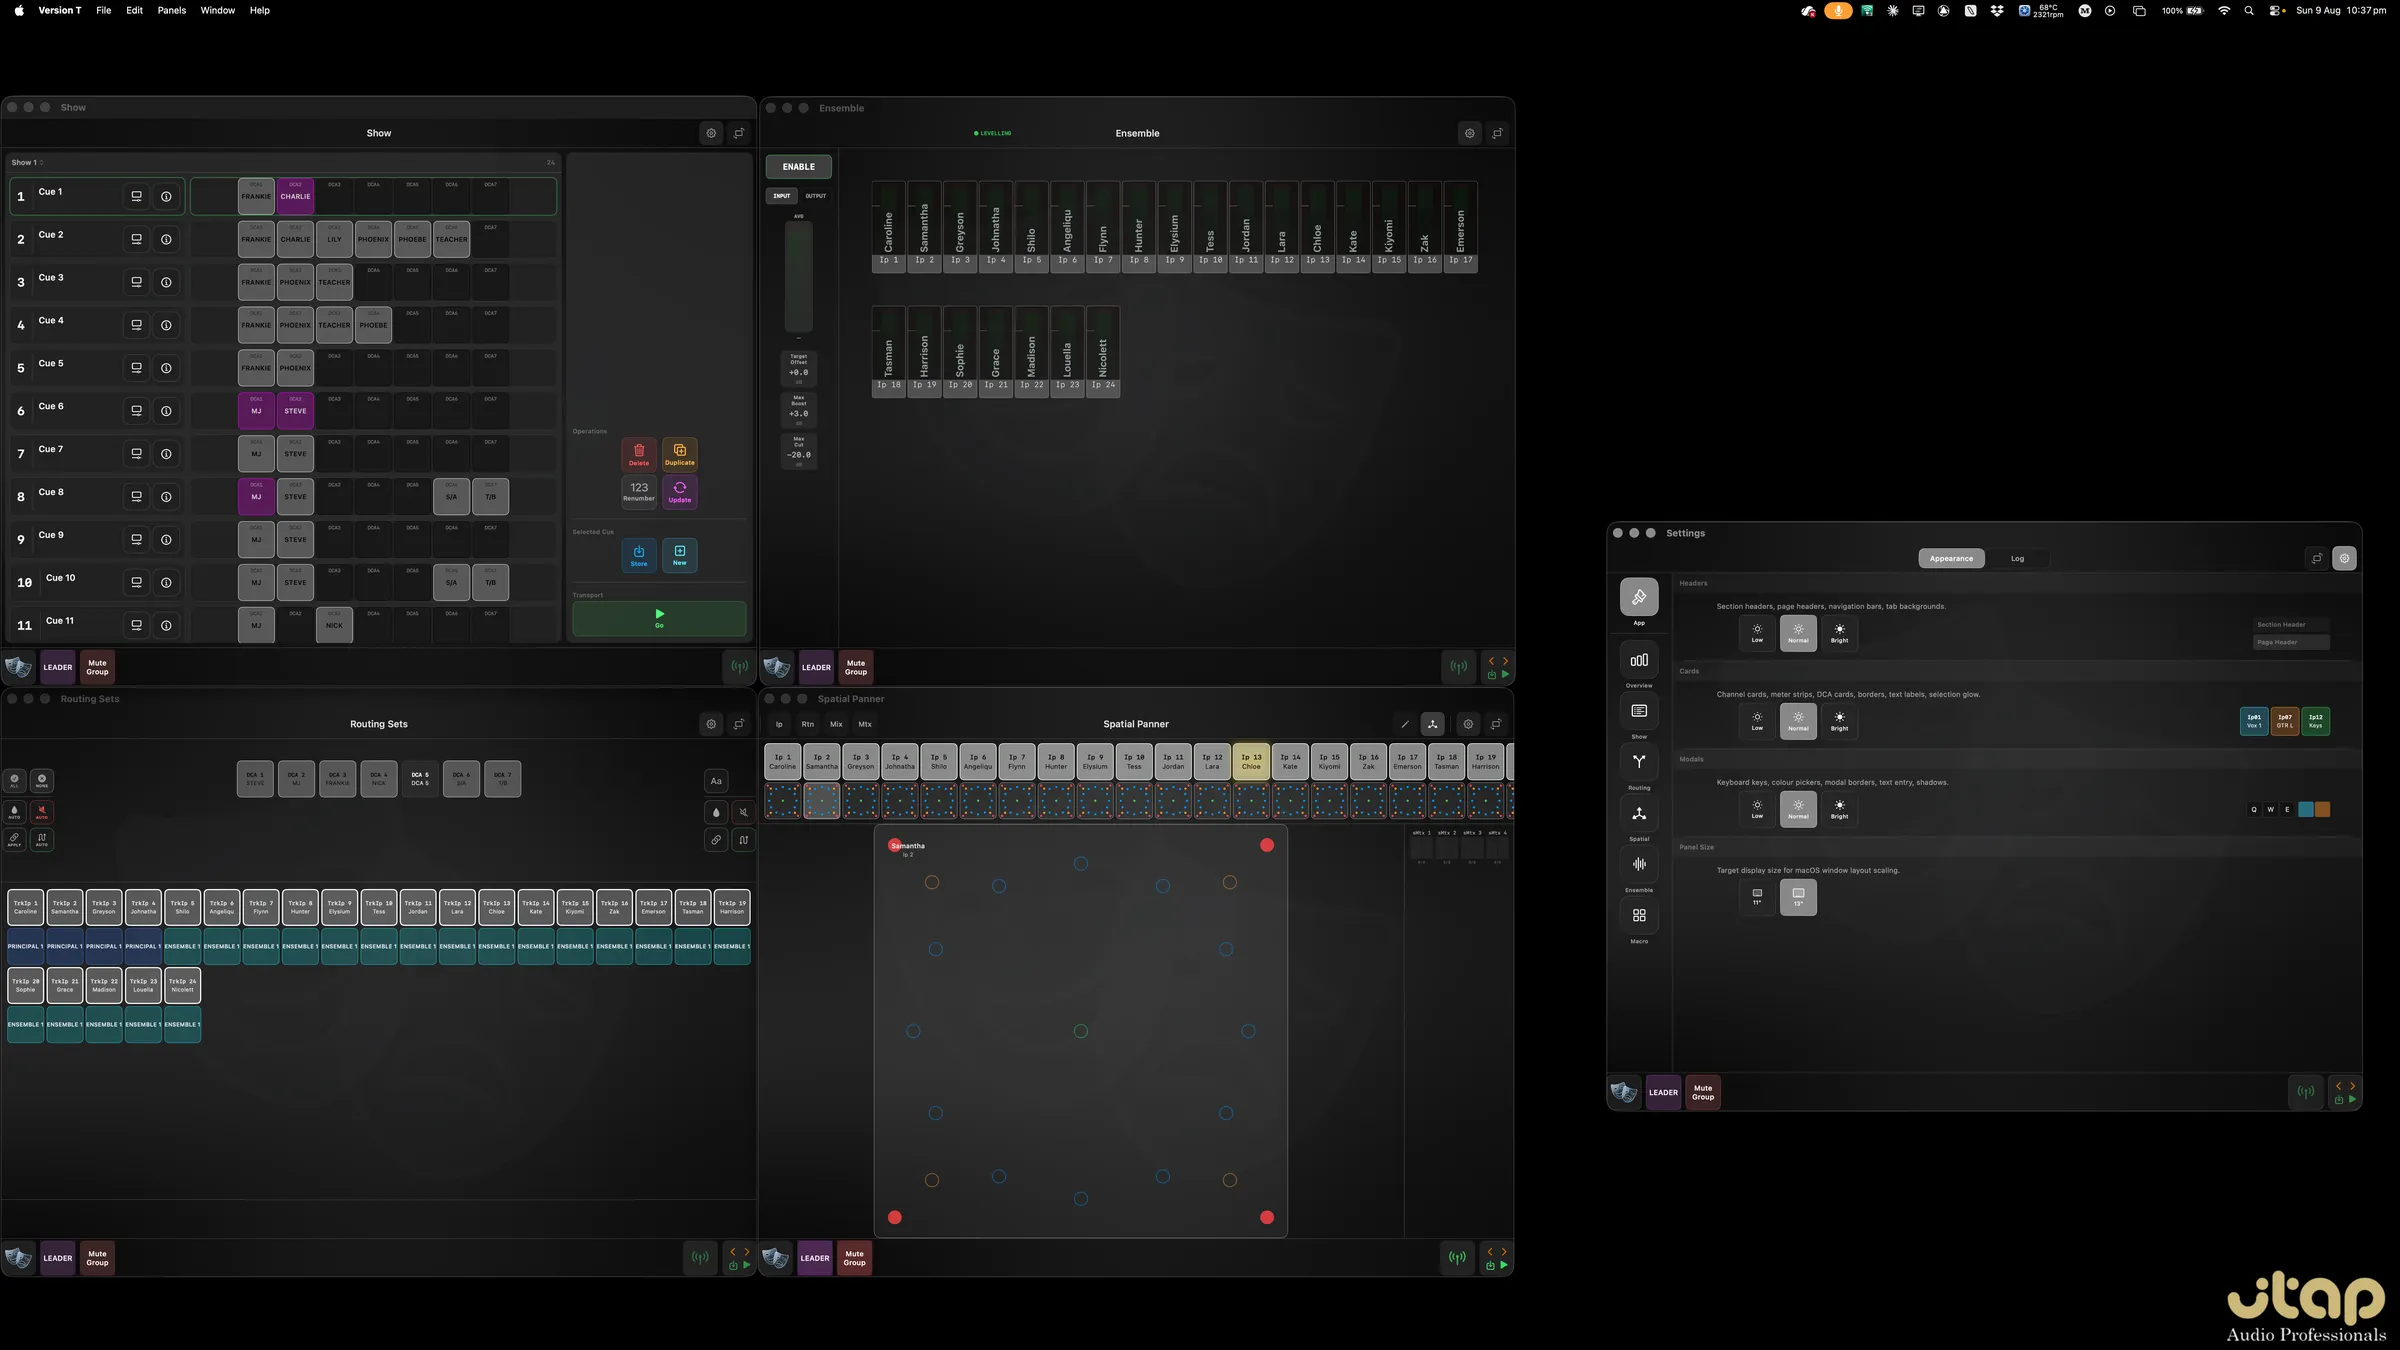
From that window, opening a panel opens it in its own window, and you can open as many windows as you like — including several of the same panel. Show, Ensemble, Routing Sets, the Spatial Panner, even Settings, all open at once and tiled across the screen. Each window is fully live and carries its own dock (connection, transport, macro sets), so you can drive the whole show from a layout of separate panels. Panels are also on the Mac menu bar (the Panels and Window menus), and the dock’s masks widget returns you to the main window rather than swapping the panel in place.
This suits a fixed FOH position where you’ve got the screen space to keep the whole show in view.
Window sizing
How a window sizes depends on the panel:
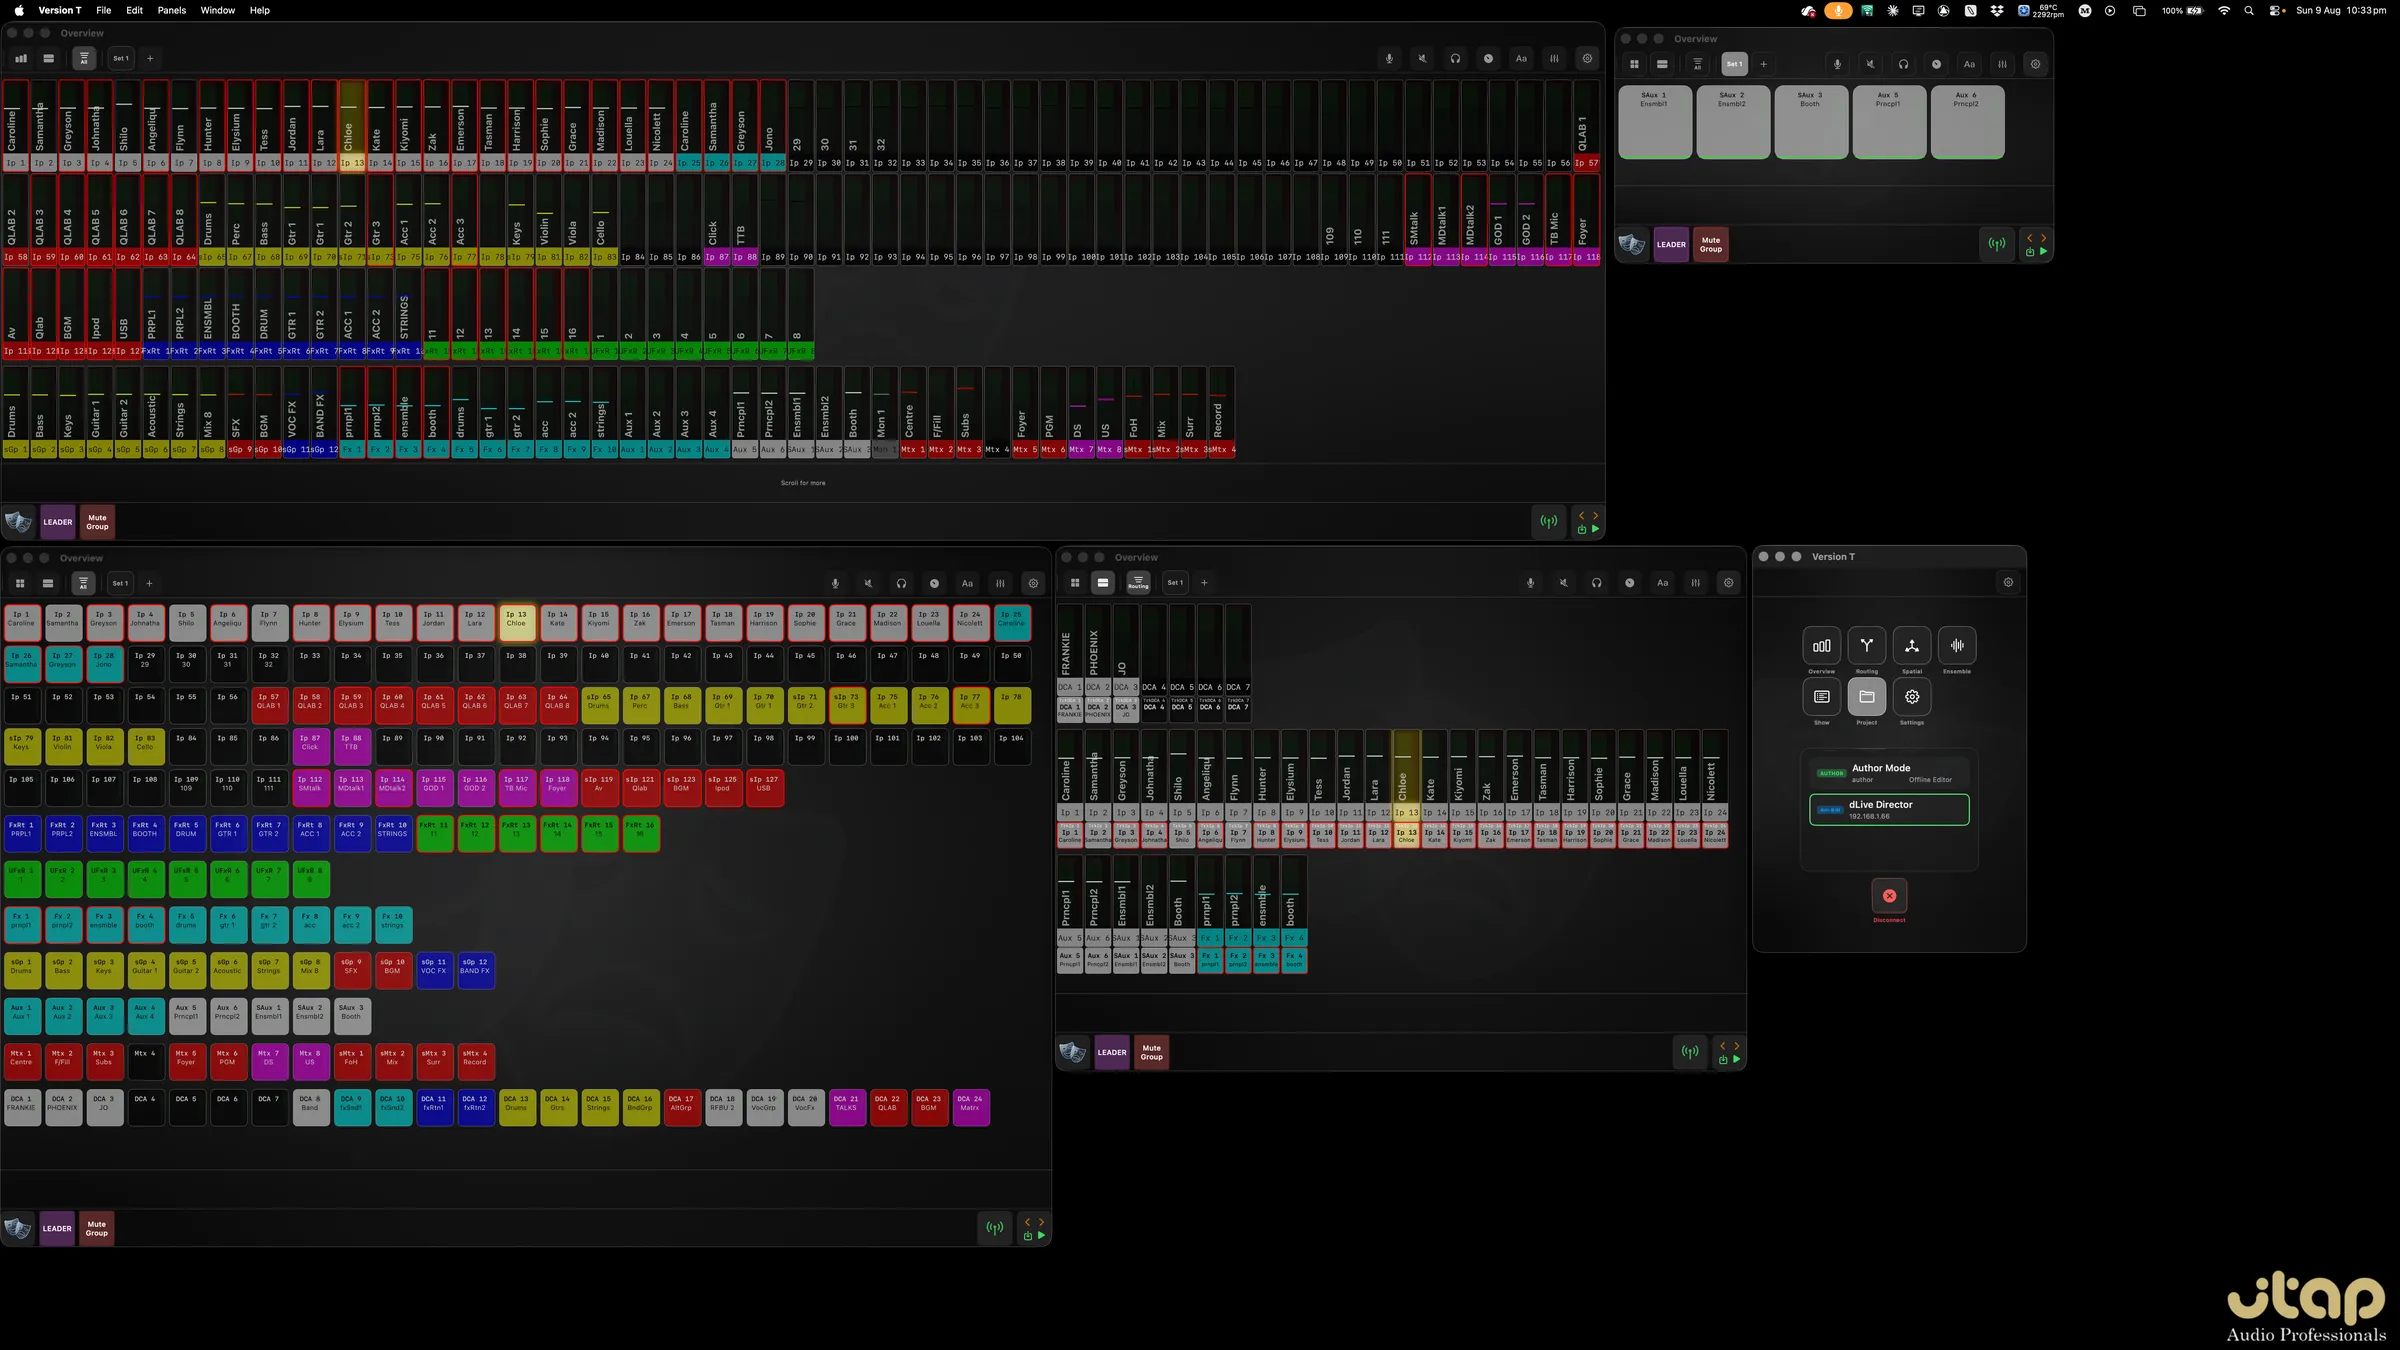
- Overview resizes freely. Drag an Overview window to any size, and run several at once — each on a different user set, view (cards or meters) and size — for a custom wall of metering no single iPad could show at once.
- Every other panel keeps an iPad-shaped window. These don’t free-resize; instead you set an orientation — landscape or portrait — from the header toggle, and a size in Settings → App → Panel Size that mimics the largest or smallest iPad window. The panel’s layout reflows for each orientation, exactly as it does on iPad, just in its own window.
Pointer and keyboard
Every tap on iPad is a click on Mac. The drag gestures — riding faders in Overview, moving a source in the Spatial Panner, floating a dock widget — all work with the pointer, and text entry (names, comments, macro commands) uses your hardware keyboard.
Installing on Mac
The Mac build comes from the App Store, the same as the iPad one — and like it, is coming to the App Store pending Apple review. Once it’s listed, open the App Store on your Mac, search for Version T, and install it from there. Updates arrive automatically.
macOS may ask for Local Network permission the first time you open it. Version T needs this to find consoles on your network, so allow it — without it, discovery can’t see your console.
Interface
The Hub
The panel launcher you land on after connecting — the cards, the Hub strip, and the lock screen.
The Hub is home — the panel launcher you land on once you connect. From here you open any part of the app, and you can always get back to it from the dock.
The panels
The Hub shows a card for each panel. Tap a card to open it.
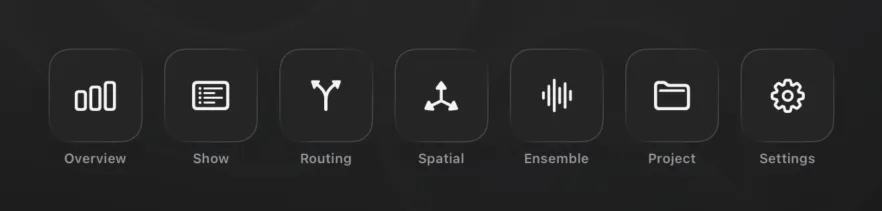
| Card | Panel | What it opens |
|---|
| Overview | Overview | Every channel and mix, with live meters |
| Show | Show | Scene list, cue list and transport |
| Routing | Routing Sets | Pre-wired signal paths, assigned per cue |
| Spatial | Spatial Panner | Spatial positioning on an editable mesh |
| Ensemble | Ensemble | Automatic chorus levelling |
| Project | Project | Show details, connection, import and export |
| Settings | Settings | App preferences |
The cards use short labels — “Routing”, “Spatial” — for the fuller panel names used throughout this manual. Above them are the Version T logo and the line “Console Upgrade to Version T.”
Moving between panels
There are two ways, and you’ll use the second one most:
- The Hub screen — this page, with its row of cards. Good when you’re starting out or want the full menu.
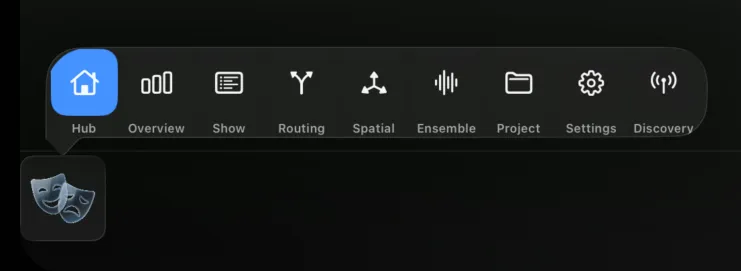
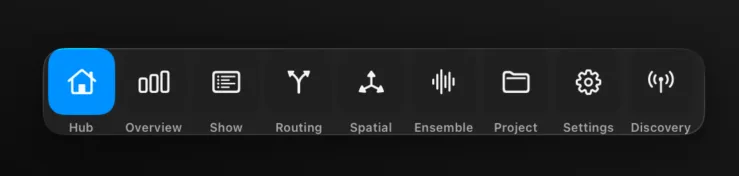
- The Hub strip — tap the theatre-masks widget in the dock (bottom-left) from any panel to pop up a compact row of every panel — Hub, Overview, Show, Routing Sets, Spatial Panner, Ensemble, Project, Settings and Discovery — with the current one highlighted. You jump straight there without returning to the Hub screen first.
Because the masks widget rides the dock on every panel, the Hub strip is always one tap away. See The Dock for the widget itself.
Locking
Tap the large theatre-masks logo at the top of the Hub screen to lock Version T — handy when you step away from the console. The lock covers everything until you dismiss it.
Interface
The Dock
The widget bar along the bottom of every panel — Hub strip, macro sets, connection status and show transport.
The dock is the bar along the bottom of the screen, present on every panel. It holds Version T’s widgets — small glass cards that give you navigation, connection status and show transport without leaving whatever panel you’re working in.

Left to right:
| Widget | Looks like | Tap opens |
|---|
| Hub | Theatre masks | The Hub strip — jump to any panel from here |
| Macro Sets | A short name per set | That set’s macros |
| Connection | Antenna, tinted by state | Console details and Disconnect |
| Transport | Green play | Store · scene / T-list · Prev / Next / GO |
The Hub and Macro Set cards sit at the left; Connection and Transport sit at the right.
Hub. Tap the masks to open the Hub strip — a compact row of every panel (Hub, Overview, Show, Routing Sets, Spatial Panner, Ensemble, Project, Settings, Discovery), with the current one highlighted. It’s the fastest way to move between panels, and it’s always in the same place.
Macro Sets. These cards are built automatically from your show data — one per macro set. Tap a card to reveal that set’s macros and fire them. If your show has no macro sets, no cards appear here.
Connection. The antenna is tinted by connection state — green connected, orange connecting, red error, grey offline. Tap it for the console’s details and a Disconnect button.
Transport. Tap the green play card for the transport strip: Store (when the T-list is active), the scrollable scene / T-list, and Prev / Next / GO. Transport is hidden on the Show panel, which has these controls inline.
Tap to open, drag to float
Every dock card behaves the same way:
- Tap — opens the widget’s strip as a popover above the card.
- Drag up — undocks the widget into a floating panel you can drop anywhere on screen. Handy for keeping transport or the Hub strip visible while you work in a panel.
- Drag a floating widget back down — redocks it.
The Connection widget is fixed — it stays in the dock and doesn’t float.
Interface
Panel Layout
The frame every panel shares — header across the top, work area in the middle, dock along the bottom.
Every panel is built on the same frame, so once you know one you know them all: a header across the top, the panel’s work area in the middle, and the dock along the bottom.
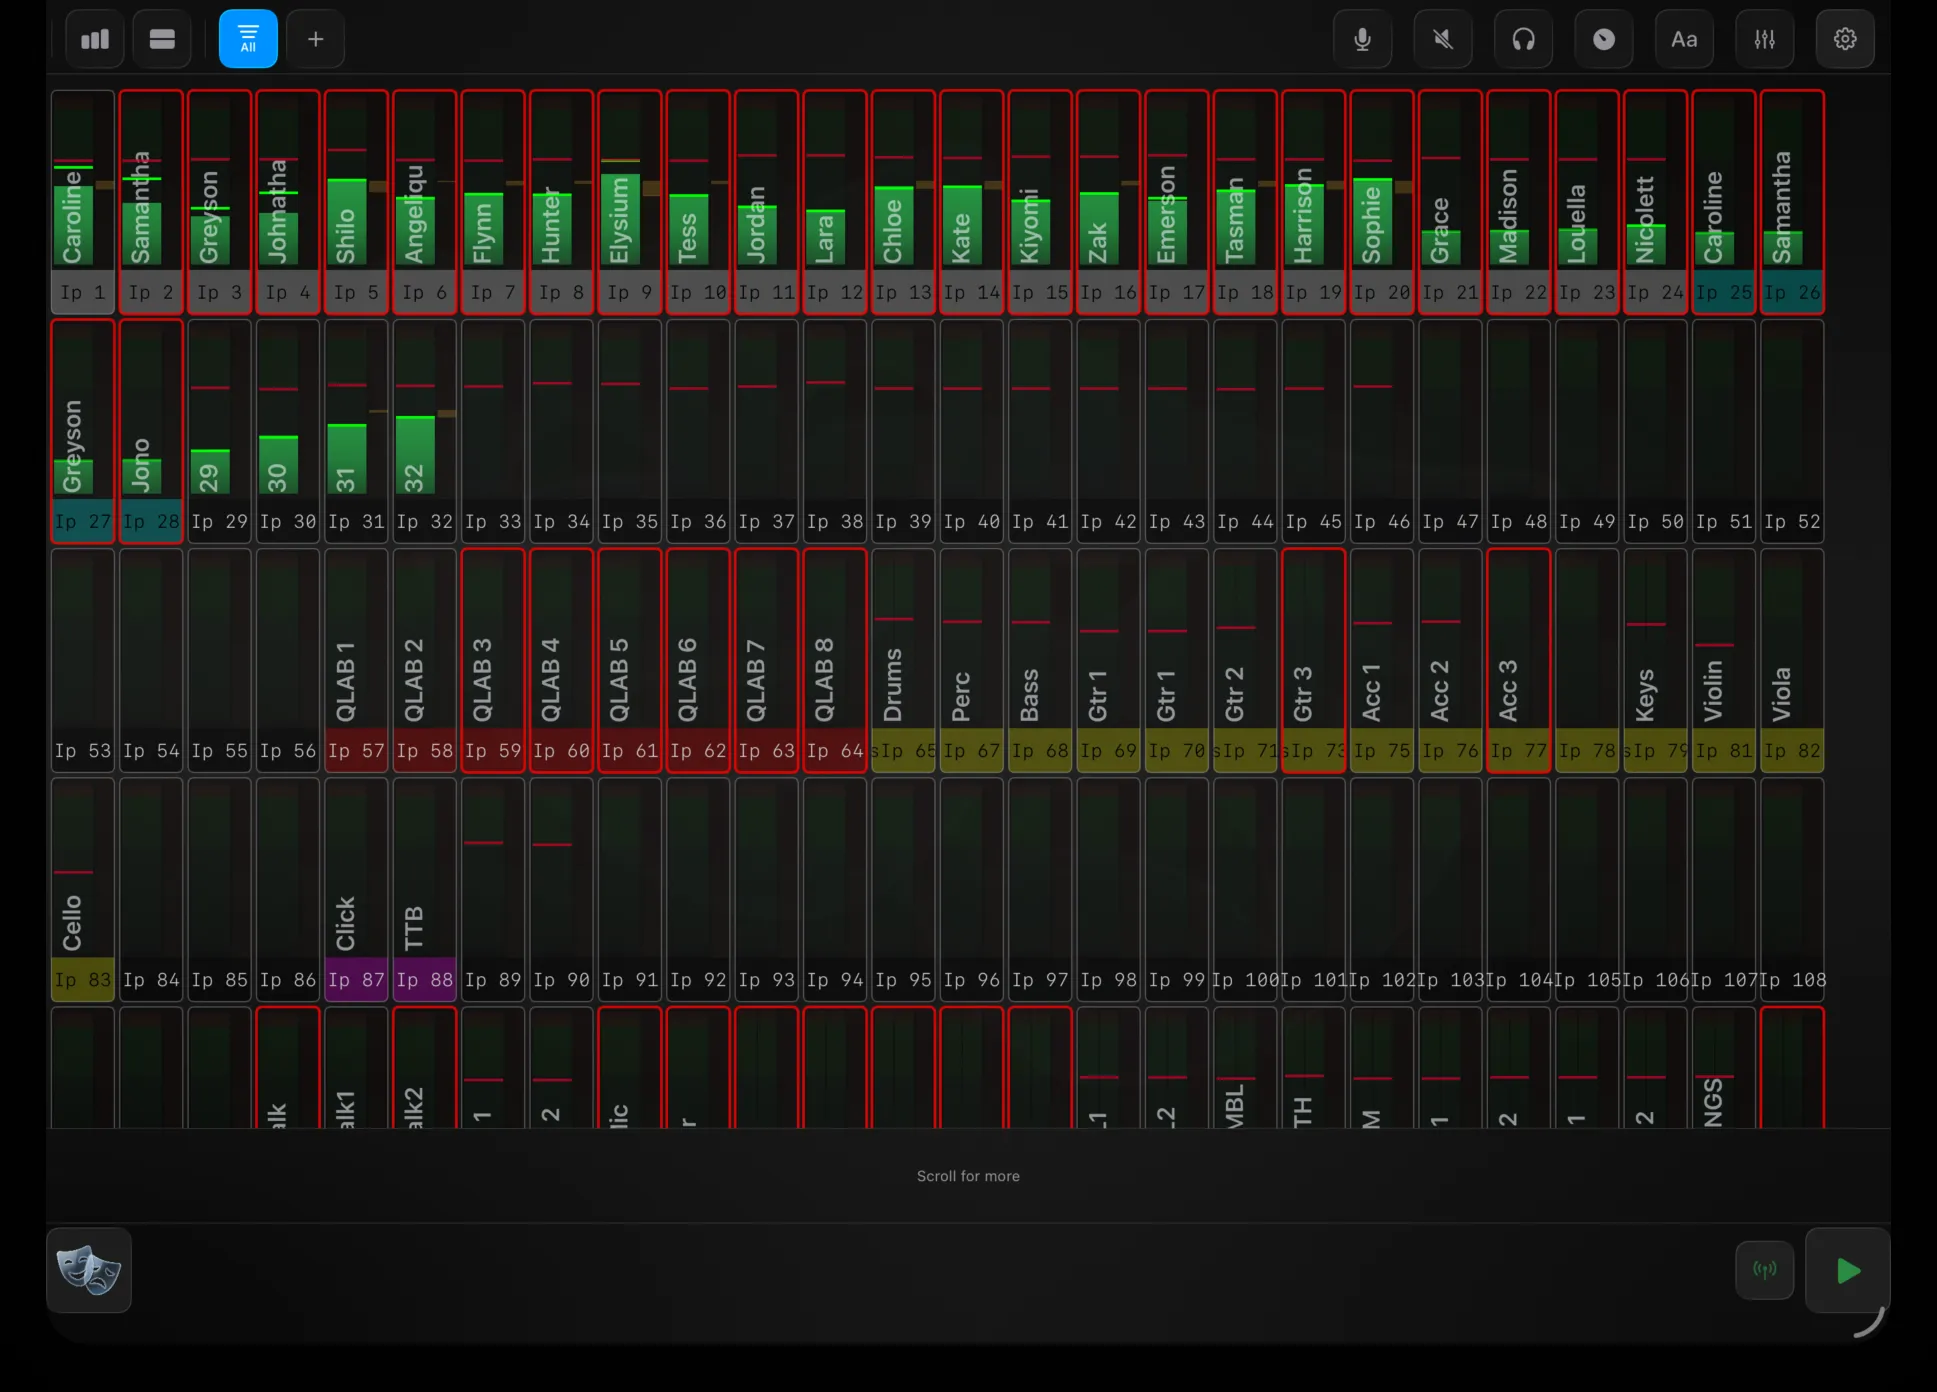
A slim bar across the top of every panel. Its shape is always the same, even though the controls change from panel to panel:
- Centre — the panel name. Whichever panel you’re in is named here (e.g. “Show”, “Overview”).
- Right — the Settings gear. Tap it to open Settings at that panel’s own section — so from Overview the gear lands you on Overview’s settings, from Show on Show’s. On Mac there’s also an orientation toggle here — see On Mac (Catalyst).
- Left and right — panel controls. The rest of the header holds controls specific to that panel: view toggles and filters on Overview, page buttons elsewhere, and so on. These are documented on each panel’s own page.
There is no masks button in the header — navigation lives in the dock (see below).
The work area
The middle of the screen is the panel itself — the channel grid, the mesh editor, the T-list, whatever that panel does. It fills all the space between the header and the dock. Some panels add their own inline controls just above the dock (Overview’s footer, Show’s control column); those belong to the panel and are covered on its page.
The dock
The bar along the very bottom is shared by every panel. It holds the Hub (masks), any Macro Sets, Connection and Transport, and it’s where you move between panels. It’s the same everywhere — see The Dock.
Opening settings
The gear never opens a pop-up over the panel. It takes you to the Settings panel, on the section that matches where you were. Settings is a panel in its own right, with its own tabbed sections, reached either from the gear or from the Hub.
Interface
Macros
One button, several console commands — built in Settings, fired from the dock as macro-set widgets.
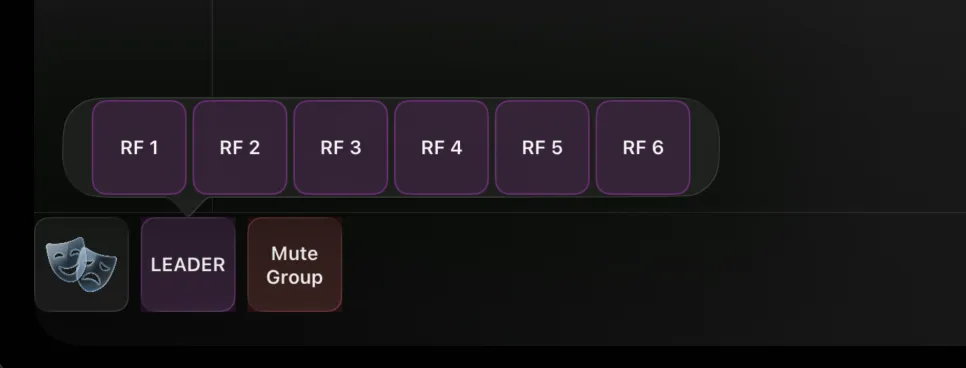
A macro is a button that fires one or more console commands in sequence. Group your macros into sets, and each set becomes a row of buttons in the dock — for the moments in a show when one tap should do several things at once: recall a cue, mute a group, and send a Go to QLab, all together.
Macros aren’t a Hub panel. You build them in Settings → Macro, and they live in the dock as macro-set widgets.
Building a macro
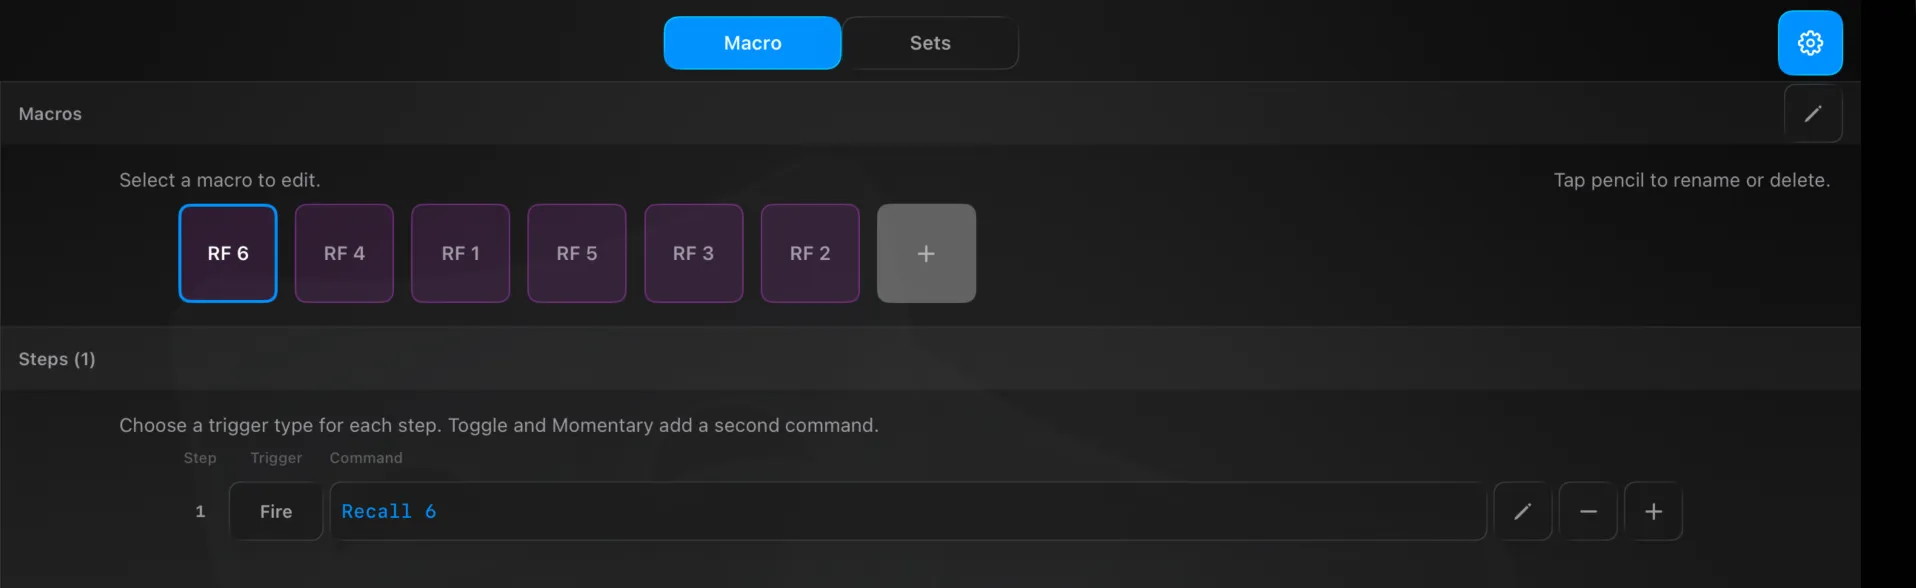
Open Settings → Macro. The Macro tab has two parts:
- Macros — your macro buttons as tiles. Tap + to add one; the pencil renames, recolours or deletes.
- Steps — the selected macro’s actions. Each step has a Trigger and a Command:
- Trigger — how the step fires: Fire (once), Press, Release, Momentary, or Toggle. Toggle and Momentary add a second command (the OFF / release action).
- Command — a plain-language line, compiled as you enter it. A green accent (and a pencil icon) means it’s valid.
Some example commands:
| Command | Does |
|---|
input 1 mute on | Mute channel 1 |
dca 2 level -5 | DCA 2 fader to −5 dB |
recall 6 | Fire cue 6 |
wait 500 | Pause 500 ms |
osc 10.0.0.5:53000 /go | Send a Go to QLab |
Chain several on one line with ; — e.g. input 1 mute on; wait 500; recall 6.
Grouping into sets
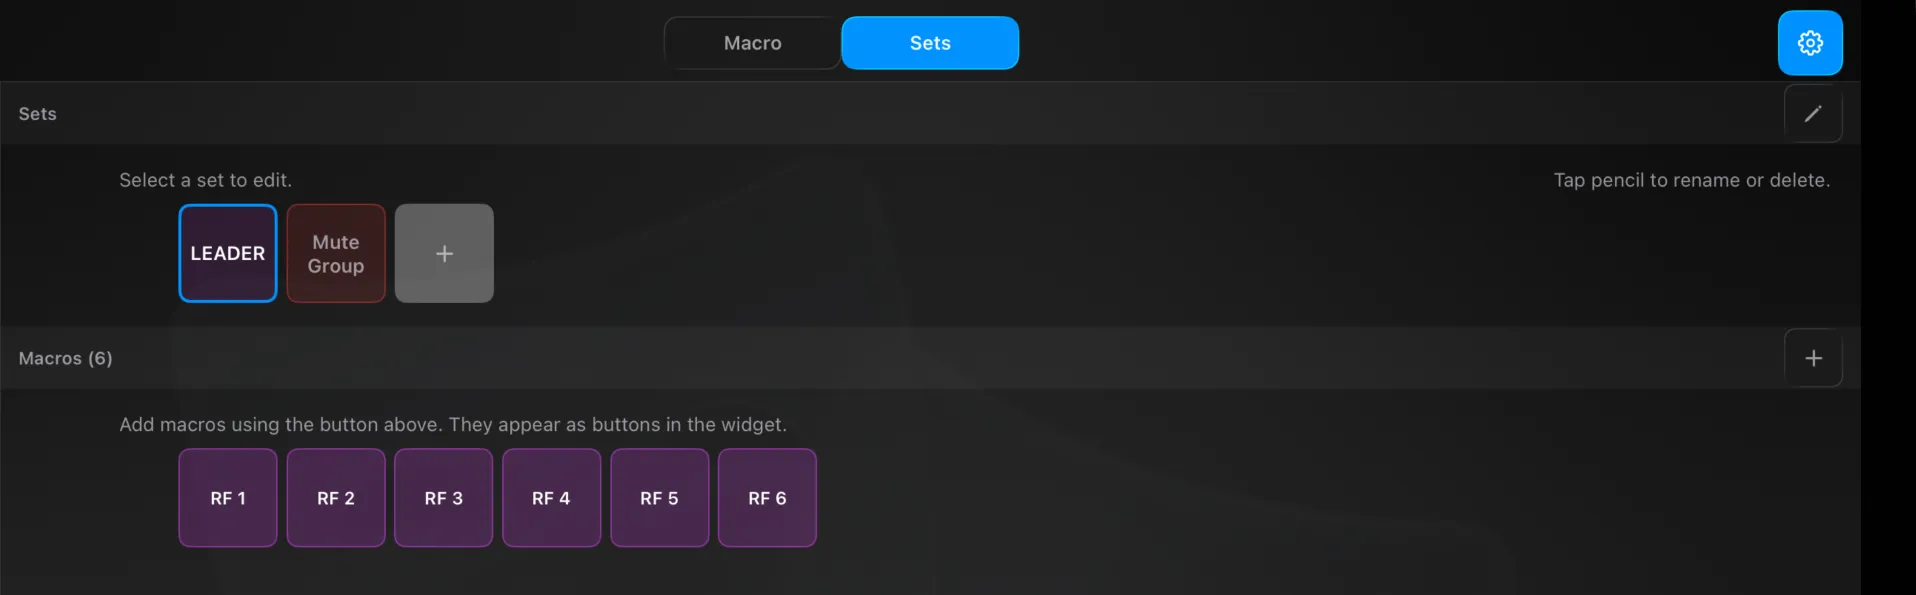
On the Sets tab:
- Sets — your macro sets as tiles (e.g. LEADER, Mute Group). Tap + to add; the pencil renames or deletes.
- Macros — add macros to the selected set with +. They appear, in order, as the buttons in that set’s dock widget.
Firing from the dock
Each macro set is a card in the dock. Tap the card to pop up its buttons, then tap a macro to fire it — one tap during the show, no menus. See The Dock.
Technical Reference
Commands use a plain-language grammar: <channel> <number> [parameter [number]] … <value> (1-based), covering channels (input, aux, dca, matrix, tracked input, tracked dca, routing set…), parameters (level, mute, pan, send, eq, comp…) and values (on/off, dB, ±inf). Special commands: recall <cue>, wait <ms>, and osc <host:port> <path> [args]. Each step is compiled at edit time (MacroParser) into a CompiledAction list that the runtime walks with no parsing (MacroExecutor); toggle and momentary steps require both the primary and alt commands to compile.
Panels
Overview
The whole console at a glance — a live grid of every channel you can mute, solo, ride, rename and re-source in place.
Overview is the whole console at a glance. Every input, mix and DCA is laid out as a live grid — names, colours and metering straight from the console — and from the same screen you can mute, solo, ride levels, rename and re-source any of them. It’s role one at its purest: a faithful mirror of what the console currently holds, turned into something you can act on.
Reading the screen
Channels are grouped by role — inputs, returns, FX, groups, auxes, mains and DCAs — in the console’s own order. Three views show them differently; toggle from the header:
- Cards — a tile per channel with its name, number, colour and a live meter.
- Meters — consolidated meter strips, for dense metering across many channels.
- Strip — a channel-strip layout.
Because Overview mirrors the console, it shows only what the console currently holds. Change a level or mute on the surface and the grid follows.
Function modes — what a tap does
The buttons on the right of the header set what tapping a channel does. One is active at a time:

| Mode | Tapping a channel |
|---|
| Alt Src | Opens its alternate-source detail (inputs and DCAs) |
| Mute | Mutes / unmutes it |
| PAFL | Solos / unsolos it (PAFL) |
| Meters | Opens a detailed meter view for it |
| Edit | Opens name and colour editing for it |
| Fader | Drag channels to ride a parameter — see below |
In Fader mode you drag a channel to change a value. Which value is set by the fader sub-mode (long-press the Fader button): Level, Trim, Gate threshold, Comp threshold, or HPF frequency. Level has a detent at 0 dB.
Alt Src, Meters and Edit open a detail panel over the grid; tap the dimmed background to close it.
Filters and user sets
The filter button (left of the header) narrows the grid — All, Inputs, Mix, DCA, or Routing (your tracked inputs and DCAs plus the routing pool). Tap to cycle; press and hold for the full menu.
Beyond the fixed filters you can build user sets — your own saved selections of channels, colour-tagged, so you can jump to just “the band” or “radio mics.” Tap a set to show only its channels; the + button creates one. Sets are edited in Settings.
Preferences
The gear (top-right of the header) opens Settings → Overview. It has four tabs.
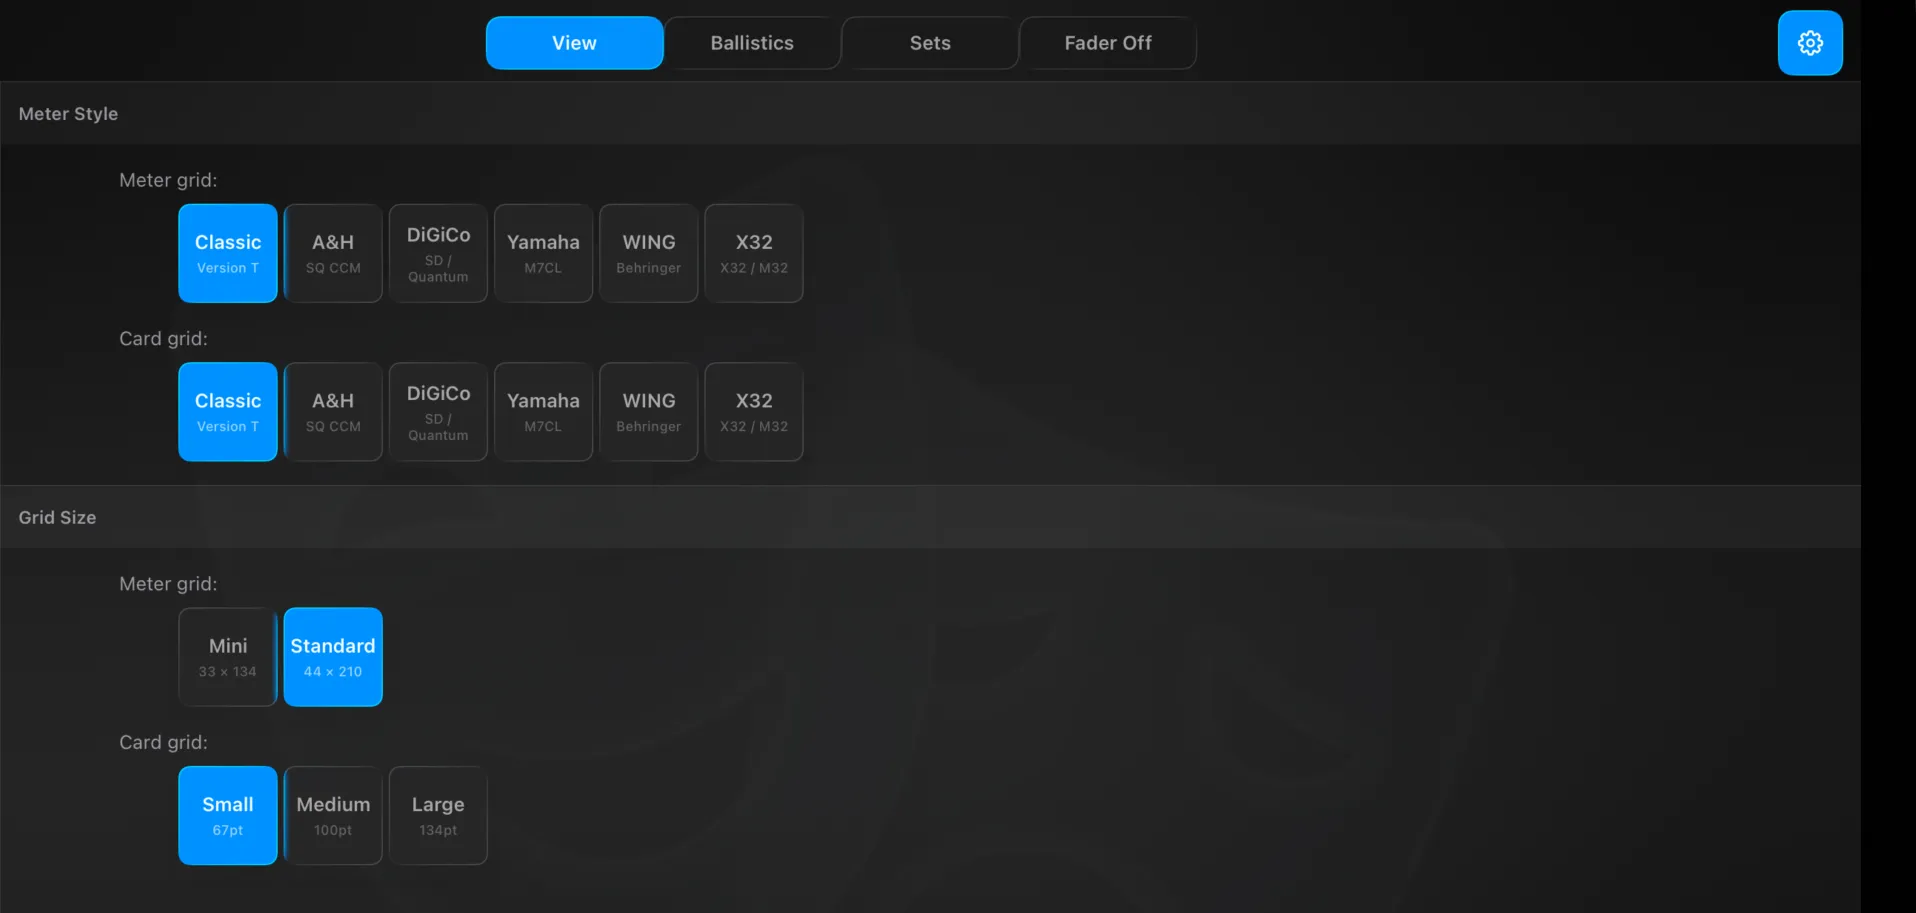
View
How the grid looks.
- Meter Style — render the meter grid and the card grid in the visual style of a chosen console: Classic (Version T), A&H (SQ CCM), DiGiCo (SD / Quantum), Yamaha (M7CL), WING (Behringer), or X32 (X32 / M32). Meter and card grids are set independently.
- Grid Size — Meter grid: Mini (33 × 134) or Standard (44 × 210). Card grid: Small (67 pt), Medium (100 pt) or Large (134 pt).
Ballistics
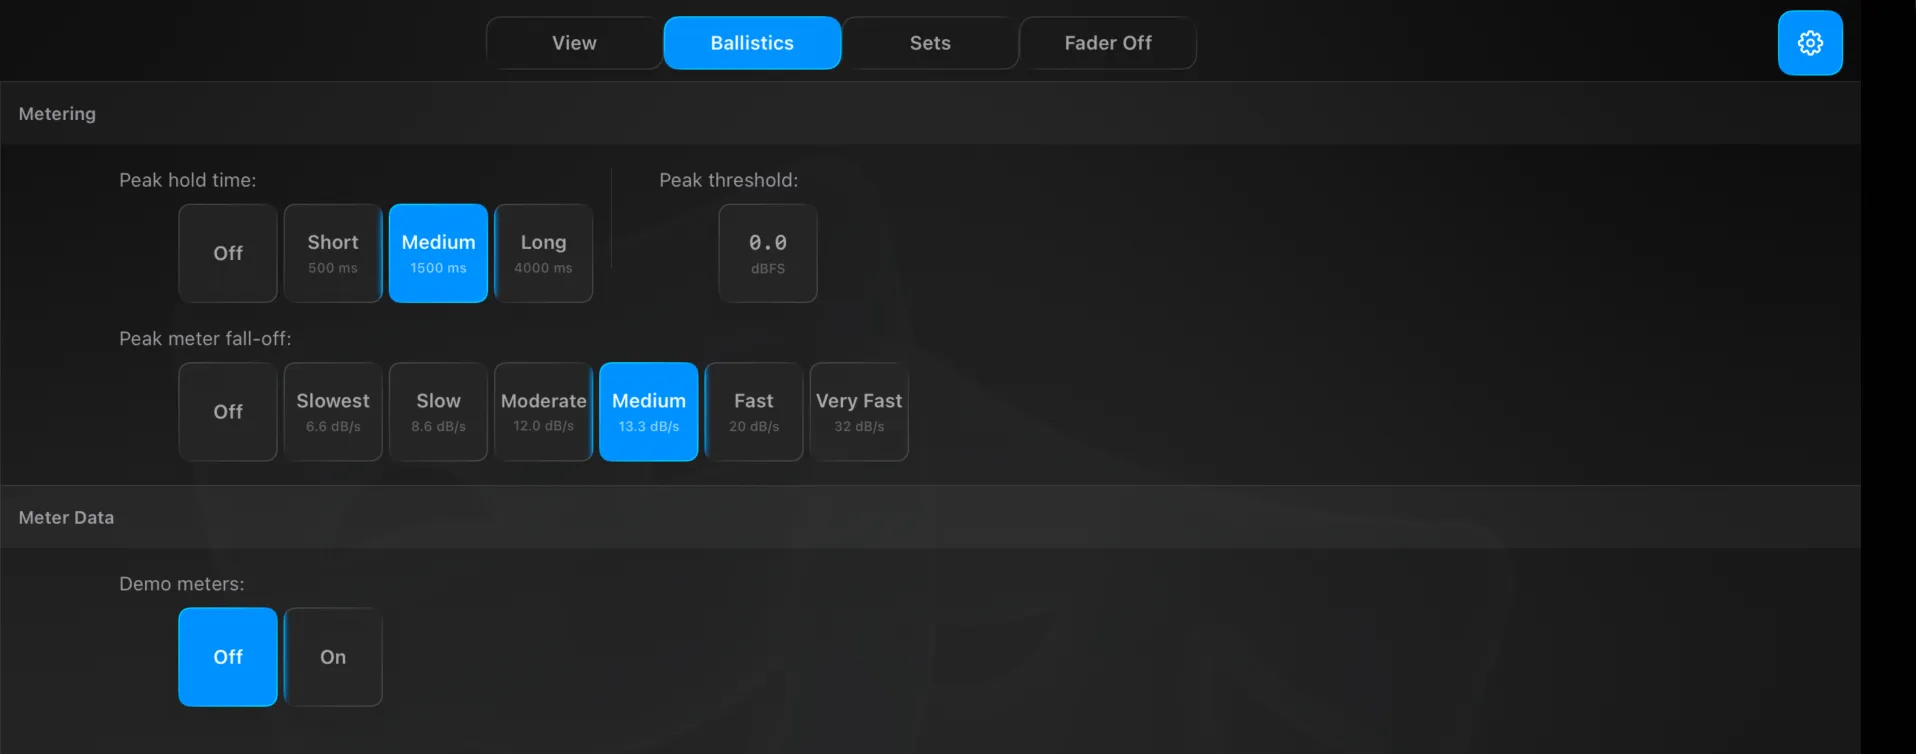
How the meters respond, in two groups.
Metering
- Peak hold time — how long a peak stays put: Off, Short (500 ms), Medium (1500 ms) or Long (4000 ms).
- Peak threshold — the level a peak registers at, in dBFS.
- Peak meter fall-off — how fast a held peak falls away: Off, Slowest (6.6 dB/s), Slow (8.6 dB/s), Moderate (12.0 dB/s), Medium (13.3 dB/s), Fast (20 dB/s) or Very Fast (32 dB/s).
Meter Data
- Demo meters — on or off. Drives the grid from simulated levels, useful for showing the app with no console connected.
Sets
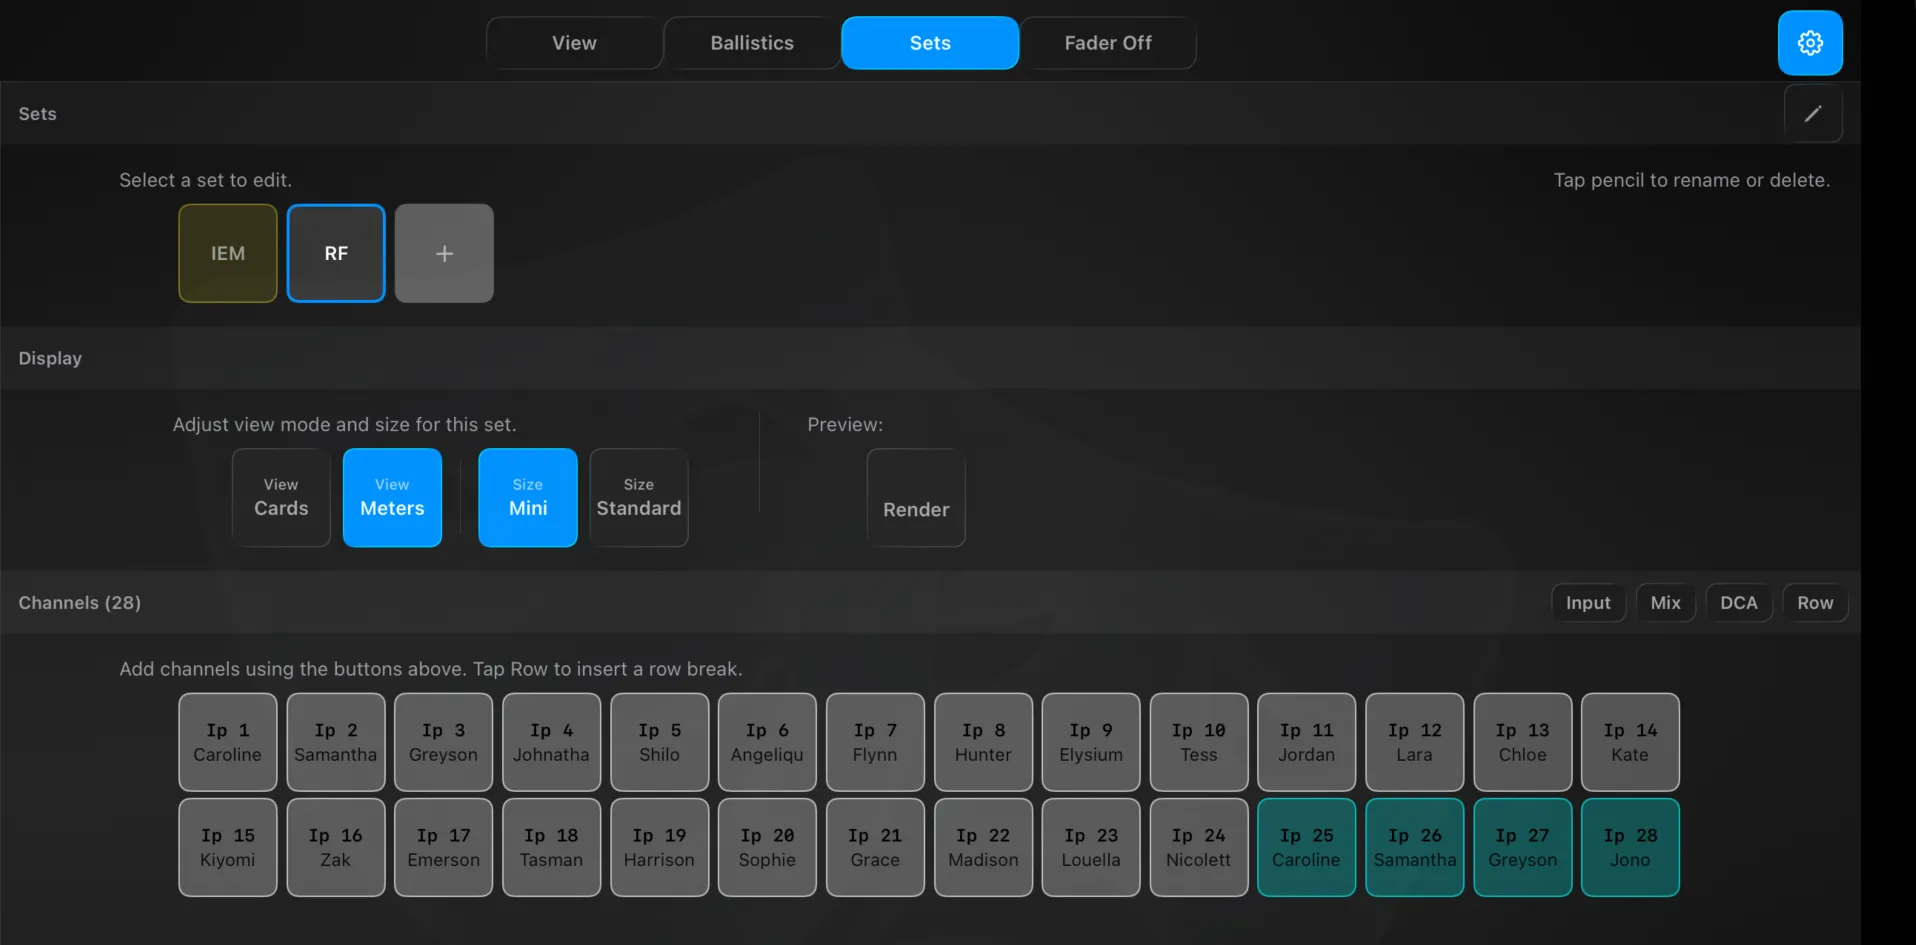
Build and manage user sets — your own channel selections that appear in the Overview header.
- Tap a set to edit it, + to create one, the pencil to rename or delete.
- Display — give each set its own view (Cards or Meters) and size (Mini or Standard); Render previews it.
- Channels — add channels with the Input / Mix / DCA buttons, and Row to insert a row break so you can lay the set out in rows. Added channels highlight; tap one to remove it.
Fader Off
Dims channels whose fader is pulled below a threshold, so “parked” channels recede in the grid.
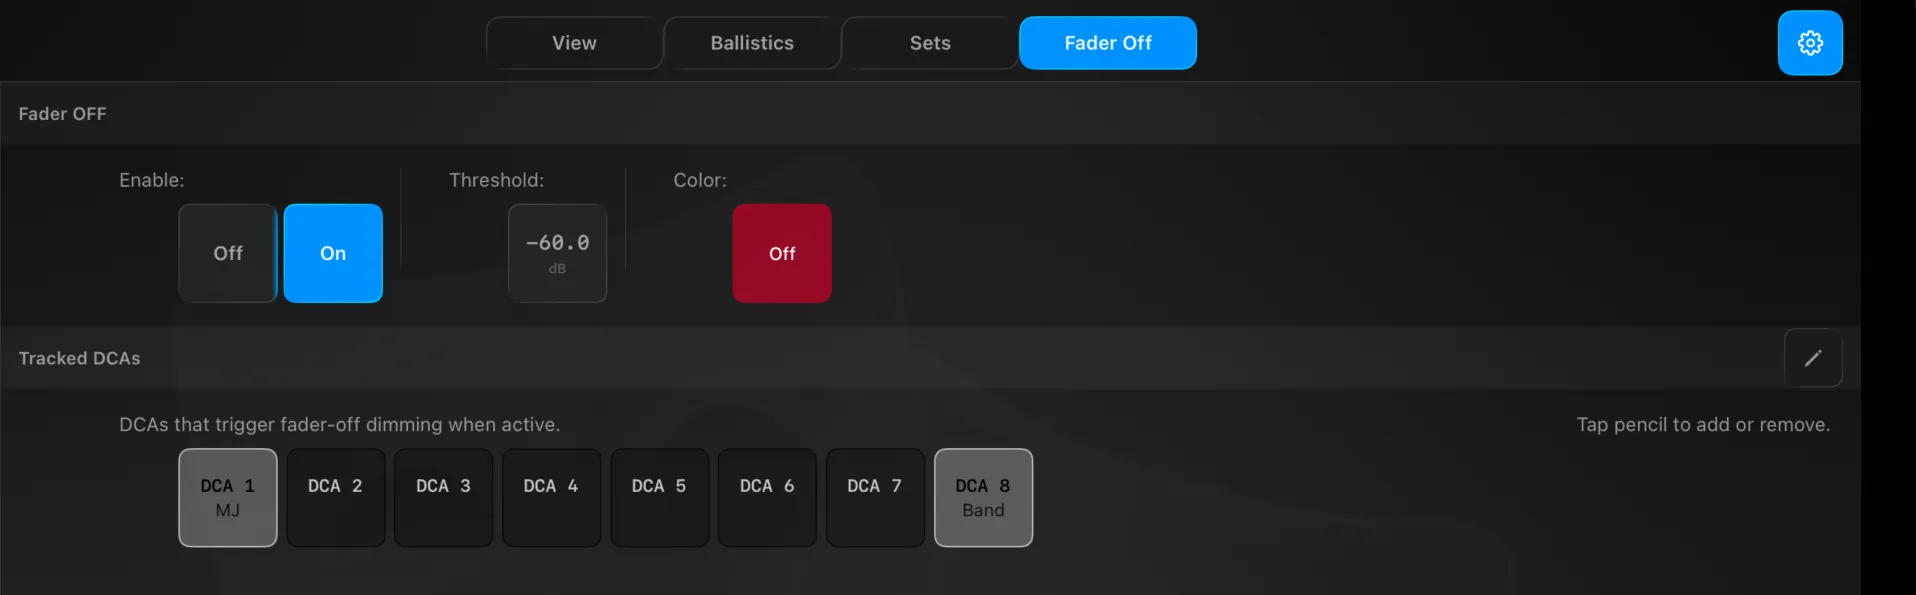
- Enable on or off, a Threshold in dB (e.g. −60.0), and a Colour for the dimmed state.
- Tracked DCAs — choose which DCAs trigger fader-off dimming when they’re active; the pencil adds or removes them.
Technical Reference
Function modes write directly through the bridge router. Fader sub-modes map to these parameters:
| Sub-mode | Parameter | Range |
|---|
| Level | channel level | −144 … +10 dB (detent 0) |
| Trim | preamp trim | −20 … +20 dB |
| Gate | gate threshold | −80 … 0 dB |
| Comp | comp threshold | −80 … 0 dB |
| HPF | high-pass frequency | 20 … 20 000 Hz |
Mute and PAFL toggle the channel’s mute/solo; Alt Src focuses the channel in the alt-source manager.
Panels
Routing Sets
Pre-wired signal paths — define a mic's full routing once, then assign it per cue with a single tap.
What a routing set is
A routing set is a pre-wired signal path. For every mix bus in the pool it defines whether this input is fed, at what level, and whether the send is pre-fader, post-fader or a group tap. You build the sets once; per cue you simply assign each mic to a set, and Version T writes all the crosspoints for you.
That assignment is the whole point: instead of touching dozens of sends per cue, you make one choice — “this mic is on Principal now” — and the DSP detail already lives in the set. The console holds the live result; the set definitions live in Version T and recall onto any console you connect to.
A musical-theatre example
A show might define a handful of sets:
| Set | Purpose |
|---|
| Principal | Solo dialogue and lead vocal — FOH, IEM detail, program feed |
| Ensemble 1 | Upstage chorus — FOH cluster, band feed, broadcast |
| Ensemble 2 | Downstage chorus — different FOH position, separate monitors |
| Booth | Offstage/booth mic — local PA only, no monitors |
| Off | Not in this scene — all sends zero |
A principal’s mic sits on Principal for a solo, switches to Ensemble 1 when they join the chorus, and goes to Off between scenes. One assignment per mic per cue.
The main screen
The header shows the title, a red AUTO ACTIVE warning when any automatic mode is armed, and the Settings gear. Below it are two zones.
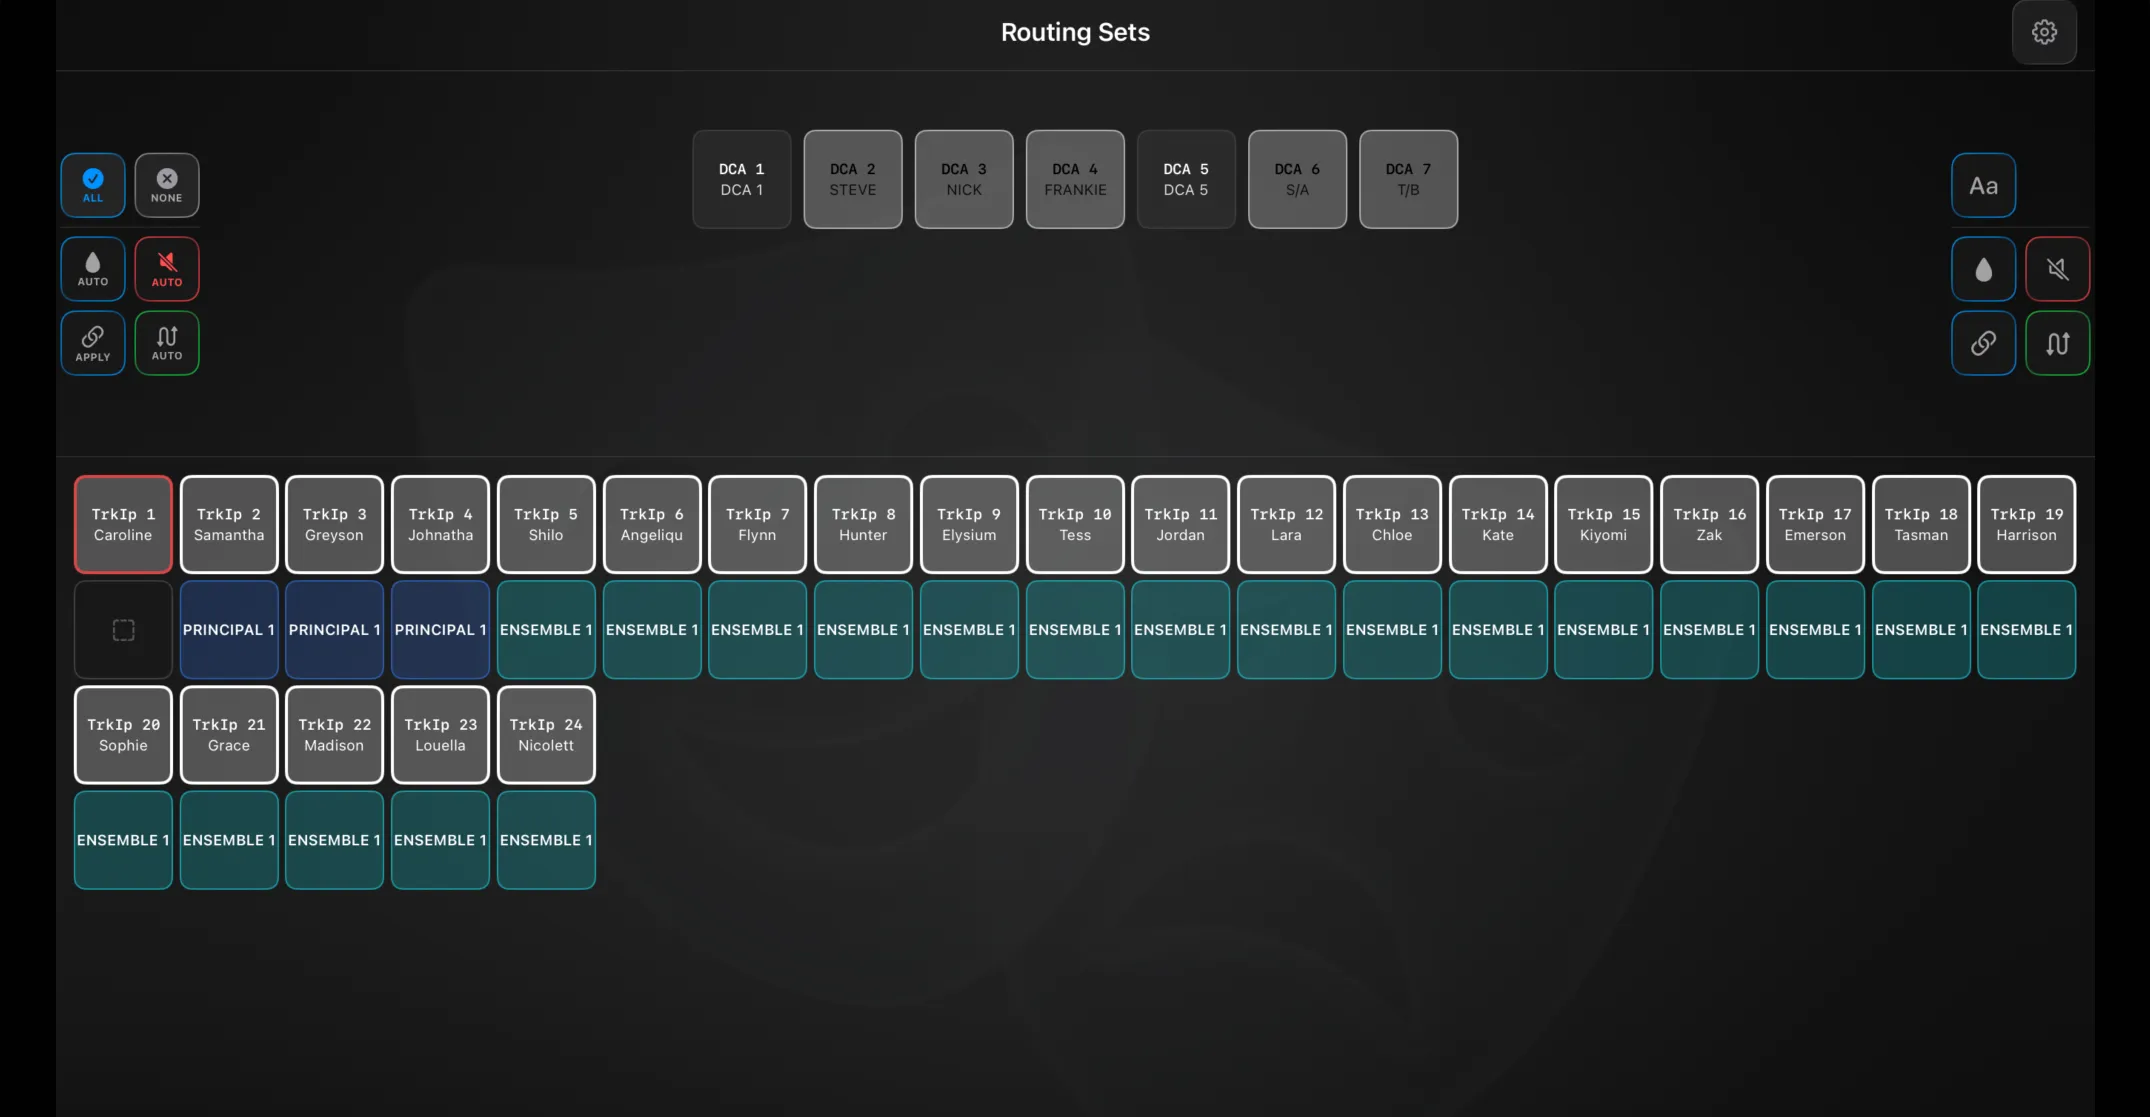
DCA panel (upper)
This is where you work with your tracked DCAs. Tap a DCA card to select it, then use the glass-mode buttons on the right to act on it:
| Mode | What it does |
|---|
| Name | Name the DCA — from the keyboard or a suggestion from its name history |
| Colour | Recolour it from the console palette |
| Mute | Mute mode |
| Assign | Add or remove its member inputs (from that DCA’s input history) |
| Routing Set | Link the DCA to a routing set |
The Auto buttons on the left apply things across all tracked DCAs at once: ALL / NONE (arm every auto action or clear them), Auto Colour, Auto Mute, Apply / Auto (assign inputs to DCAs from name history — tap Apply once, or long-press to latch it on), and Auto Routing (route each input to the set linked to its DCA). While any auto mode is latched the panel tints red and the header shows AUTO ACTIVE.
Routing sets grid (lower)
Every tracked input as a card, colour-coded by its current set. Used together with the glass modes to assign, mute or rename inputs.
Assigning routing
- Auto Routing — routes each tracked input to the set linked to its current DCA. The everyday one-tap recall.
- Apply / Auto Assign — assigns inputs into DCAs from their name history, so a re-patched performer lands back on the right DCA.
- Manual — select a DCA, use Routing Set mode to link a set, or Assign mode to change its members.
Preferences
The gear opens Settings → Routing, with four tabs.
Sets
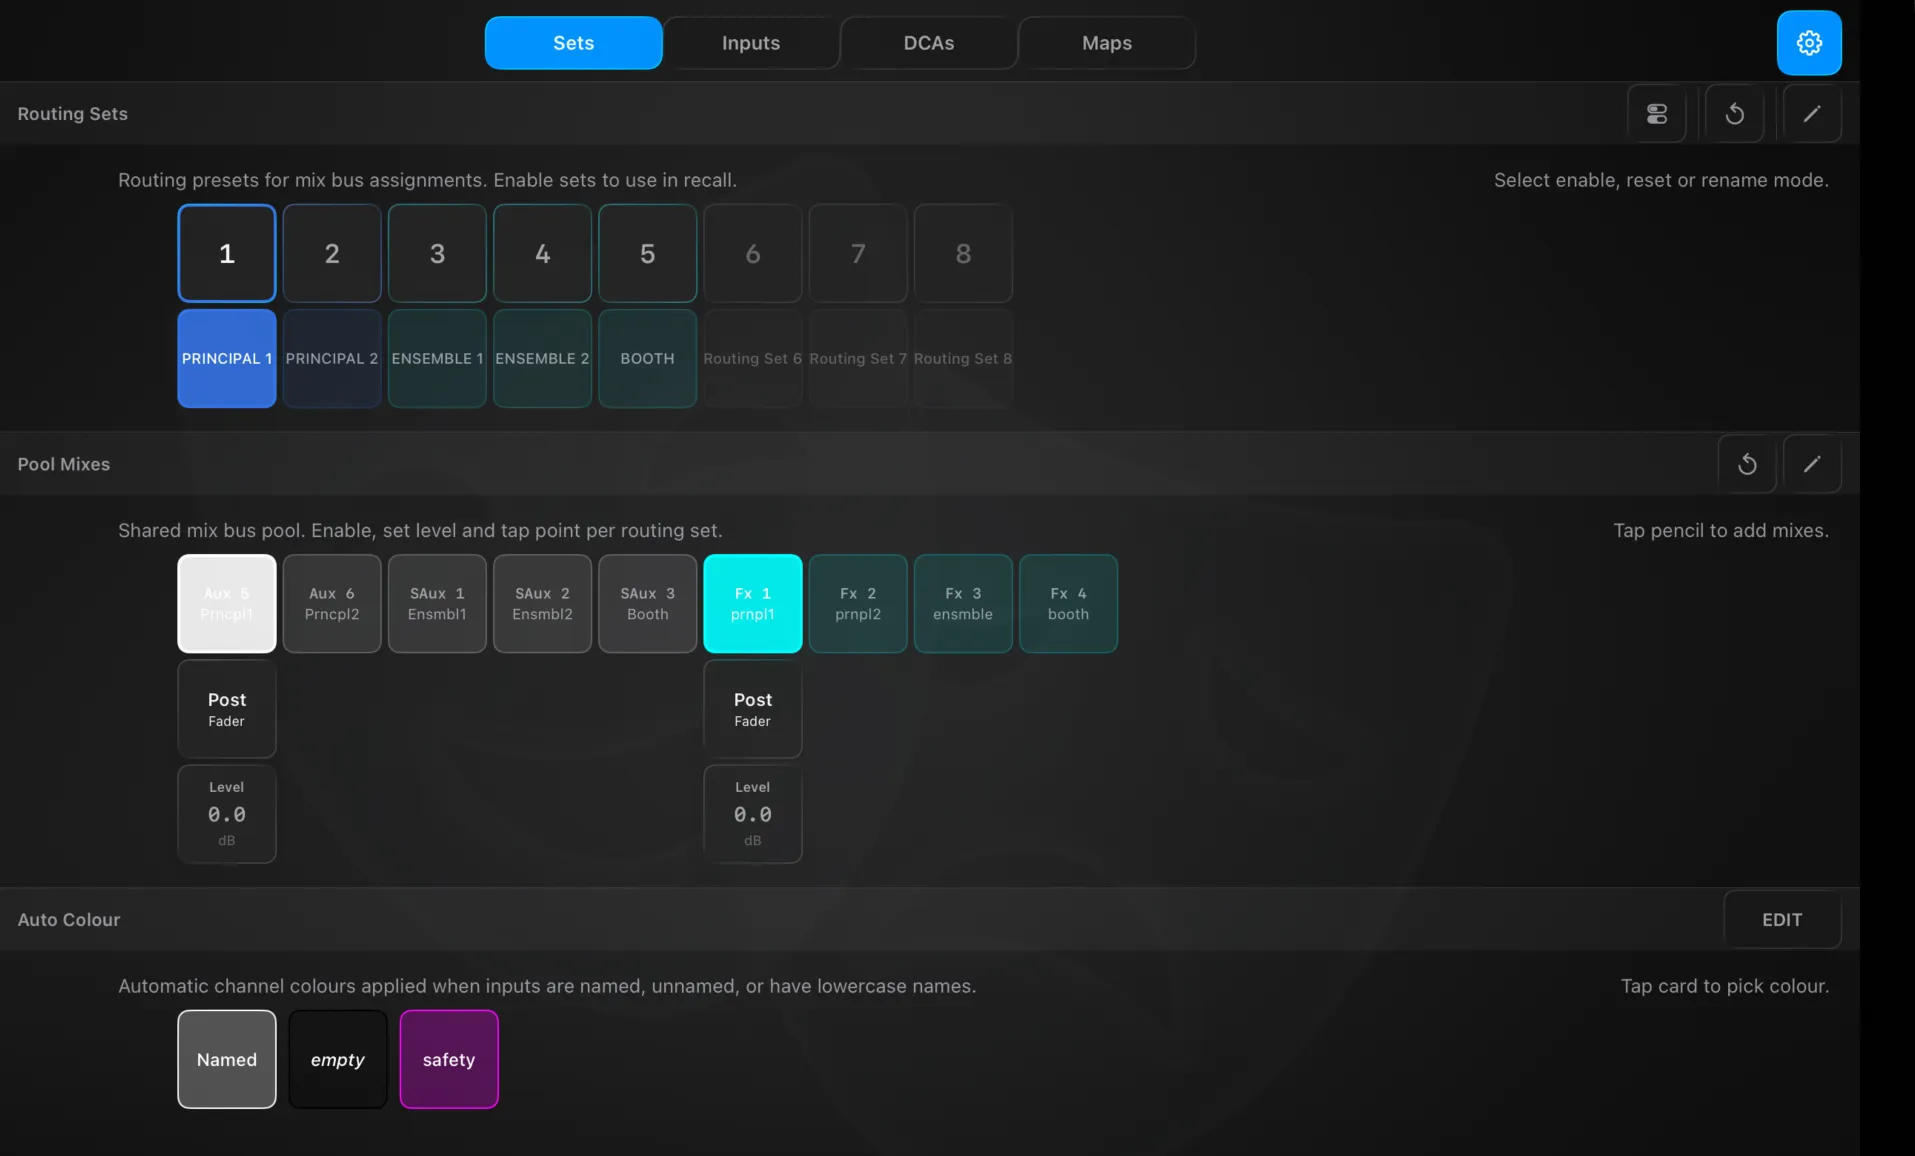
- Routing Sets — one tile per set. A mode picker switches the tiles between enable (only enabled sets are recall-eligible; a red ✗ warns an enabled set has no mix assignments), reset (clear a set), and rename (name + colour).
- Pool Mixes — the shared list of managed mix buses. The pencil adds mixes; reset clears. With a set selected, each pool mix shows an enable, a level (drag), and a pre/post tap that cycles Pre → Post (and Group on WING / X32-M32).
- Auto Colour — the colours auto-applied to named, unnamed and lowercase (“safety”) inputs.
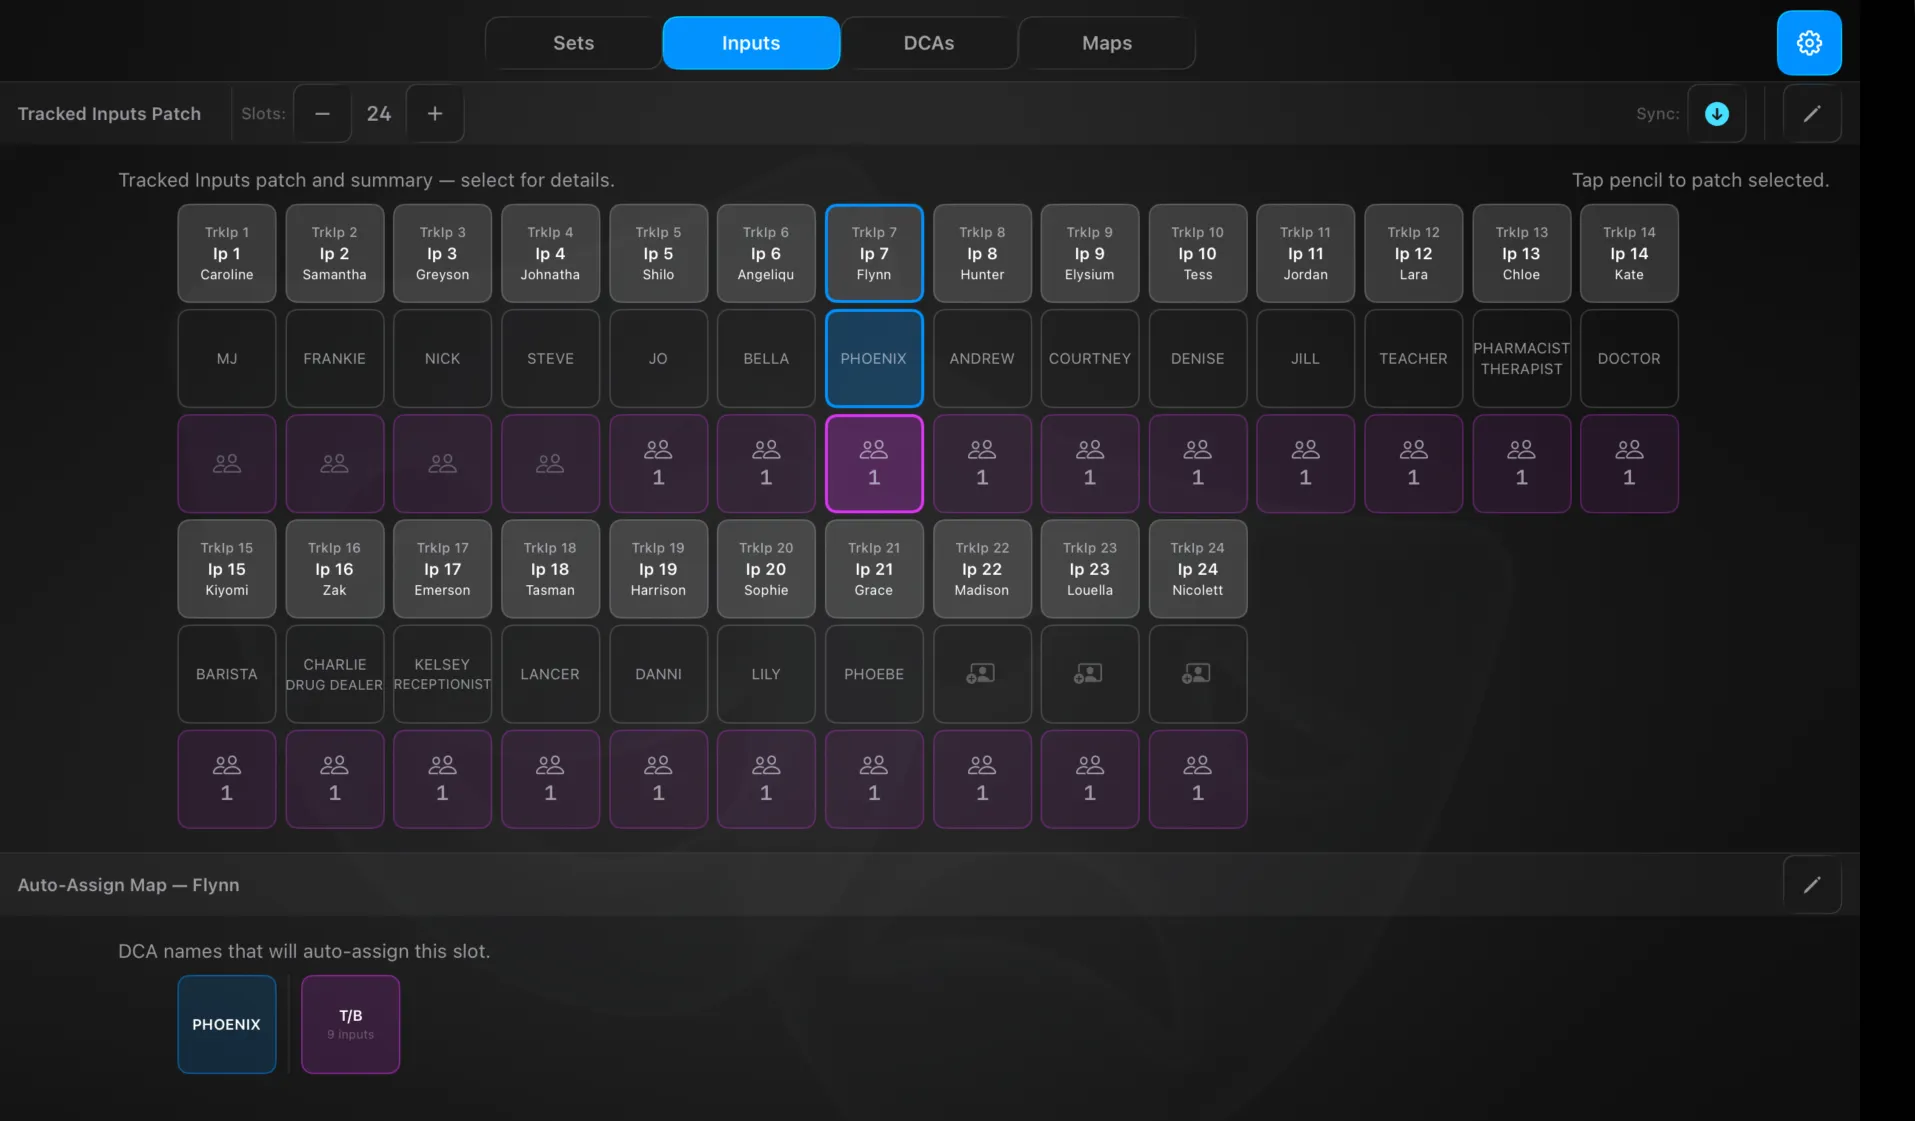
- Tracked Inputs Patch — set the slot count (up to 48) and patch console inputs into slots. A Sync toggle chooses direction: push the tracked name/colour to the console, or pull the console’s name/colour into the slot.
- Auto-Assign Map — for the selected input, the DCA names that will auto-assign it: solo names (blue — learned when it was the only member) and group names (purple, with an input count — learned as part of a group). Edit to add or remove. Each input card also shows its current solo name and group membership at a glance.
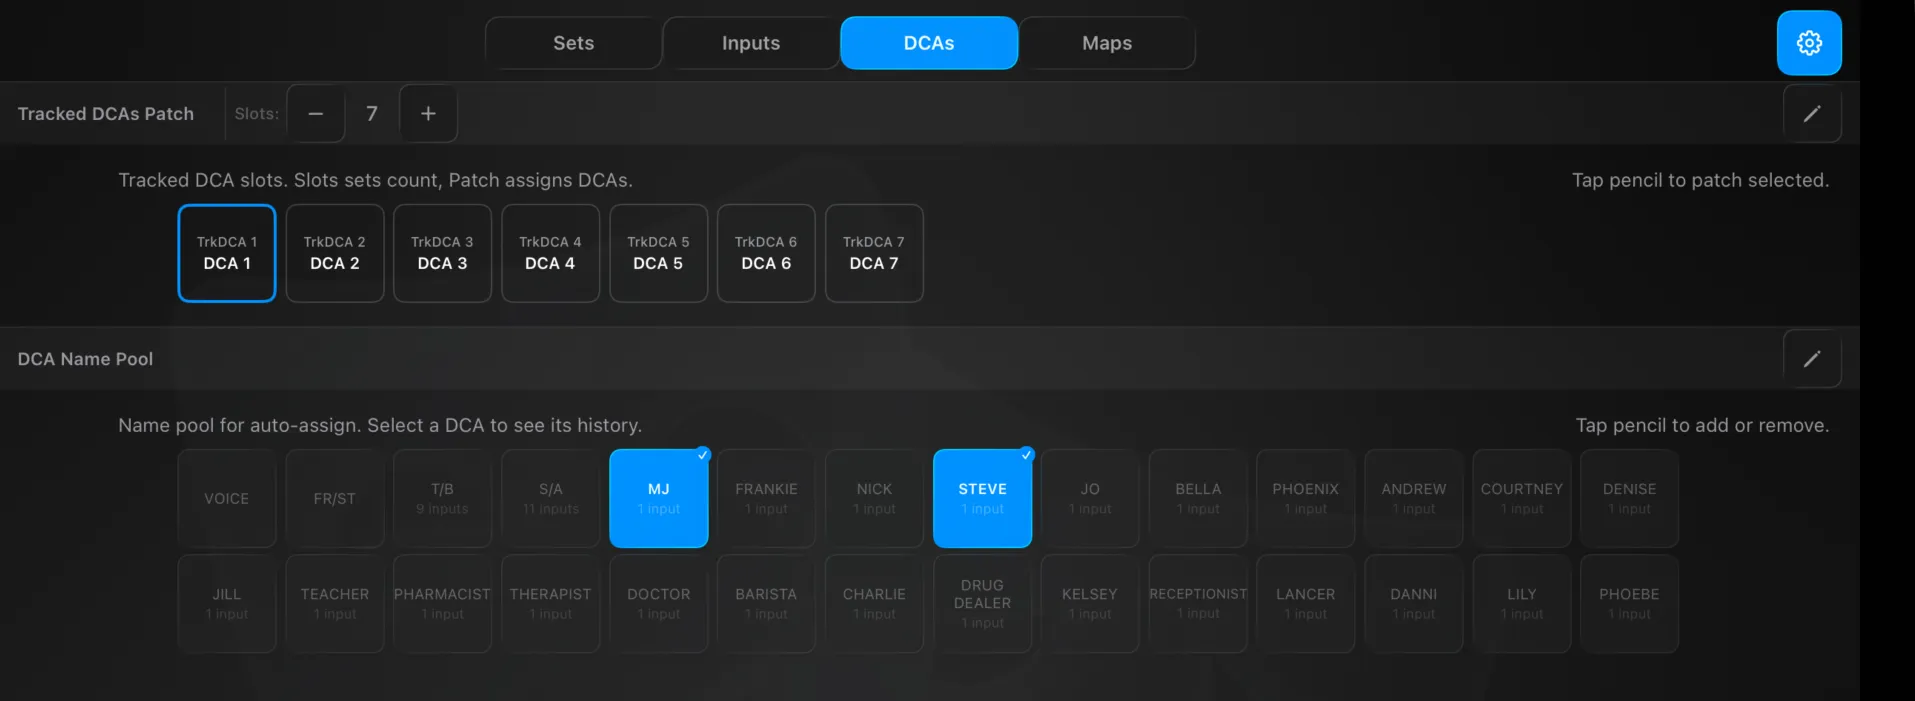
DCAs
- Tracked DCAs Patch — set the slot count (up to 24) and patch console DCAs into slots.
- DCA Name Pool — the pool of names used for auto-assign. Select a tracked DCA to see and toggle the names in its history; edit the pool to add or remove names.
Maps
The Cast Map — how Version T learns and holds a show’s names across a run.
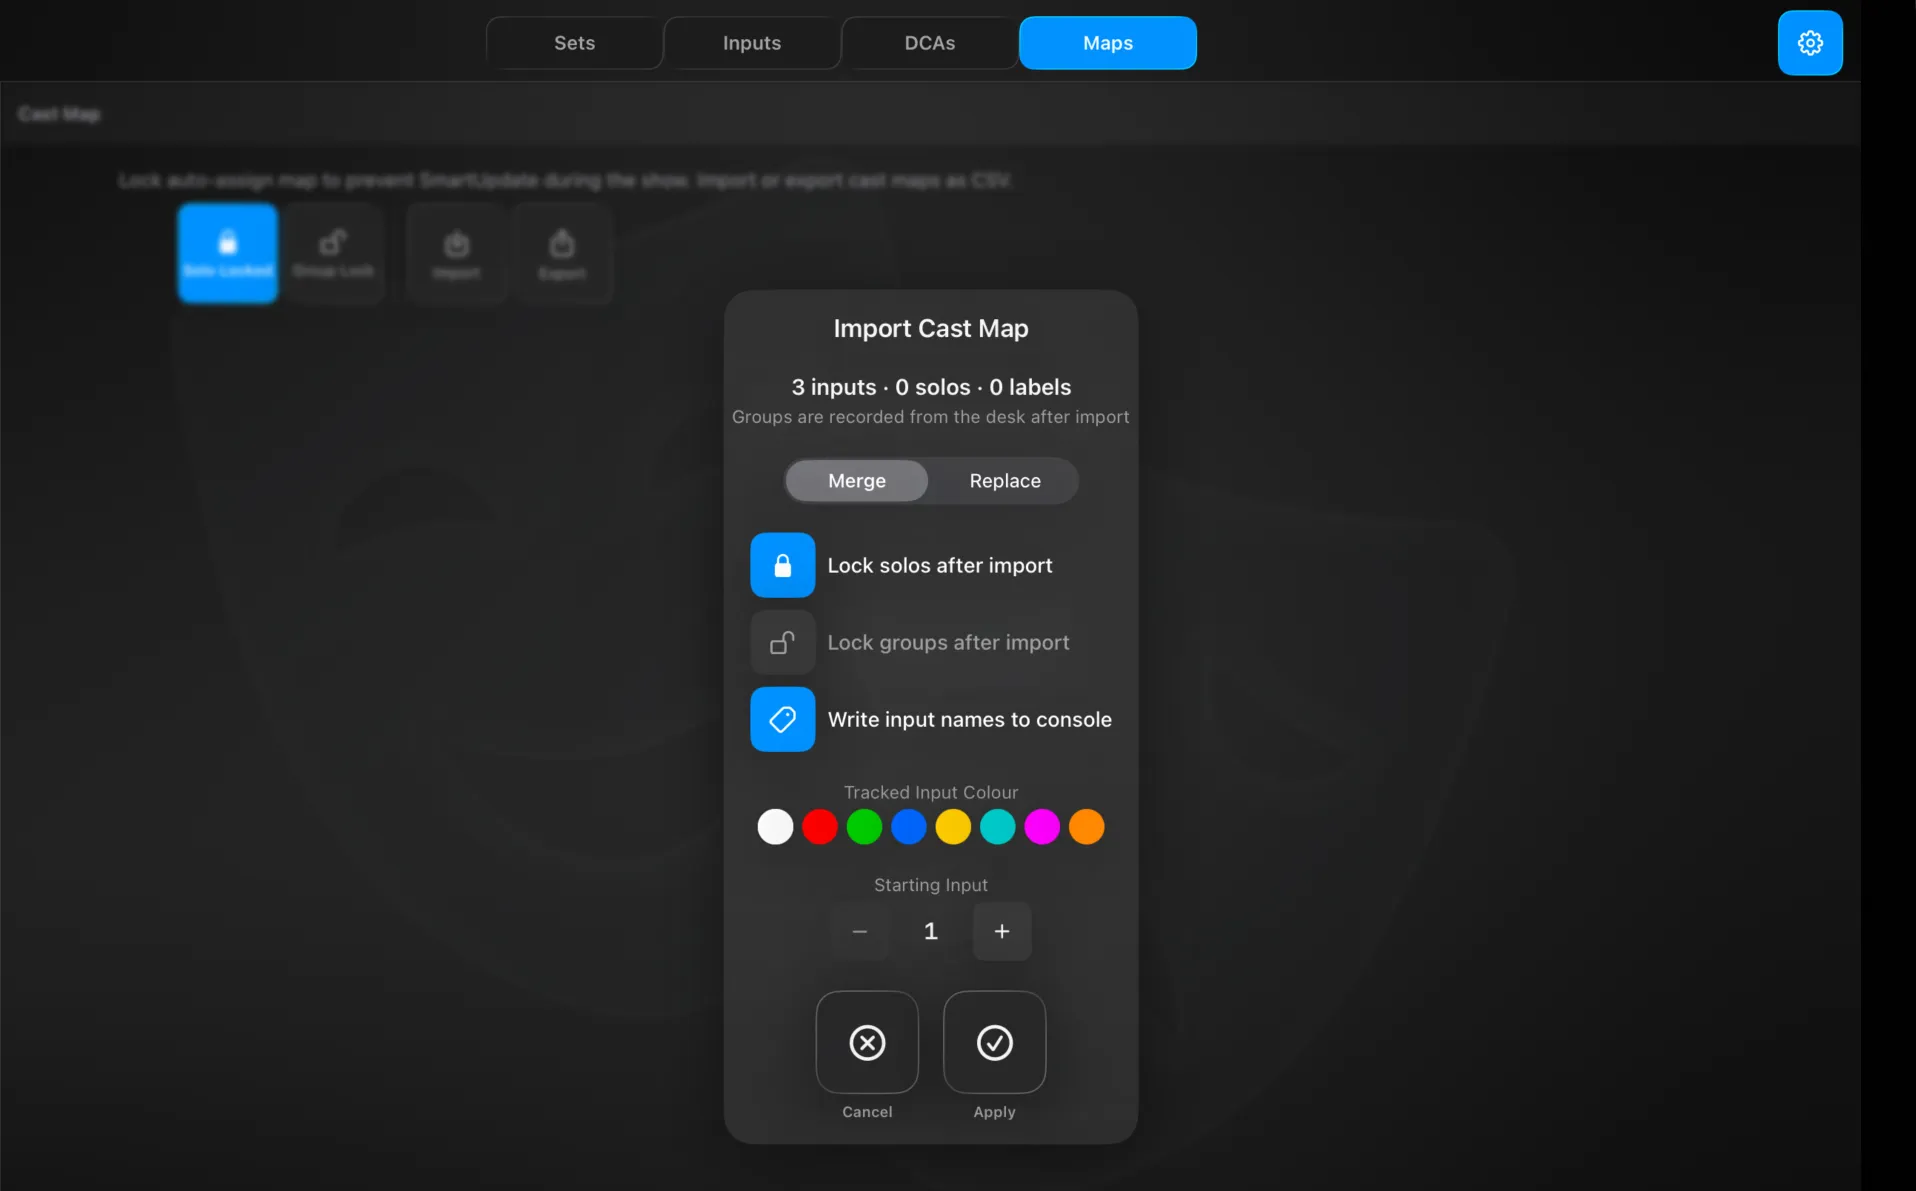
- Solo Lock / Group Lock — freeze the auto-assign map so SmartUpdate stops relearning names mid-show. Lock solos, groups, or both once the cast is settled.
- Import / Export — move the cast map in and out as JSON. On import you choose Merge or Replace, whether to lock solos and lock groups afterwards, and whether to write the input names to the console; you also set a tracked-input colour and the starting input the list maps onto. The dialog summarises what the file holds (e.g. “3 inputs · 0 solos · 0 labels” — groups are recorded from the desk after import).
This is how you pre-load a show before rehearsals: build the cast list as JSON — CastingMap authors it for you — import it, and every performer’s name, colour and DCA history is in place before the first cue.
Limits
| Item | Limit |
|---|
| Tracked Inputs | 48 slots |
| Tracked DCAs | 24 slots |
| Pool Mixes | console maximum |
| Routing Sets | 8 |
Technical Reference
Routing lives in RoutingPreferences: the mix pool, trackedInputs, trackedDCAs, the sets (each with enables, levels, preFader, color), plus the auto-assign data (dcaAssignmentHistory, dcaNameHistory, namesDictionary) and autoColor settings.
Pre/post values: Pre = 0, Post = 1, Group = 2.
Matching: Version T continuously reads the console’s live crosspoint enables for each tracked input and compares them against every set’s enable pattern — the first match is shown as that input’s current set. Matching uses the enable pattern only; levels and pre/post are write-only.
Panels
Spatial Panner
Position a source anywhere across the whole speaker system by dragging a dot on a mesh, not just left to right.
The Spatial Panner places a source in space across your whole speaker system, not just left-to-right. Instead of one pan control, you position a source on a 2D stage map — a mesh of speaker outputs — and Version T sets the send level to every output to put the sound where you want it. It reads the console’s live sends, so it can also show you where each source currently sits.
This is a good example of role one: the console has the sends, but it has no concept of “put this voice downstage-left across twelve speakers.” Version T adds that control surface on top.
Two modes
The two buttons at the top-right switch the panel between:
- Spatial Panner (the 3D-move icon) — the live view, where you position sources.
- Mesh Organizer (the pencil) — where you build and manage the meshes themselves.
Spatial Panner (live view)
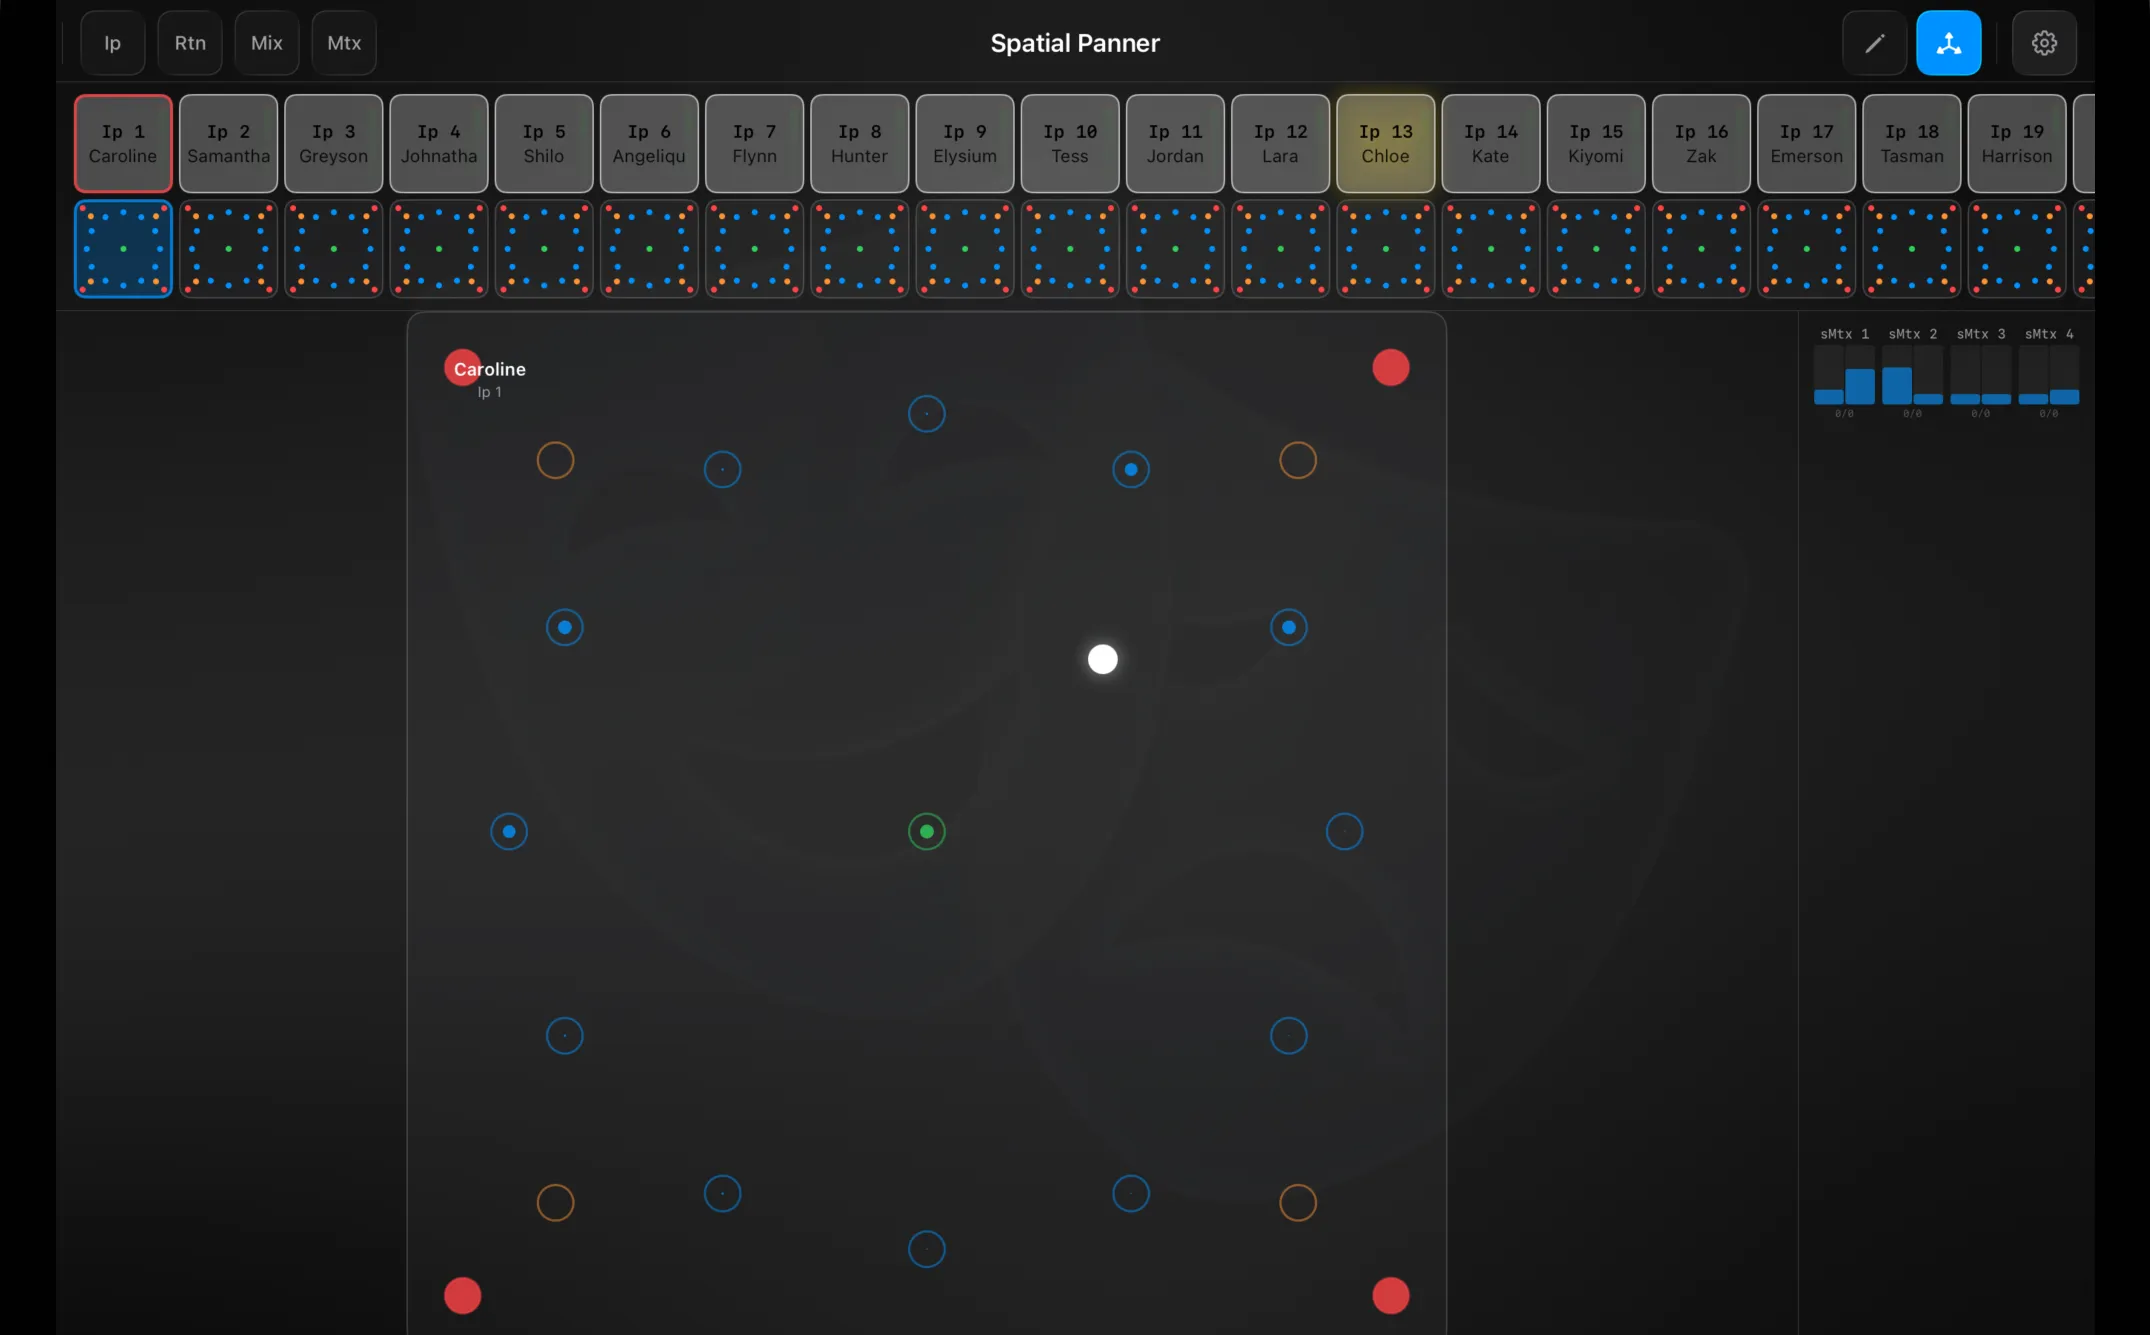
A strip of channels runs along the top, each with a live mini-map showing where that source currently sits. The quick-jump buttons — Ip / Rtn / Mix / Mtx — scroll to inputs, FX returns, mixes (buses on WING) and matrices.
Tap a source to open it on the big stage map. The mesh’s points are drawn as markers — outputs (blue), the centre split (green), mutes (red) and sums (orange) — and the source’s position is the white dot. Drag the dot anywhere on the map to move the source: Version T sets the send to every output to match, and the matrix meters down the right-hand side show the resulting levels live.
Mesh Organizer (edit view)
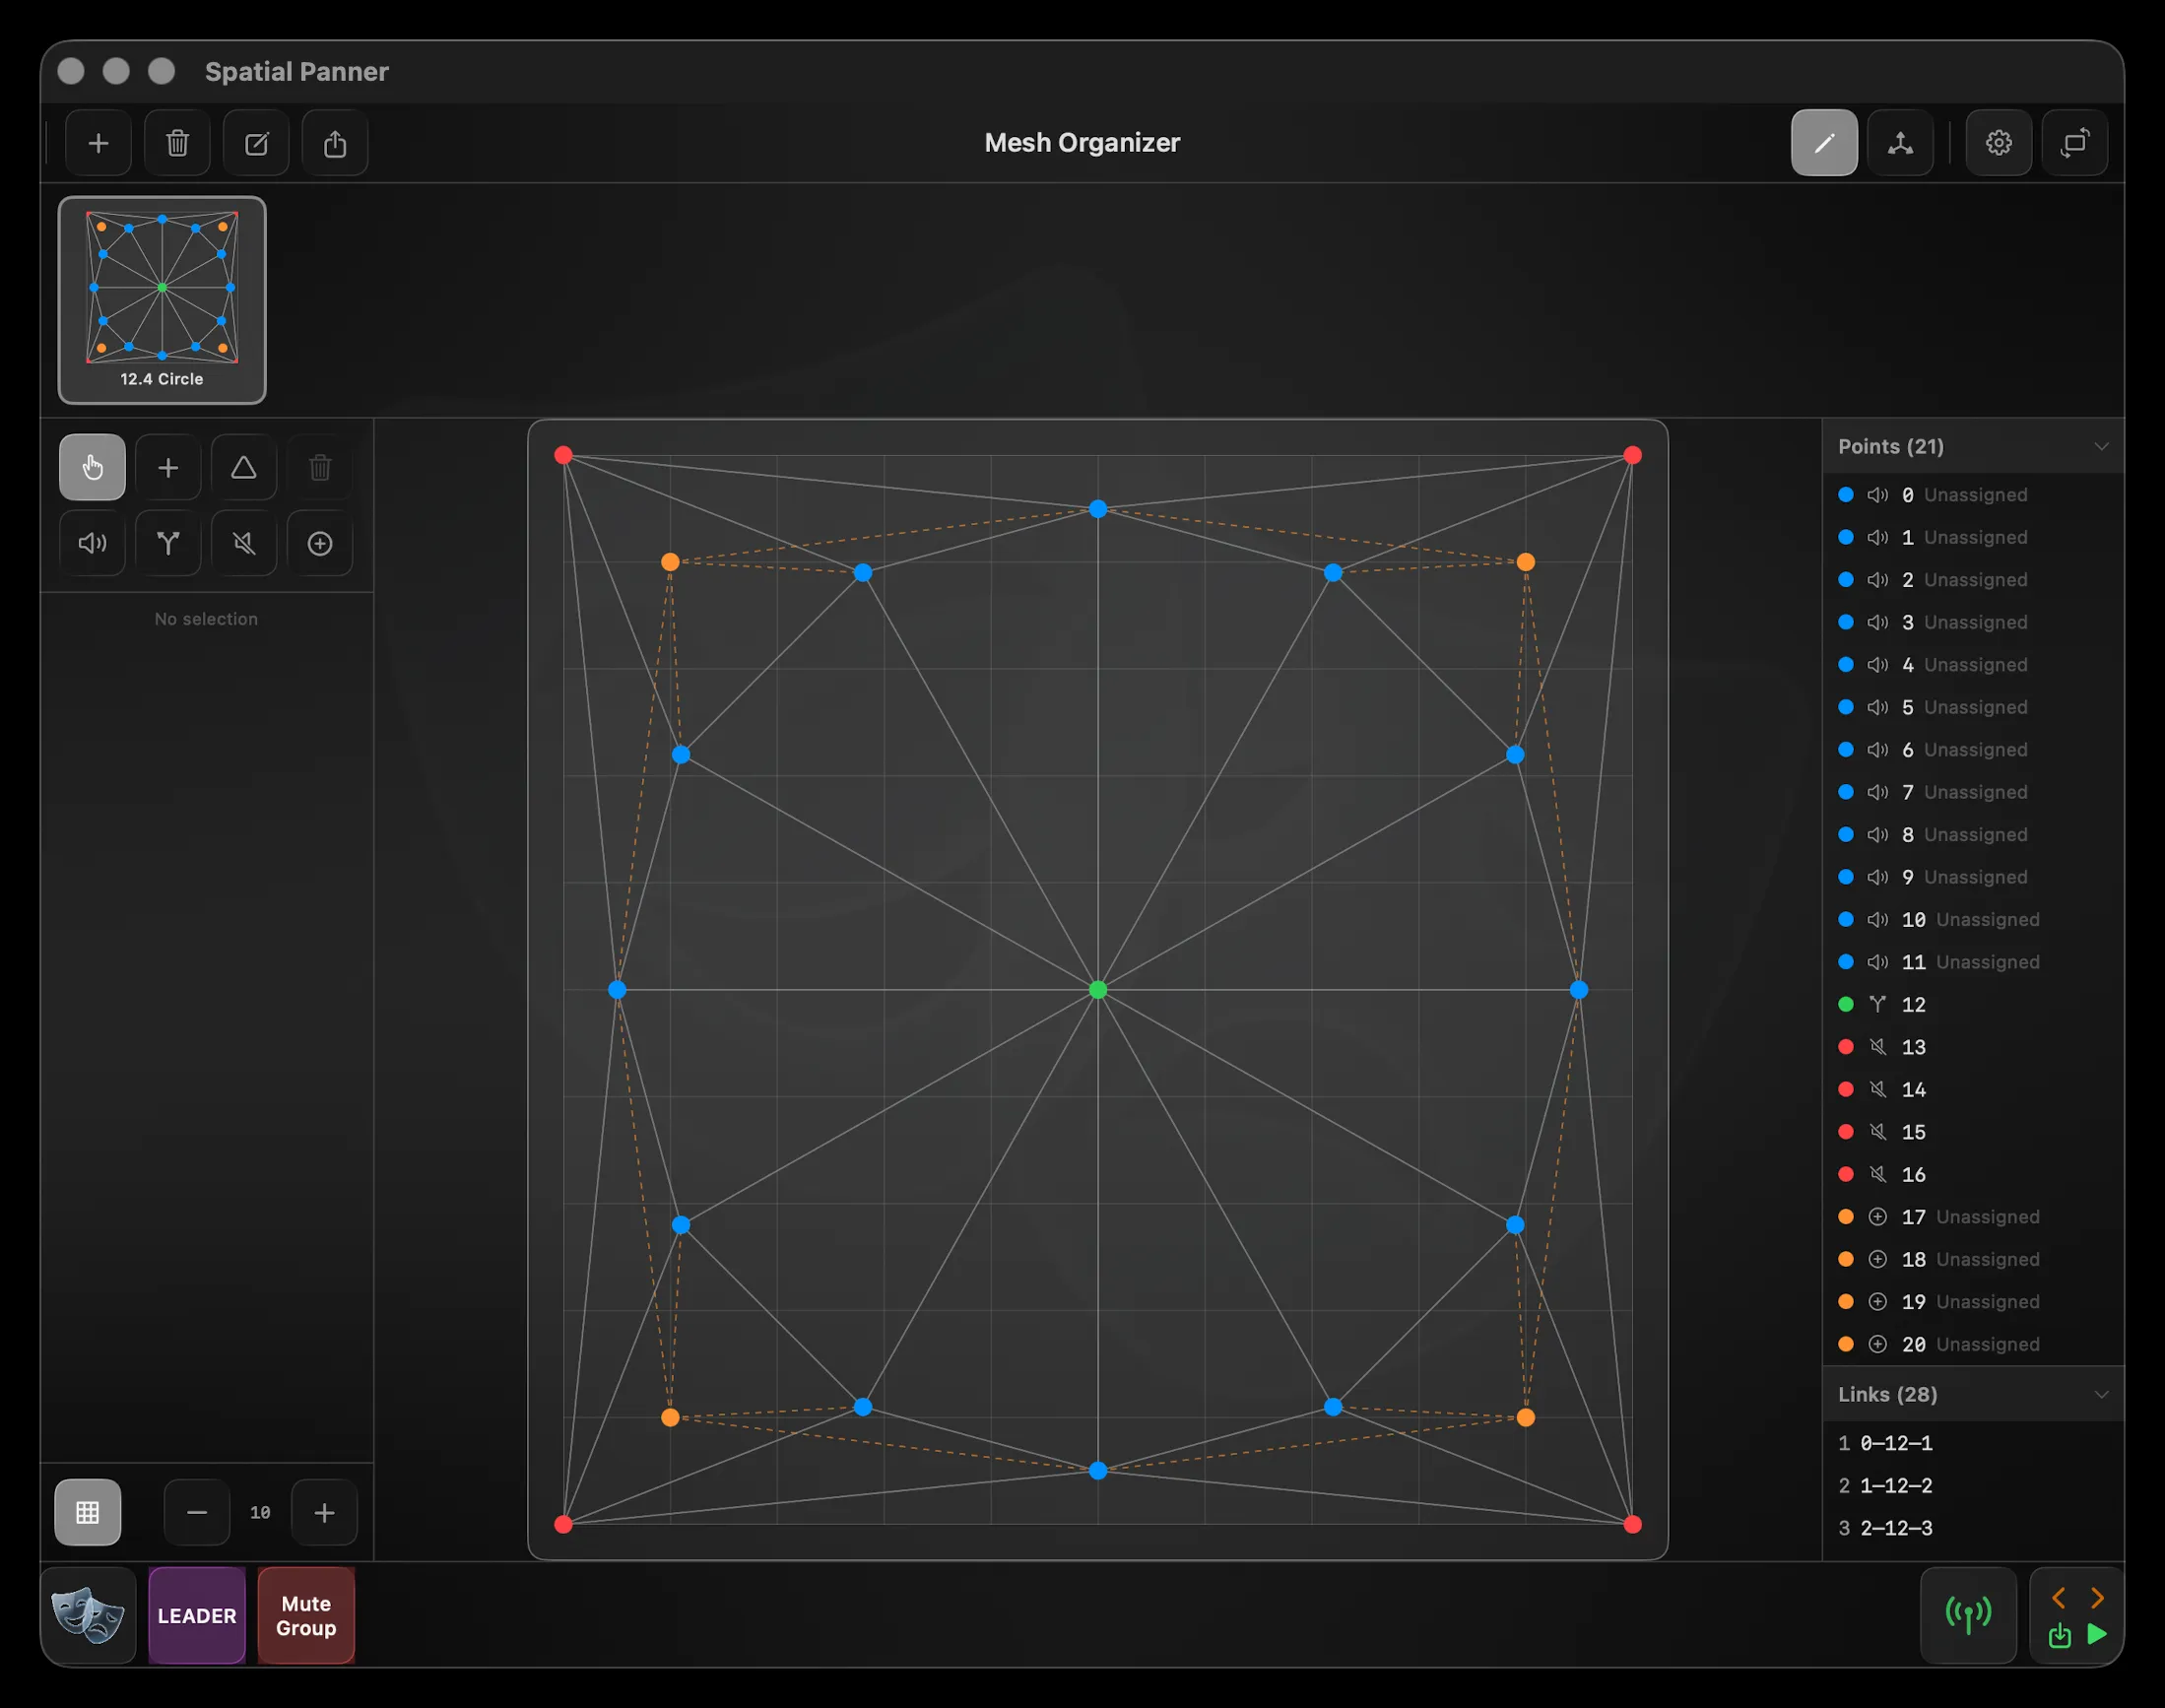
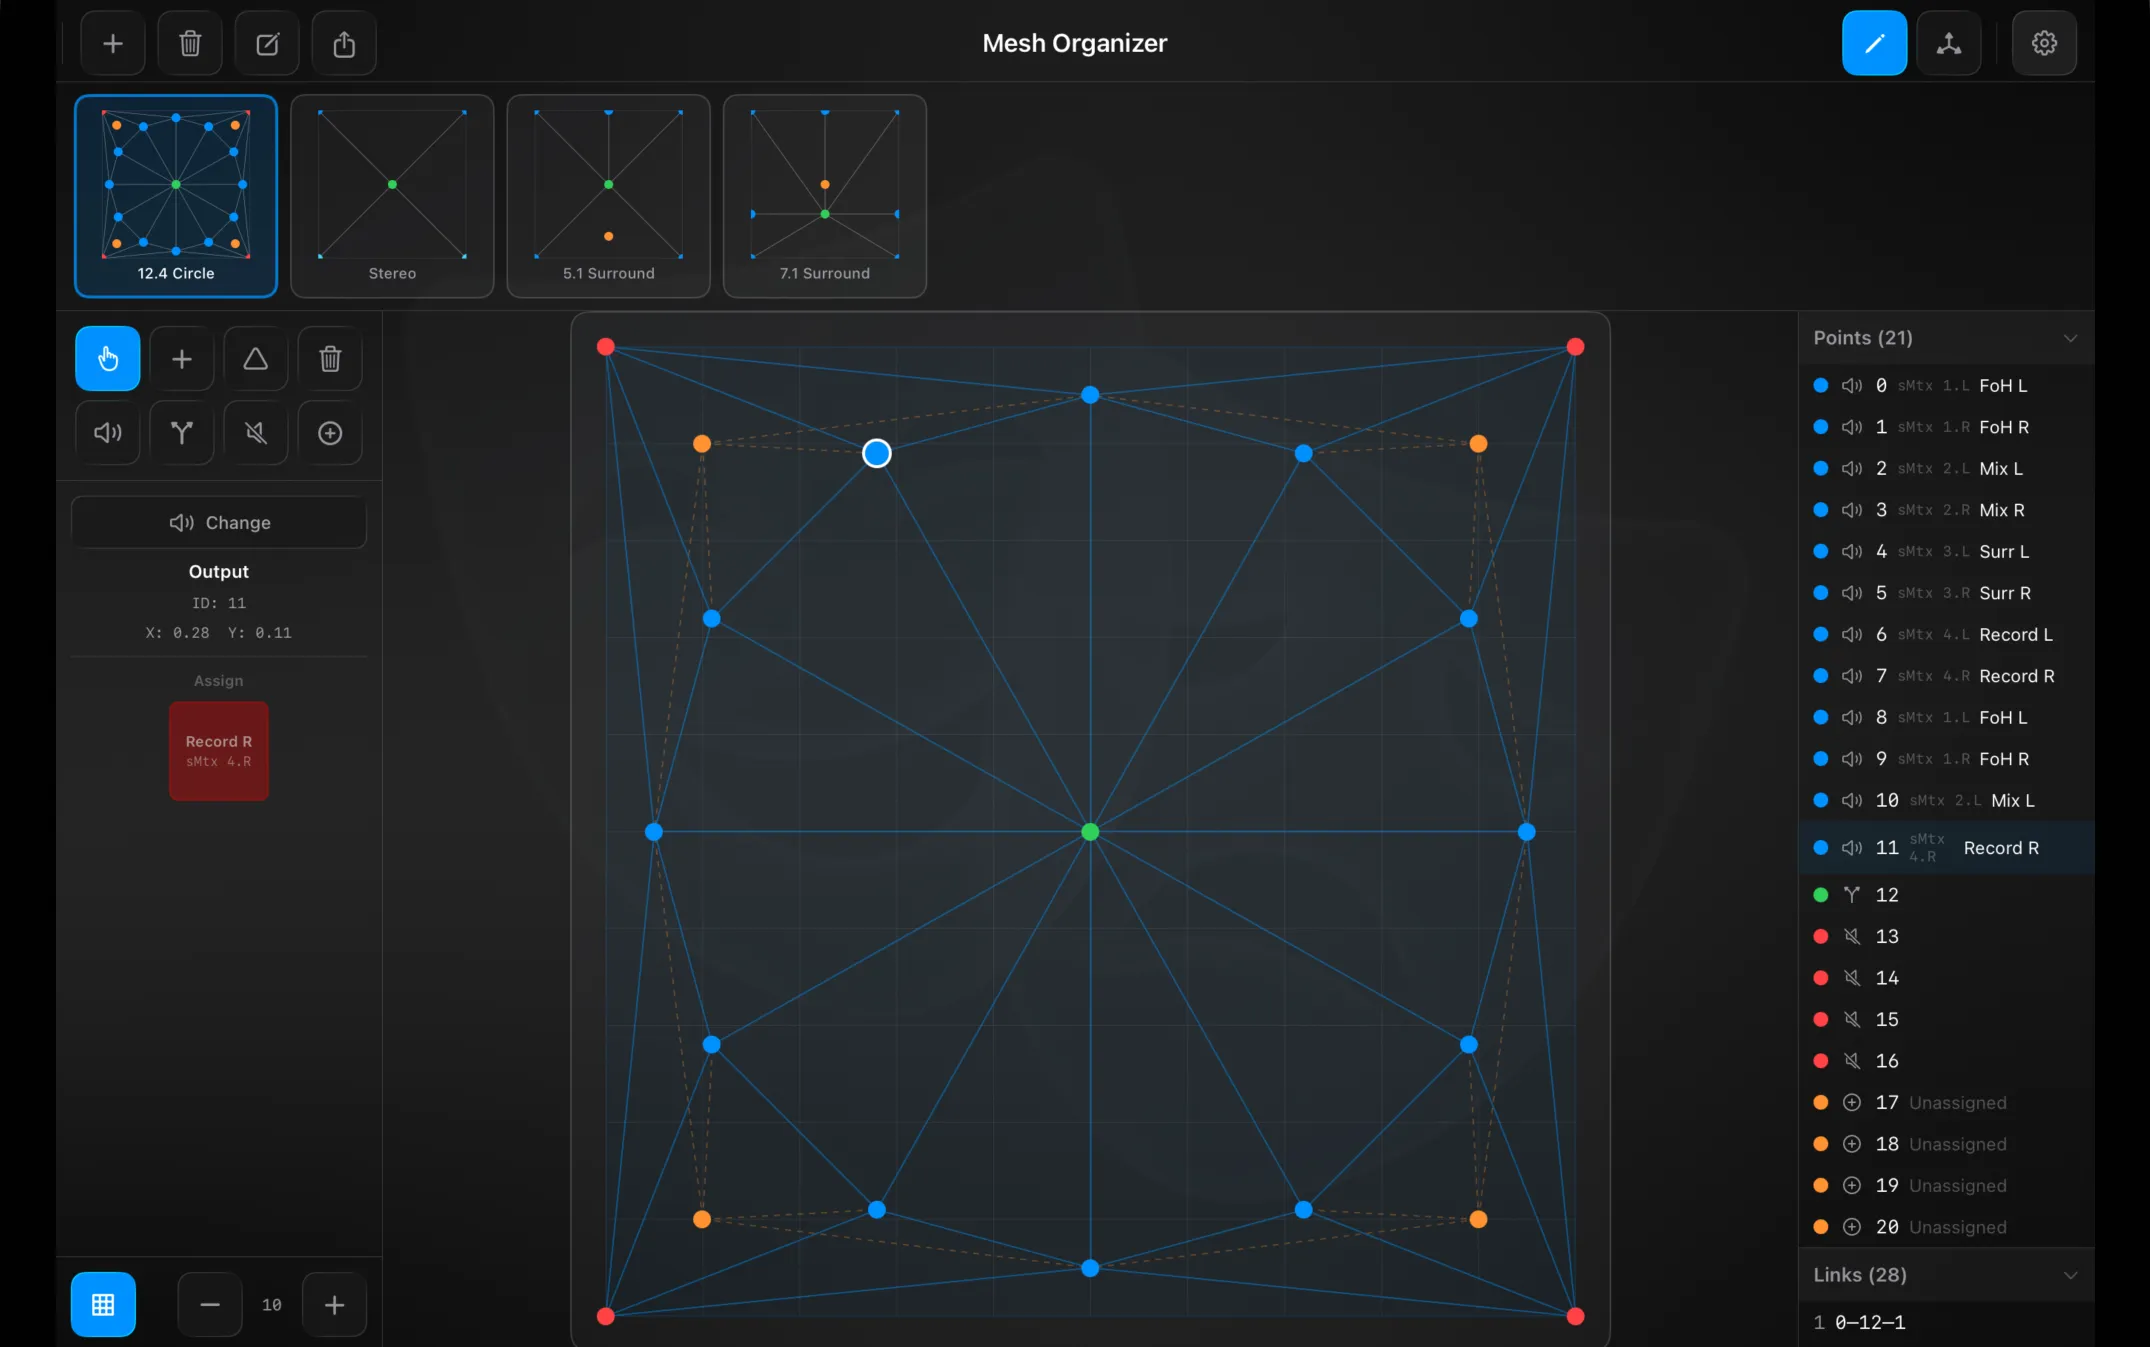
Switch to the pencil to build meshes. Your meshes run along the top as thumbnails — start from a template (Stereo, 5.1 Surround, 7.1 Surround, 12.4 Circle, or Blank), and the header buttons + add, trash, rename and share (copies the mesh to the clipboard as JSON, to paste into another show).
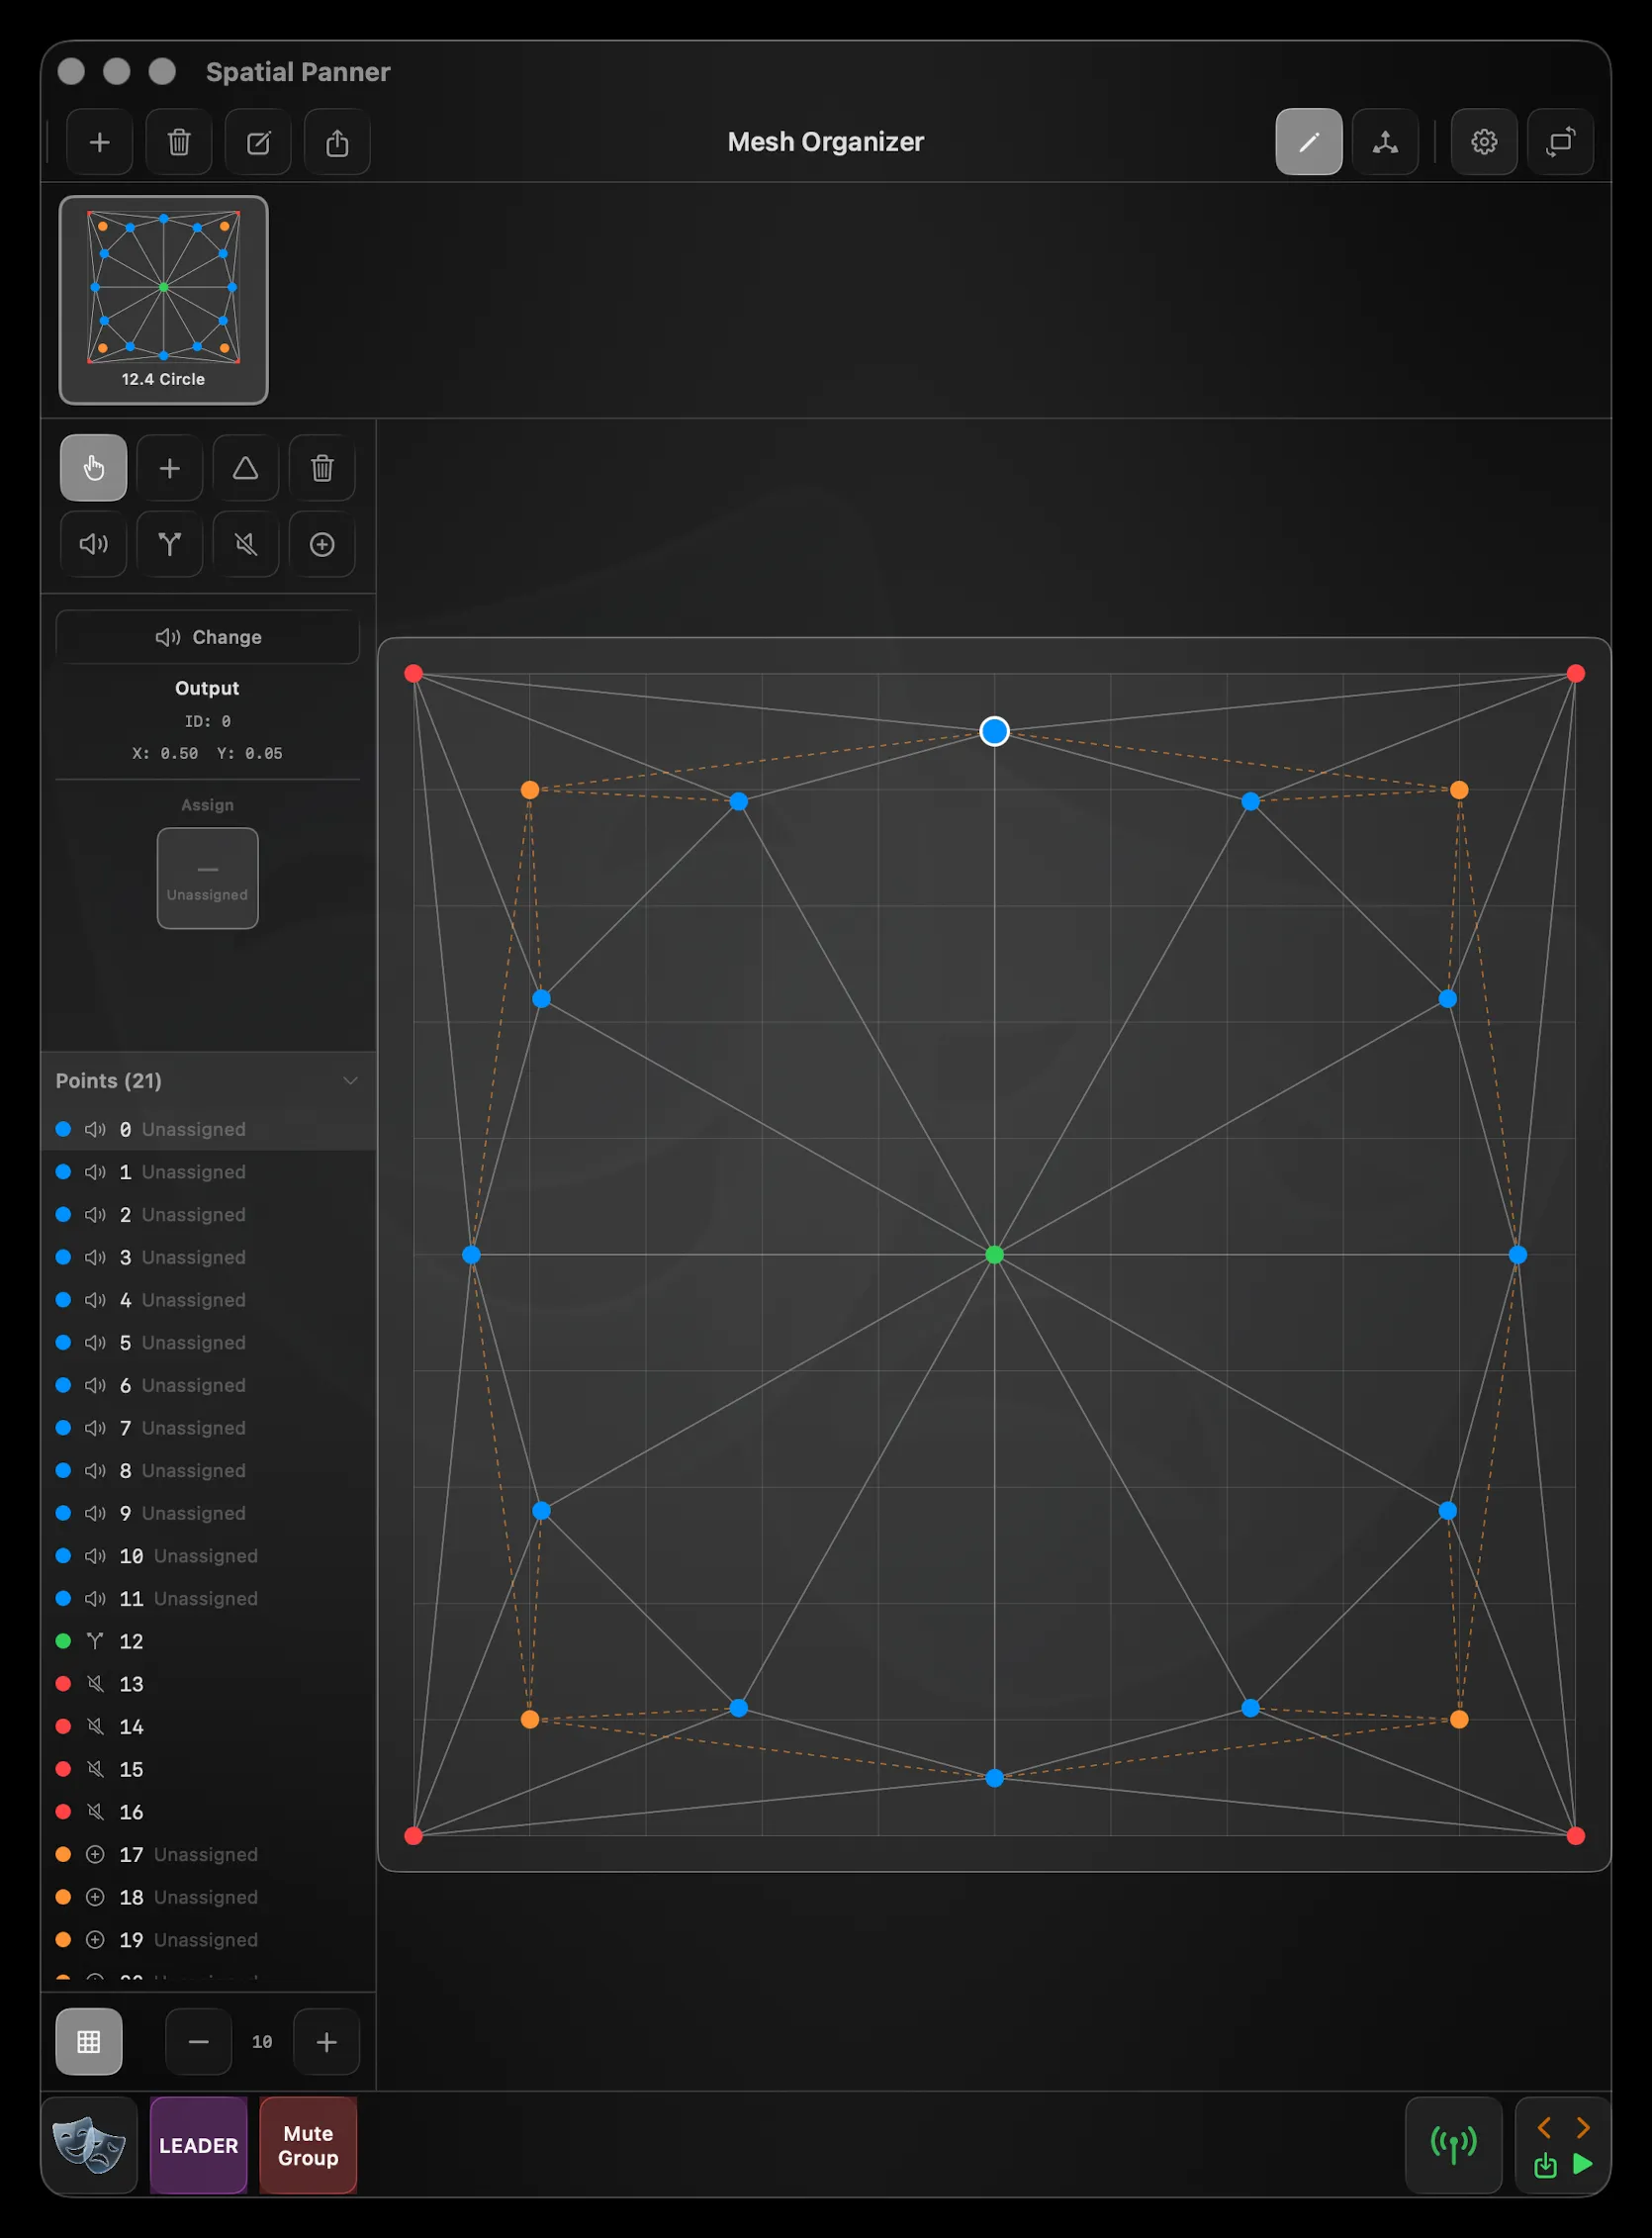
The canvas is your stage. You place points and join them into triangles; the panner interpolates the output gains across those triangles. Each point has a type, chosen from the second row of tools:
| Type | Colour | What it is |
|---|
| Output | Blue | A speaker / matrix destination — assign it to an output |
| Split | Green | A split point |
| Mute | Red | A mute point — silences the region around it |
| Sum | Orange | A sum point (shows “Unassigned” until you give it an output) |
The tools on the left are select, add, link (tap three points to form a triangle) and delete, with a grid toggle and size control below. Selecting a point shows its ID and X / Y position and its Assign card — tap Change to reassign which output it drives. On the right, Points lists every point with its assignment, and Links lists every triangle.
Preferences
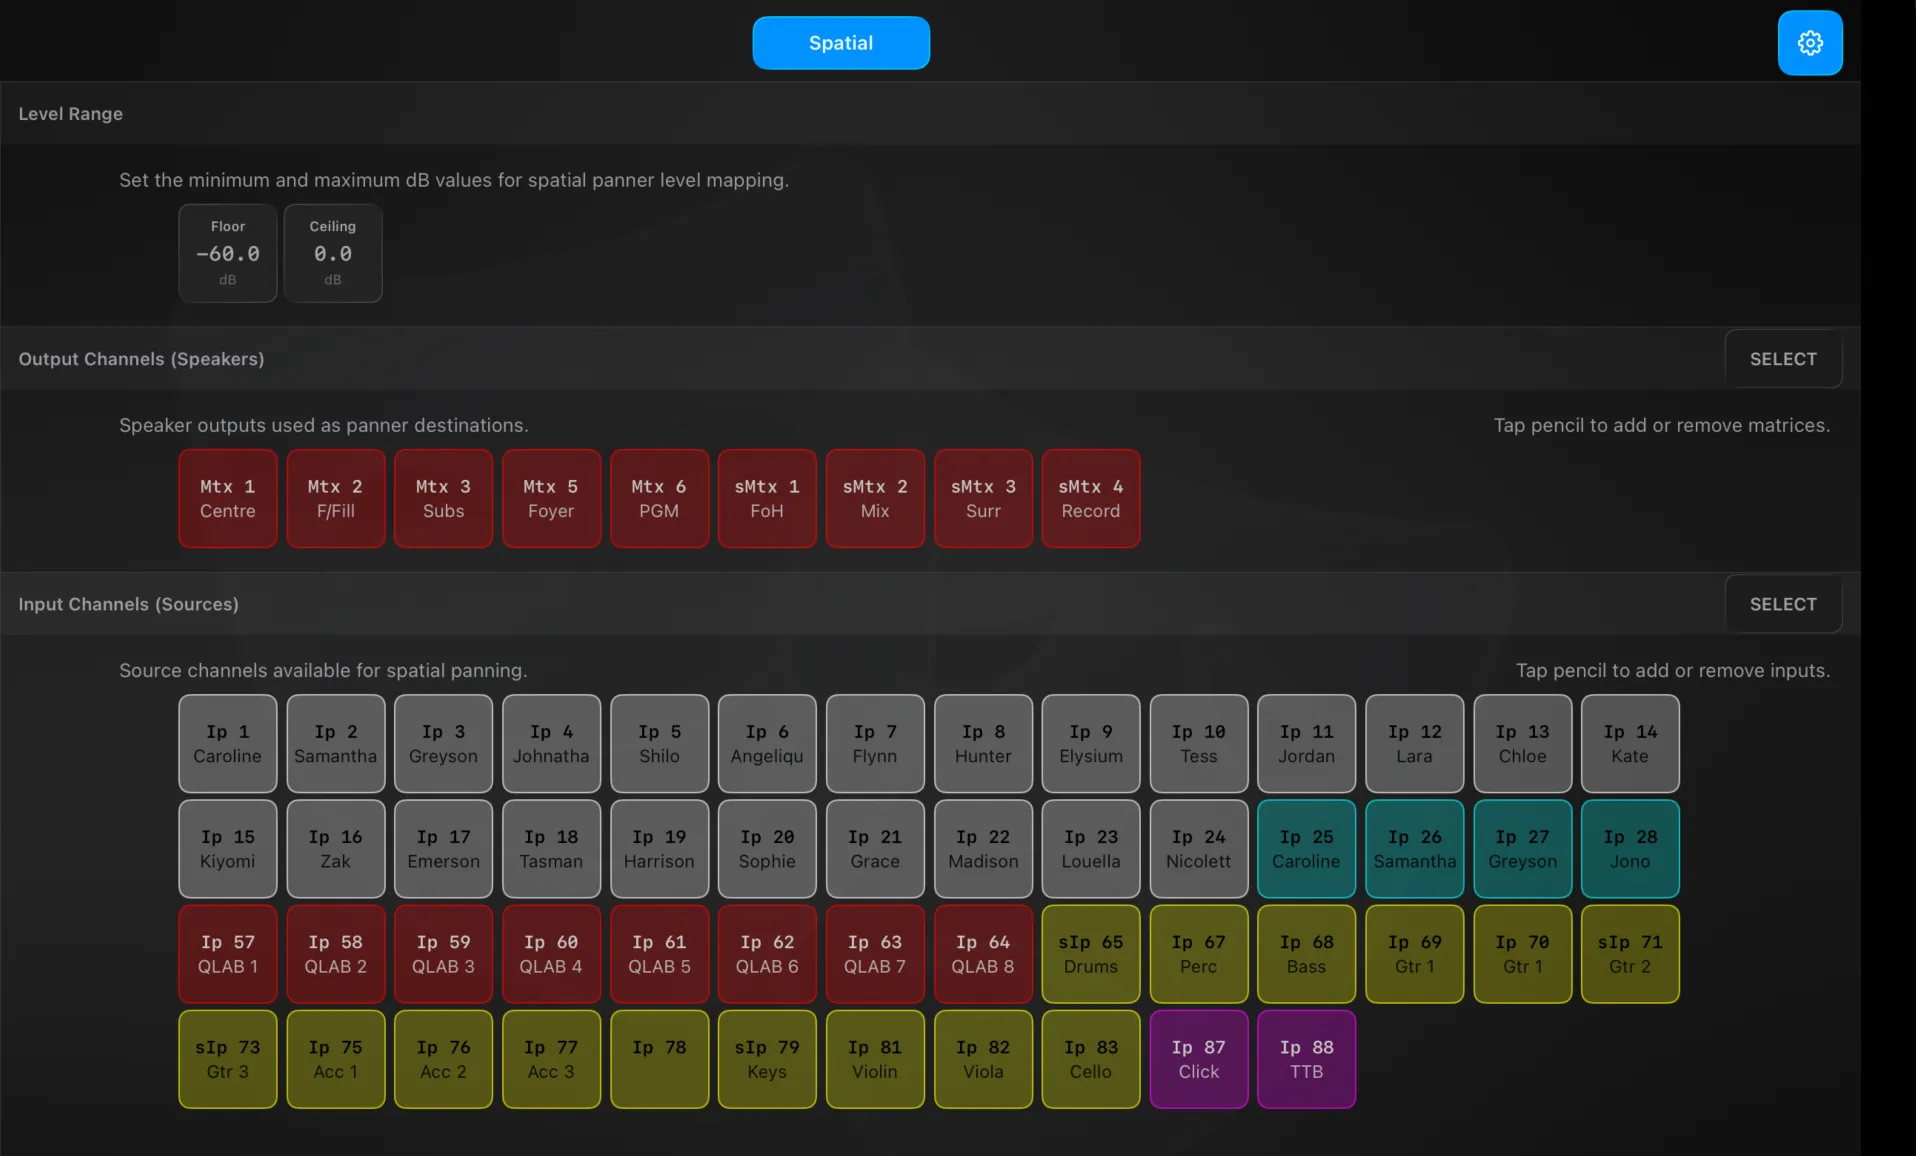
The gear opens Settings → Spatial (a single page):
- Level Range — the Floor and Ceiling dB that positions map onto (drag each). Floor stays at least 10 dB below ceiling; ceiling caps at +10.
- Output Channels (Speakers) — the matrices used as panner destinations. Tap SELECT to add or remove.
- Input Channels (Sources) — the source channels available for panning. Tap SELECT to add or remove.
Technical Reference
PannerPreferences holds the source inputChannels, destination outputChannels, the patchCables, each source’s assigned mesh (meshIndex), and floorDB / ceilingDB. MeshPreferences holds the meshes — each Mesh is a set of points (id, normalized x/y, type, patch) and triangular links. MeshManager resolves a position into per-output weights (resolveWeights) and, in reverse, solves a set of live gains back into an XY position (reversePosition) to draw the dot.
Panels
Ensemble
A Vocal Rider–style engine that rides a chorus toward its own rolling average, so the ensemble stays even without a hand on every fader.
Ensemble keeps a chorus even, automatically. It’s a Vocal Rider–style engine: it watches the mics in your chosen routing sets, works out the group’s average level, and rides each mic toward that target — quietly lifting the ones that drop and trimming the ones that jump — so the ensemble stays balanced without a hand on every fader.
It only writes when you enable it, and it corrects trim, so it sits underneath your fader moves rather than fighting them.
The main screen
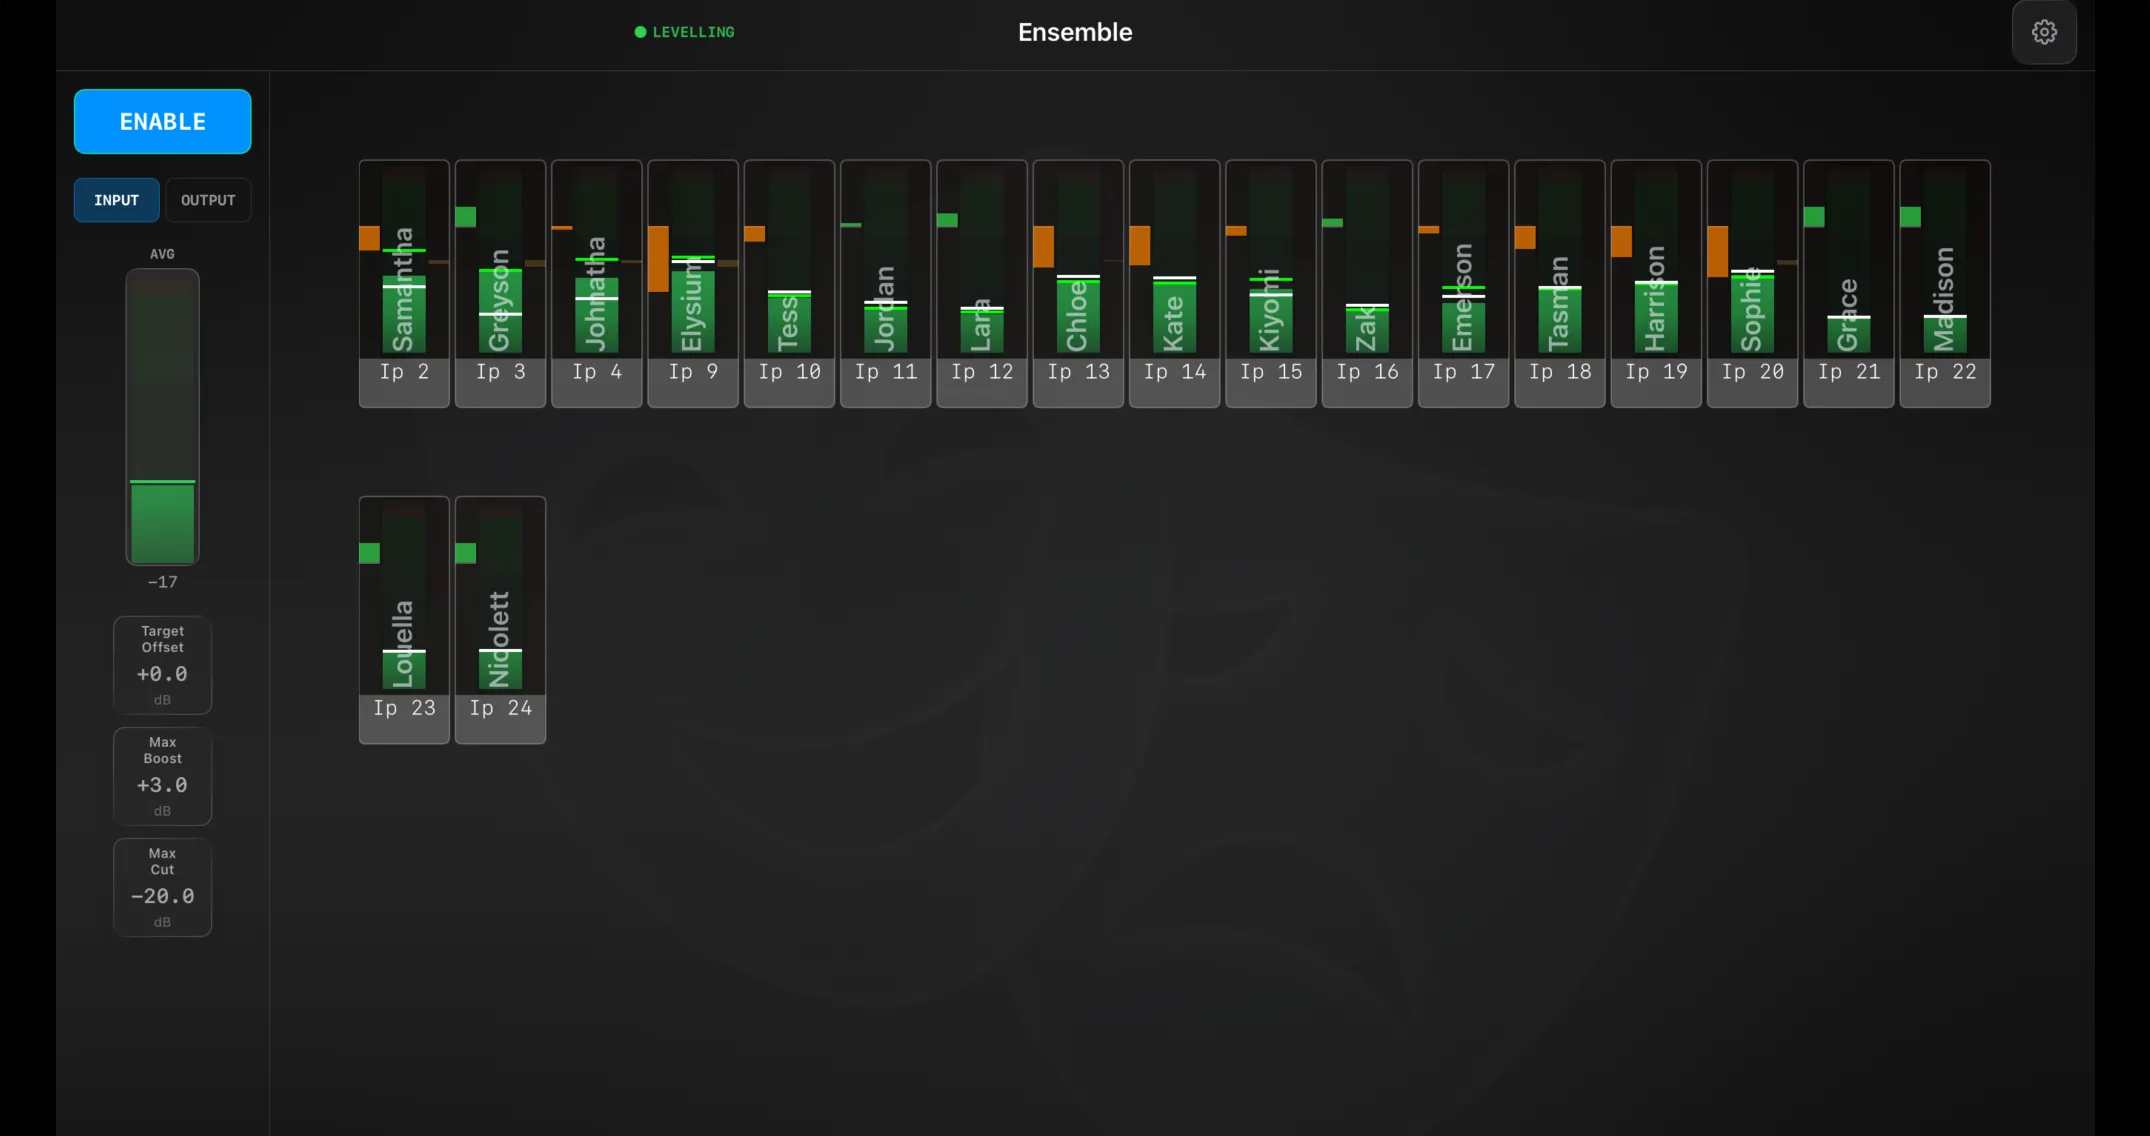
The header shows the title and, when the engine is running, a green ● LEVELLING indicator.
Down the left is the control sidebar:
- ENABLE — turns the engine on. It asks first, because from that moment it starts writing trim corrections to the console.
- INPUT / OUTPUT — switches the meter grid between the incoming levels and the corrected result, so you can see what the engine is doing.
- AVG — a live meter of the group average, with the engine’s rolling target marked as a green line and shown in dB below.
- Quick adjust — Target Offset, Max Boost and Max Cut as drag cards, so you can nudge the engine mid-show without opening Settings.
The rest of the screen is a meter strip per active mic. Membership is automatic: whichever mics are in your included routing sets right now are the ones the engine rides — so as cues change the ensemble follows.
Preferences
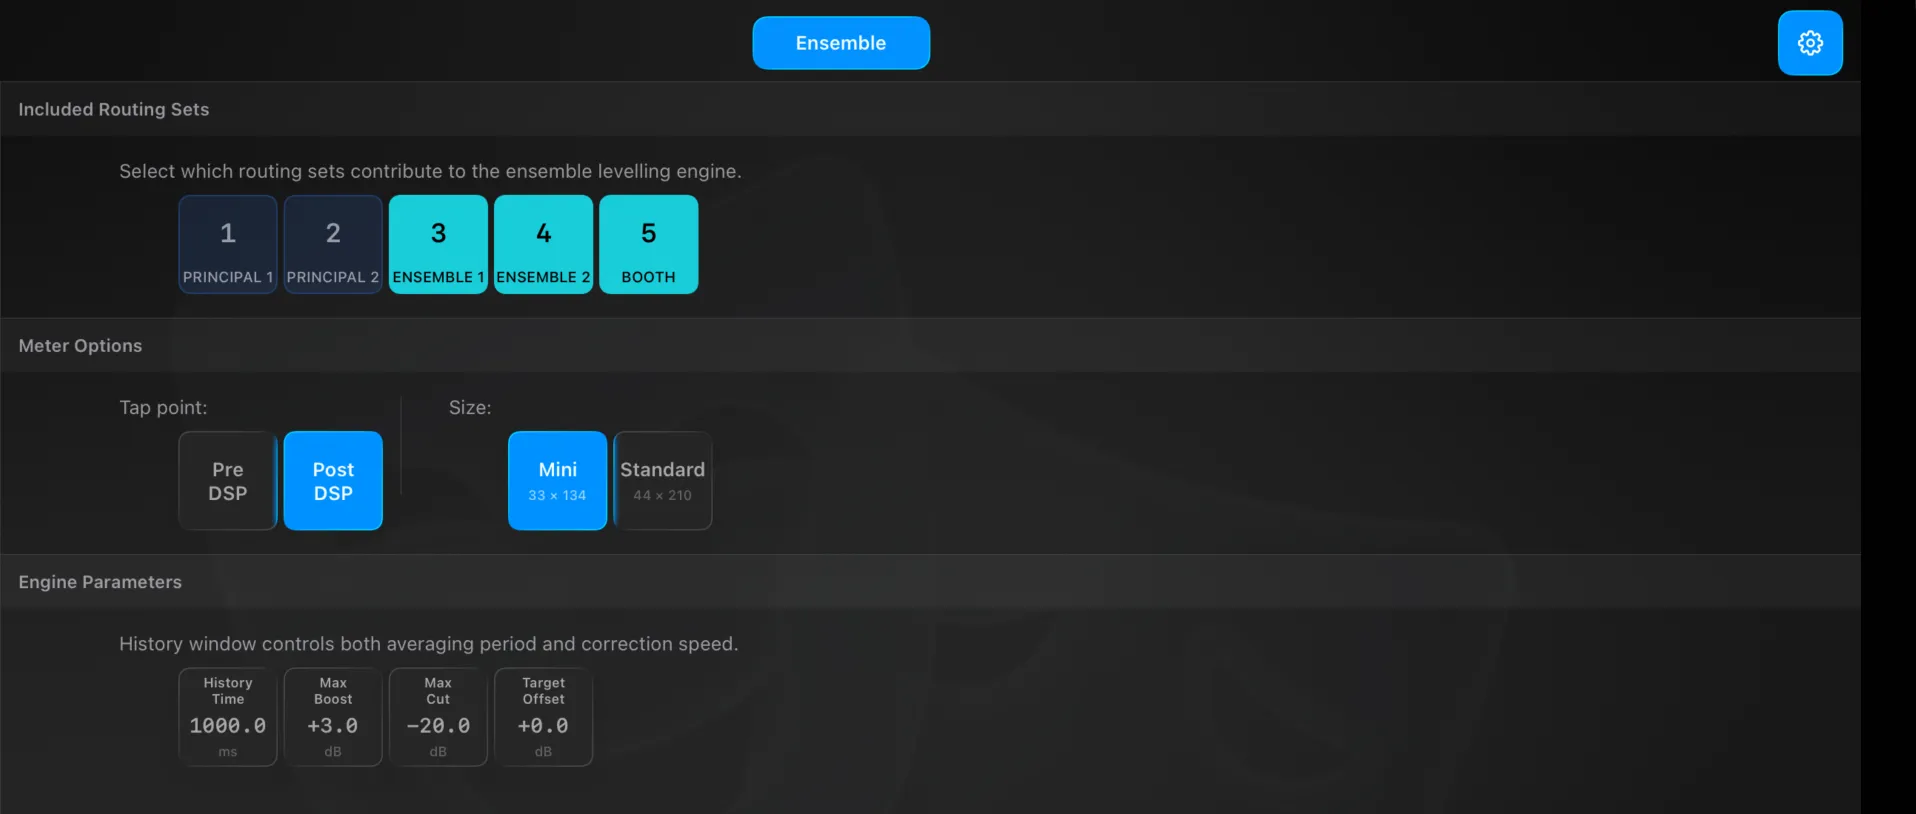
The gear opens Settings → Ensemble (a single page):
- Included Routing Sets — pick which enabled routing sets feed the engine. This is what defines “the ensemble”: only mics currently assigned to these sets are levelled.
- Meter Options — the Tap point (Pre DSP or Post DSP) the engine and meters read from, and the meter Size.
- Engine Parameters — History Time (the averaging window, which also sets how fast corrections move), Max Boost, Max Cut, and Target Offset.
How it works
BridgeEnsembleManager reads the meter taps for the active channels — membership derived live from routing-set matching — computes a target from the rolling group average, works out each channel’s correction bounded by Max Boost / Max Cut, smooths it with hold and release over the History Time window, and writes the correction only once it exceeds a small dead band (about 0.5 dB). The engine ticks on each meter push (~50 Hz).
Panels
Show
Build the running order as a T-list of cues, each a portable snapshot that recalls onto whatever console you're patched into.
Show is where the portable show comes to life. You build the running order as a T-list — a list of cues — and each cue captures the parameters you choose as a self-contained snapshot. Press Go and Version T rebuilds that snapshot onto the connected console. The console holds the live result; Version T owns the cue list, so the same show recalls on whatever desk you’re patched into.
The T-list
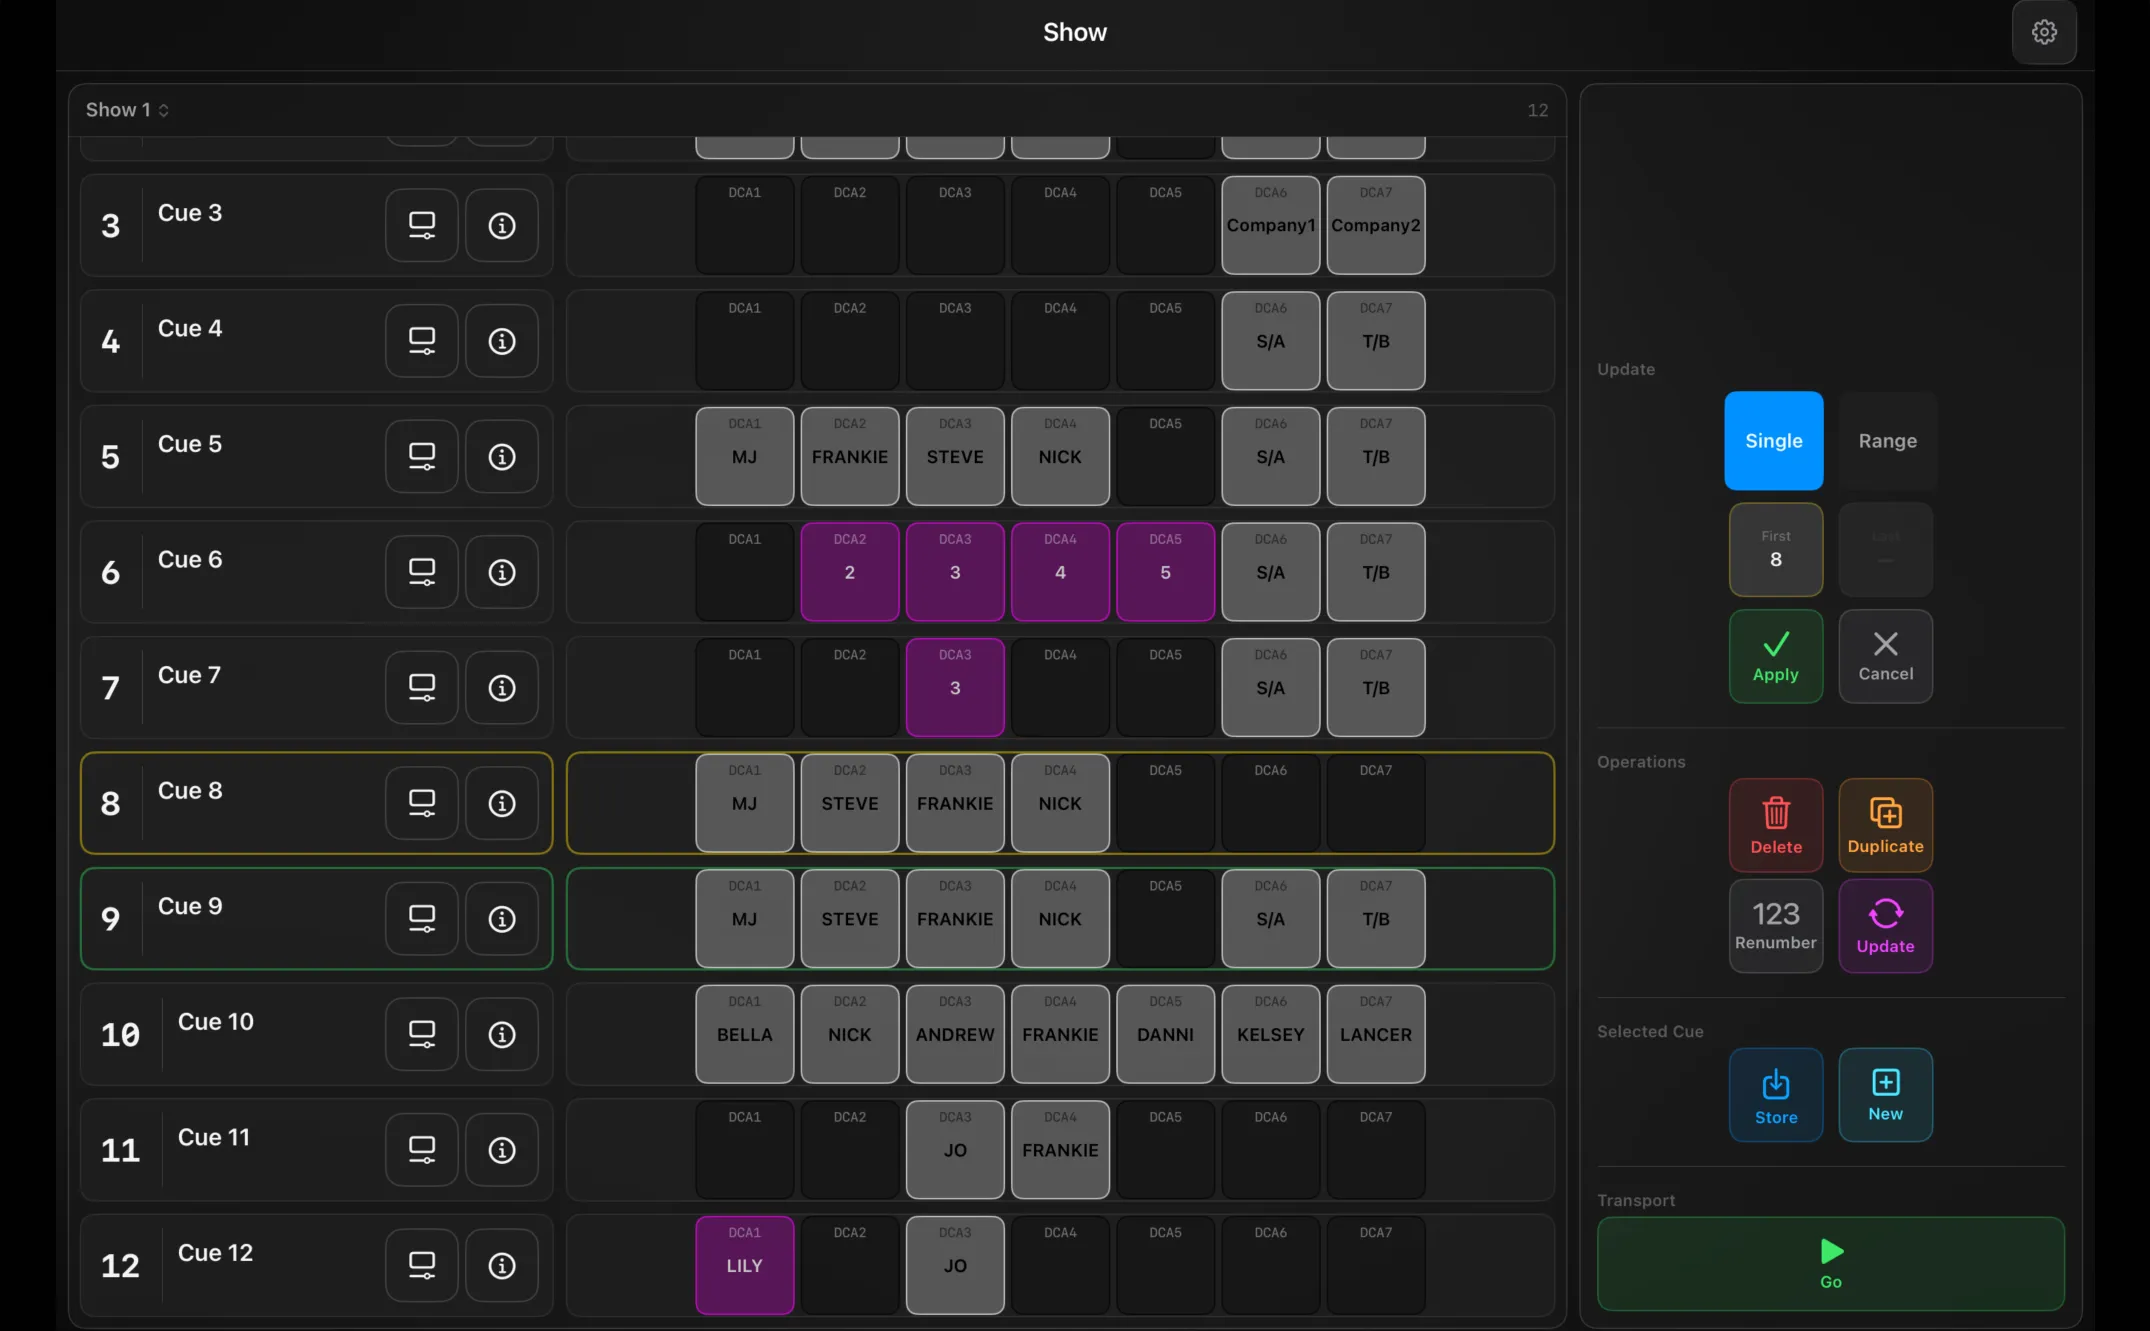
The main area is your cue list. At the top, a menu switches between showlists (or creates a new one), with the cue count beside it.
Each cue is a card showing its number, name and comment, with two buttons on the right — a safety button (tinted when the cue has recall-safes) and an info / lock button — and a DCA preview strip showing the DCA names and colours stored in that cue.
Cards colour-code their state: the active cue is yellow, the standby (next Go) is green, a range selection is cyan, and the selected cue is outlined white. Disabled cues are dimmed.
Building and running cues
The controls panel (beside the list in landscape, below it in portrait) has three groups:
- Selected Cue — Store overwrites the selected cue with the current live state; New captures the live state into a brand-new cue after the selected one.
- Transport — Go recalls the standby cue and advances.
- Operations — Delete, Duplicate, Renumber, Update. Choosing one opens a scope picker: Single or Range (tap the First and Last cues), then Apply or Cancel.
Store, Go and Delete can each ask for confirmation first — set in Settings.
What a cue captures
Every cue is built from datacues, one per category. These are portable parameter sets — what should change, in Version T’s terms — so a cue recalls on any connected console:
| Datacue | Tag | Captures |
|---|
| Routing | RTG | Each tracked input’s routing set |
| DCA | DCA | DCA names, colours and membership |
| Mute | MUT | Tracked input mutes |
| Fader | LVL | Levels |
| Spatial | SPA | Panner positions |
| Alt Source | ALT | Alternate sources |
| Scene Recall | SCN | A console scene recall (venue-specific, not portable) |
Editing a cue
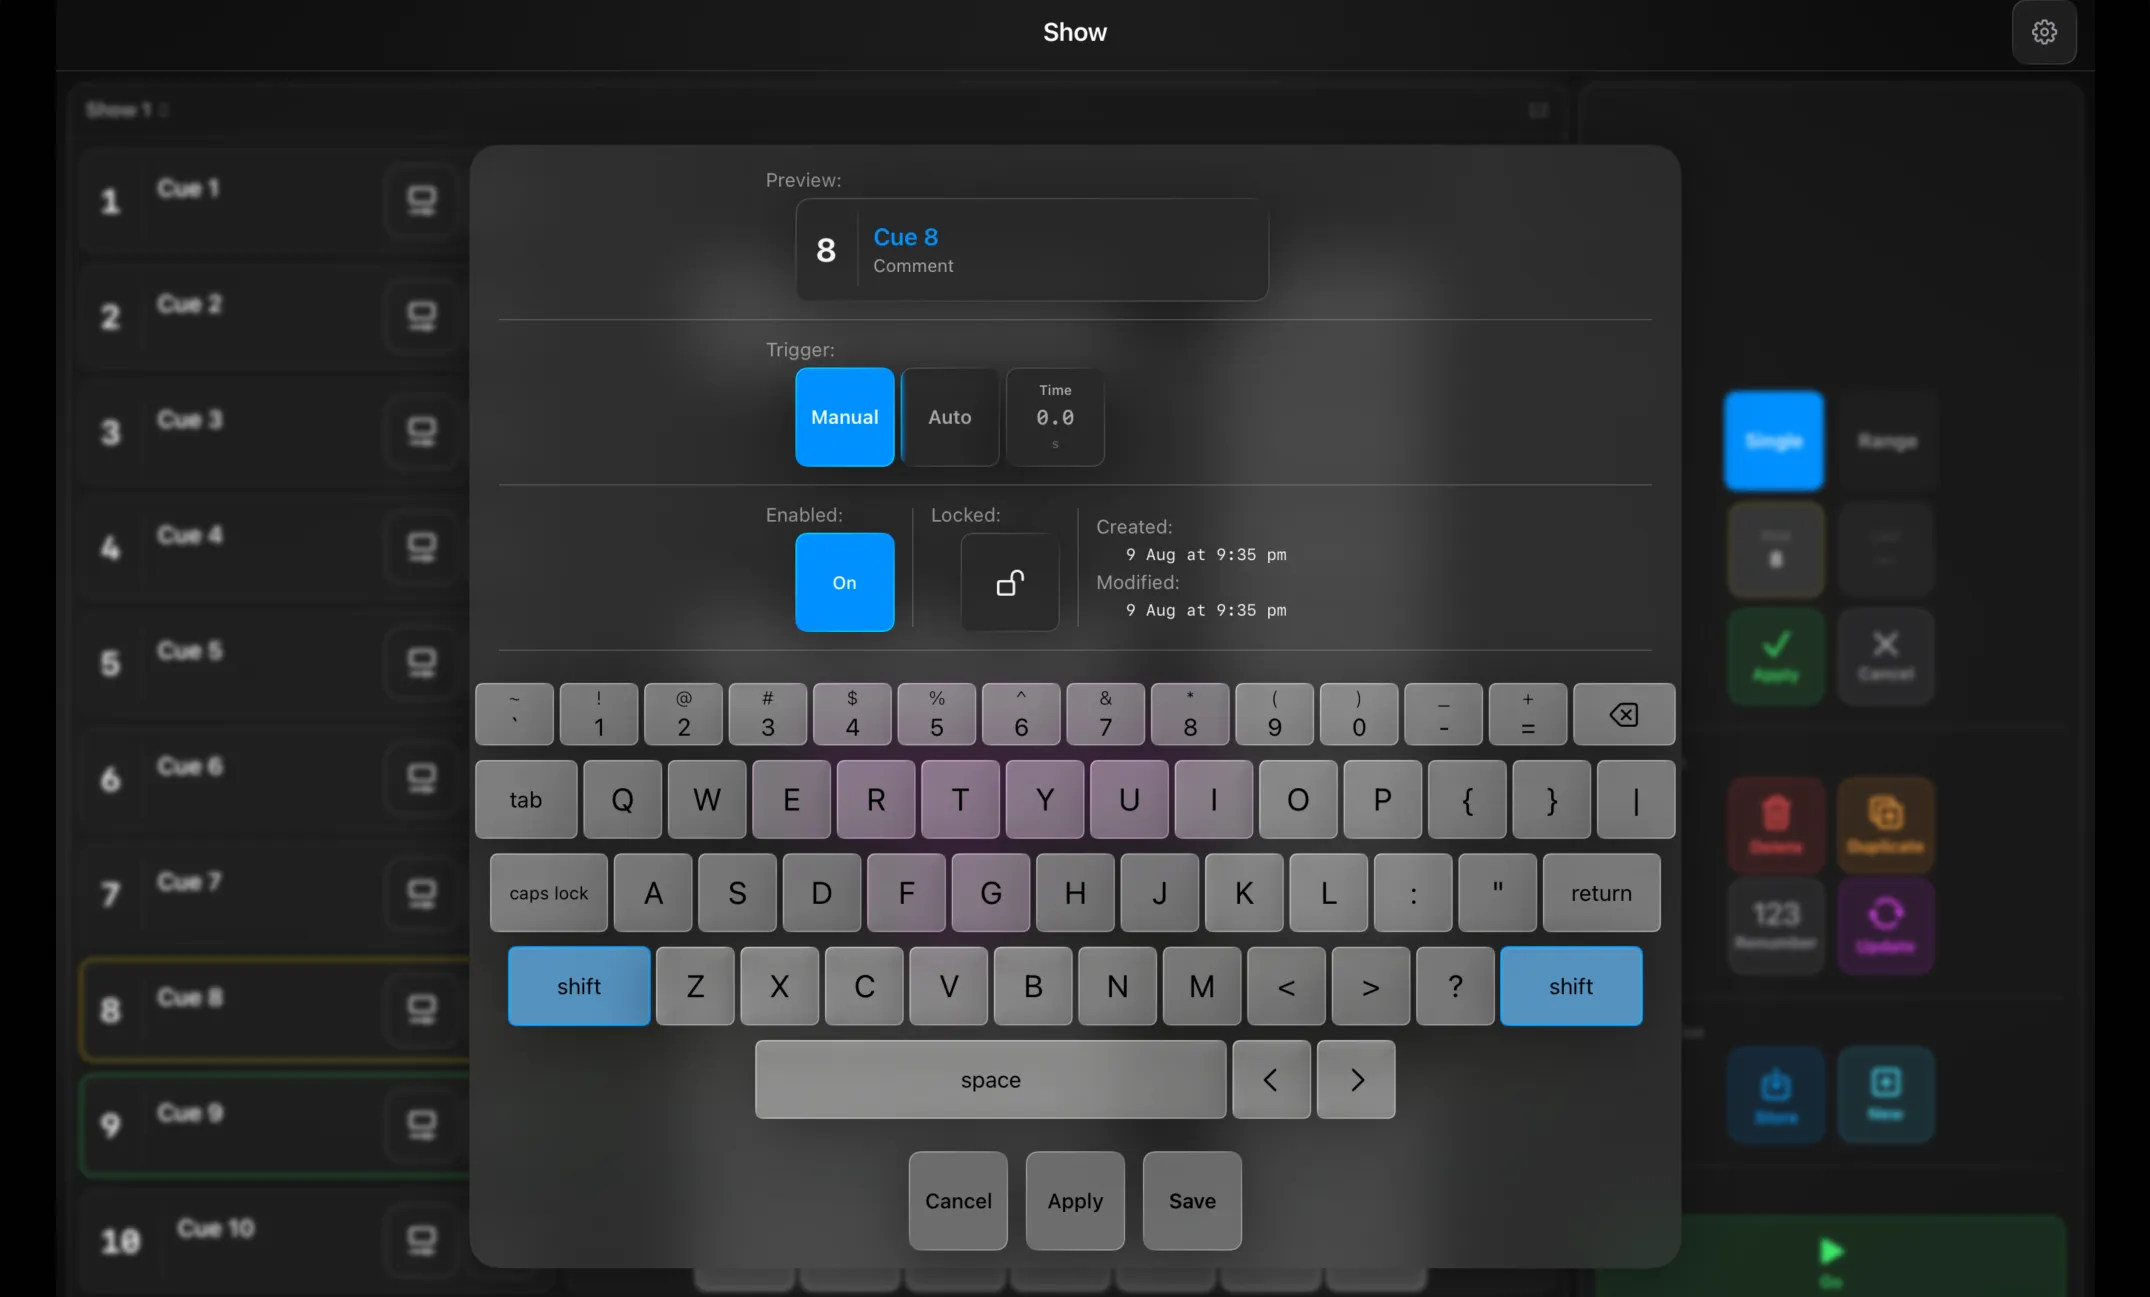
Tap a cue’s info button to edit it: name, cue number, comment, trigger (Manual, or Auto with a wait time), Enabled and Locked, plus its created / modified stamps.
Recall safes
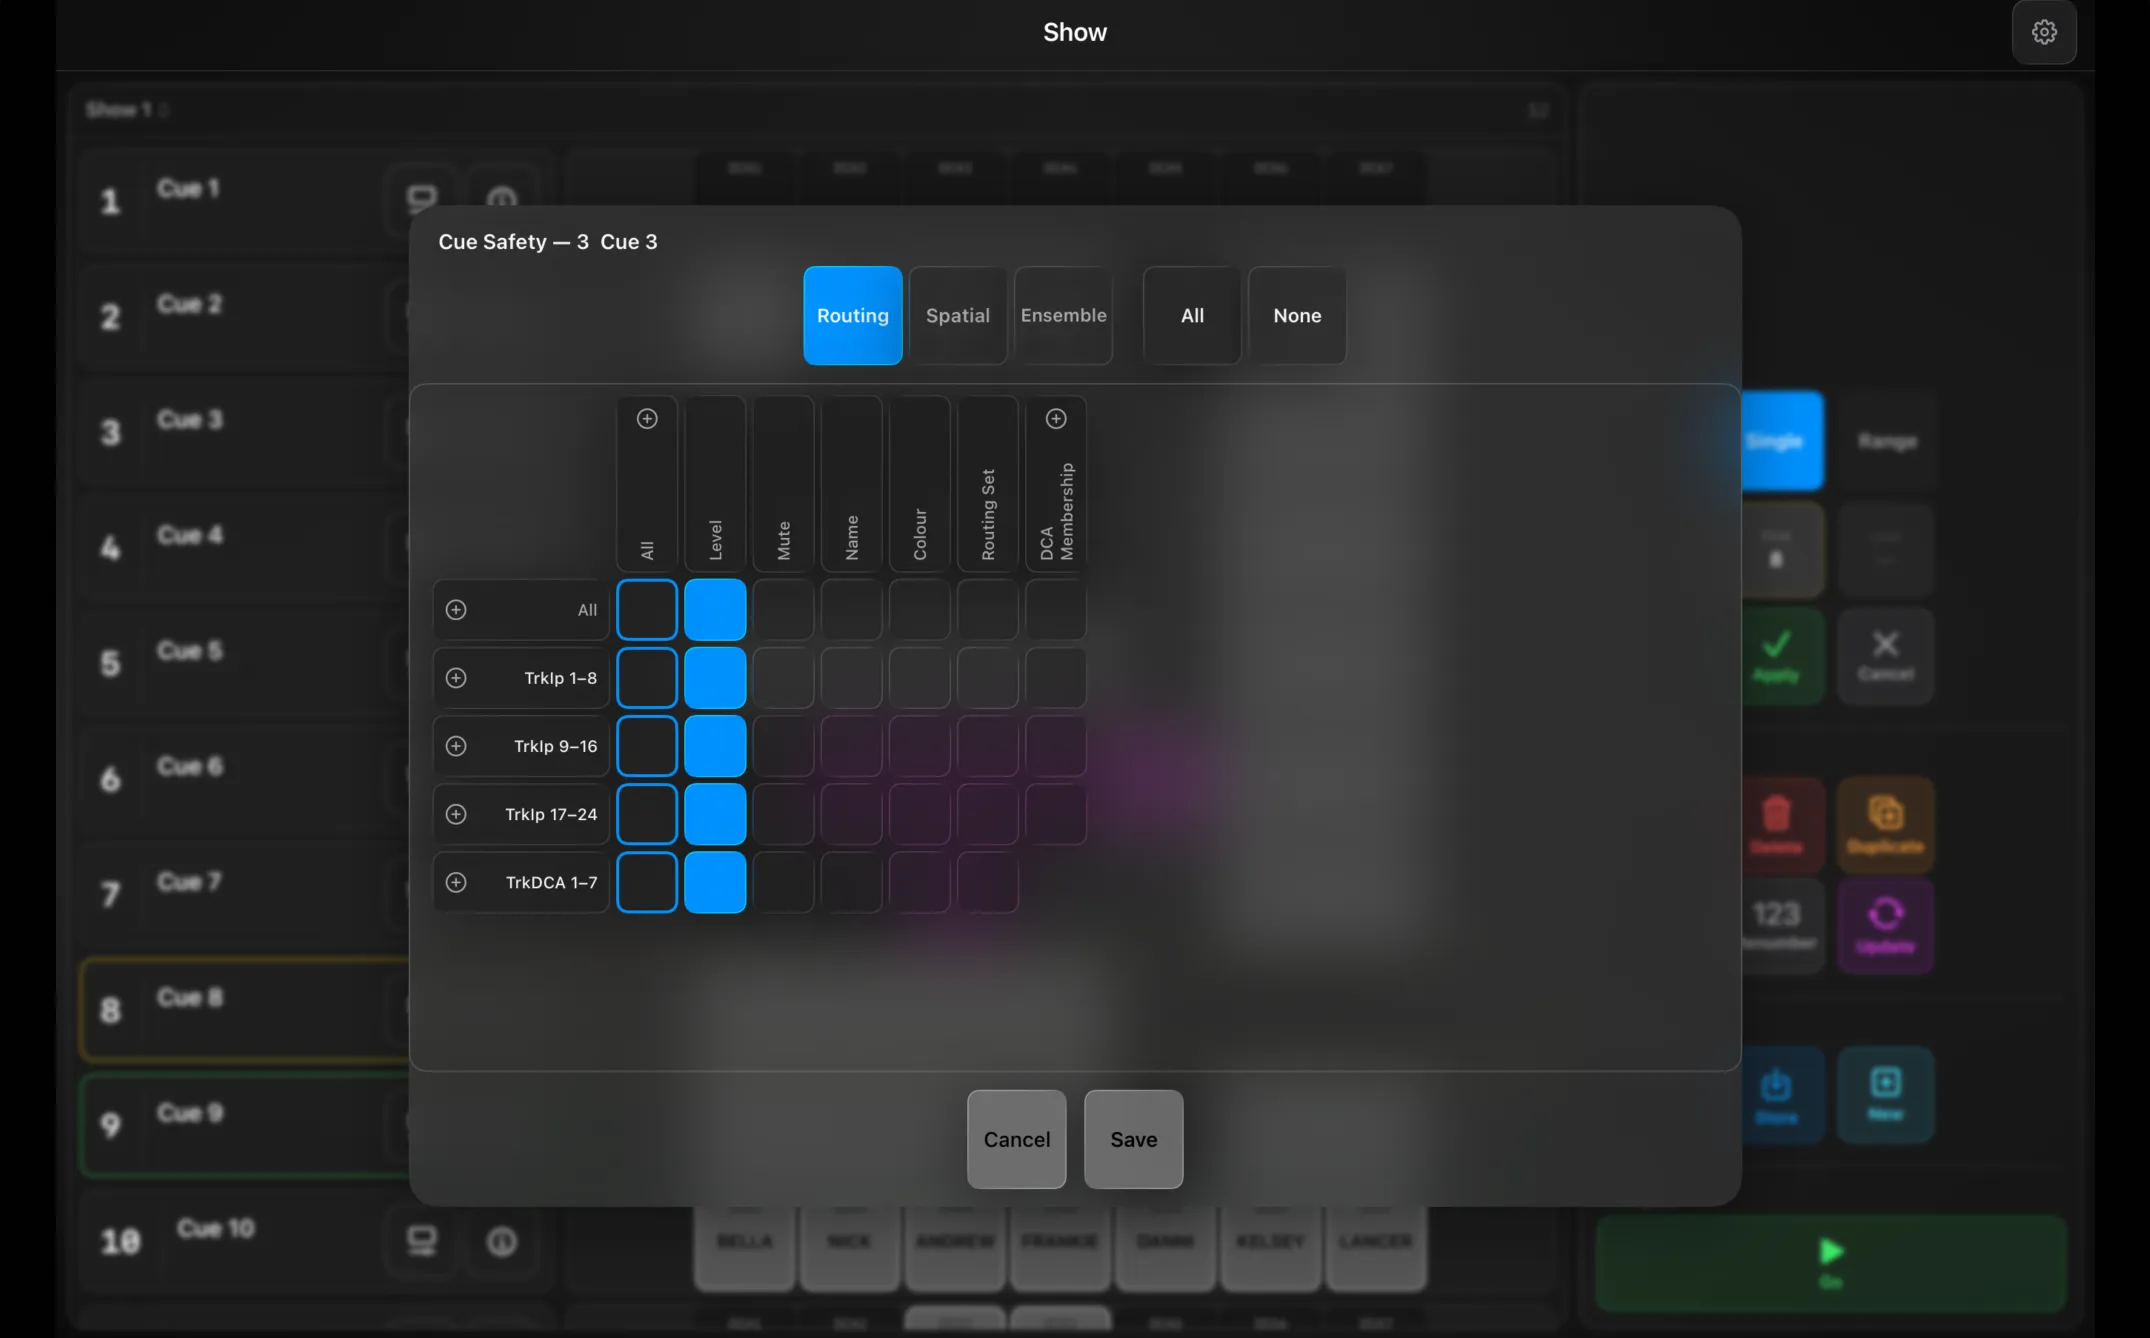
Recall safes protect parameters from being overwritten when a cue is recalled. Version T holds them at two levels, both using the same inputs/DCAs × parameters grid:
- Per-cue recall safes — tap a cue’s safety button. Each cue carries its own safe set; when that cue fires, the addresses you’ve protected are skipped. The grid runs your tracked inputs and DCAs against parameters (Level, Mute, Name, Colour, Routing Set, DCA Membership…), split by scope (Routing / Spatial / Ensemble), with Quick Set All / None, then Save.
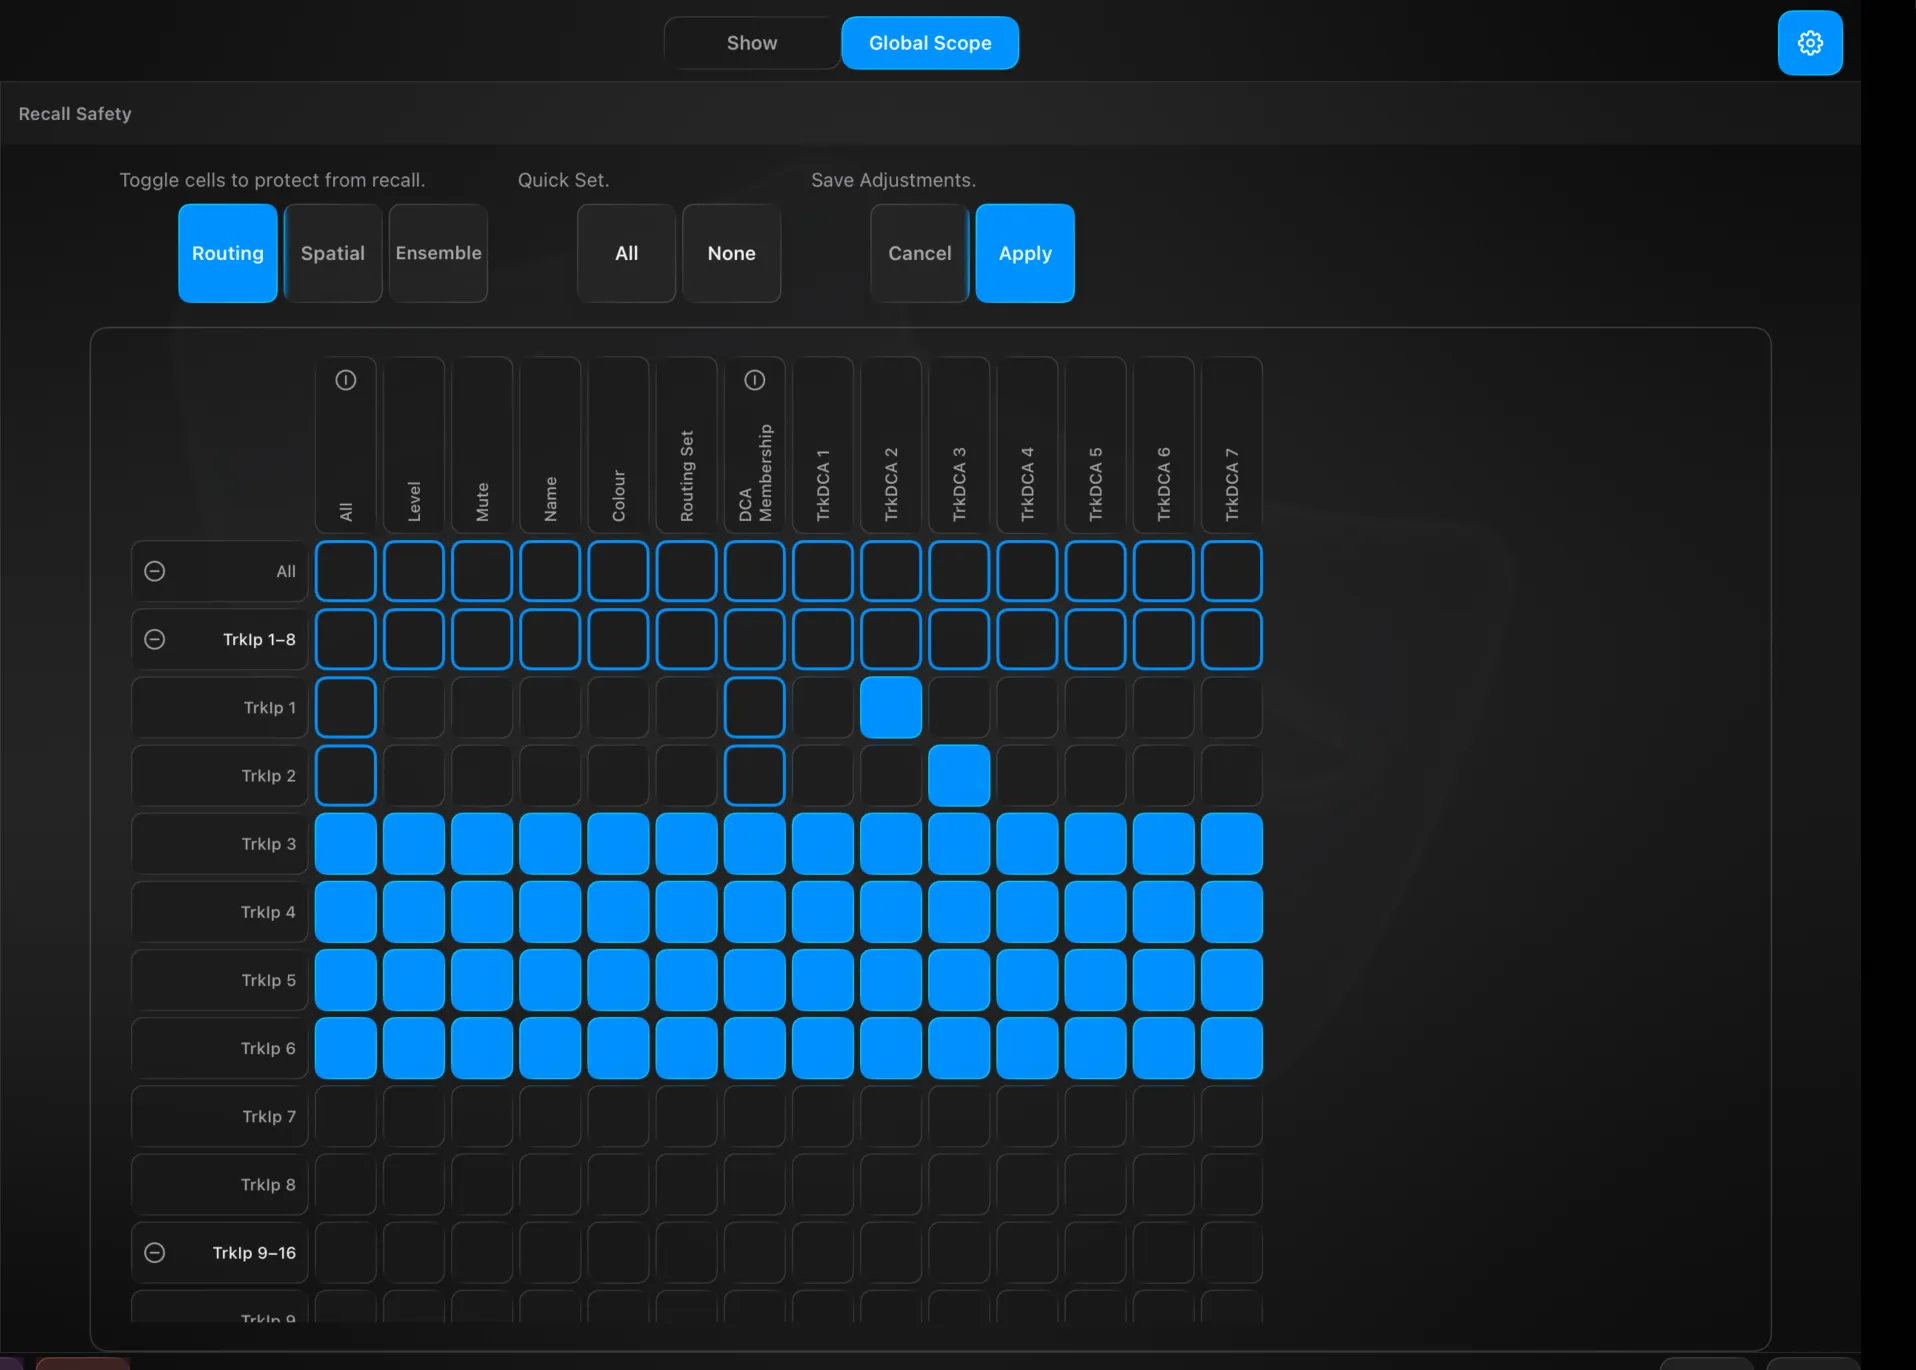
- Global safes — app-wide protection, set in Settings → Show → Global Scope (below). Any address in the global safe set is never overwritten by any cue recall.
The difference is only scope: one cue versus the whole session.
Preferences
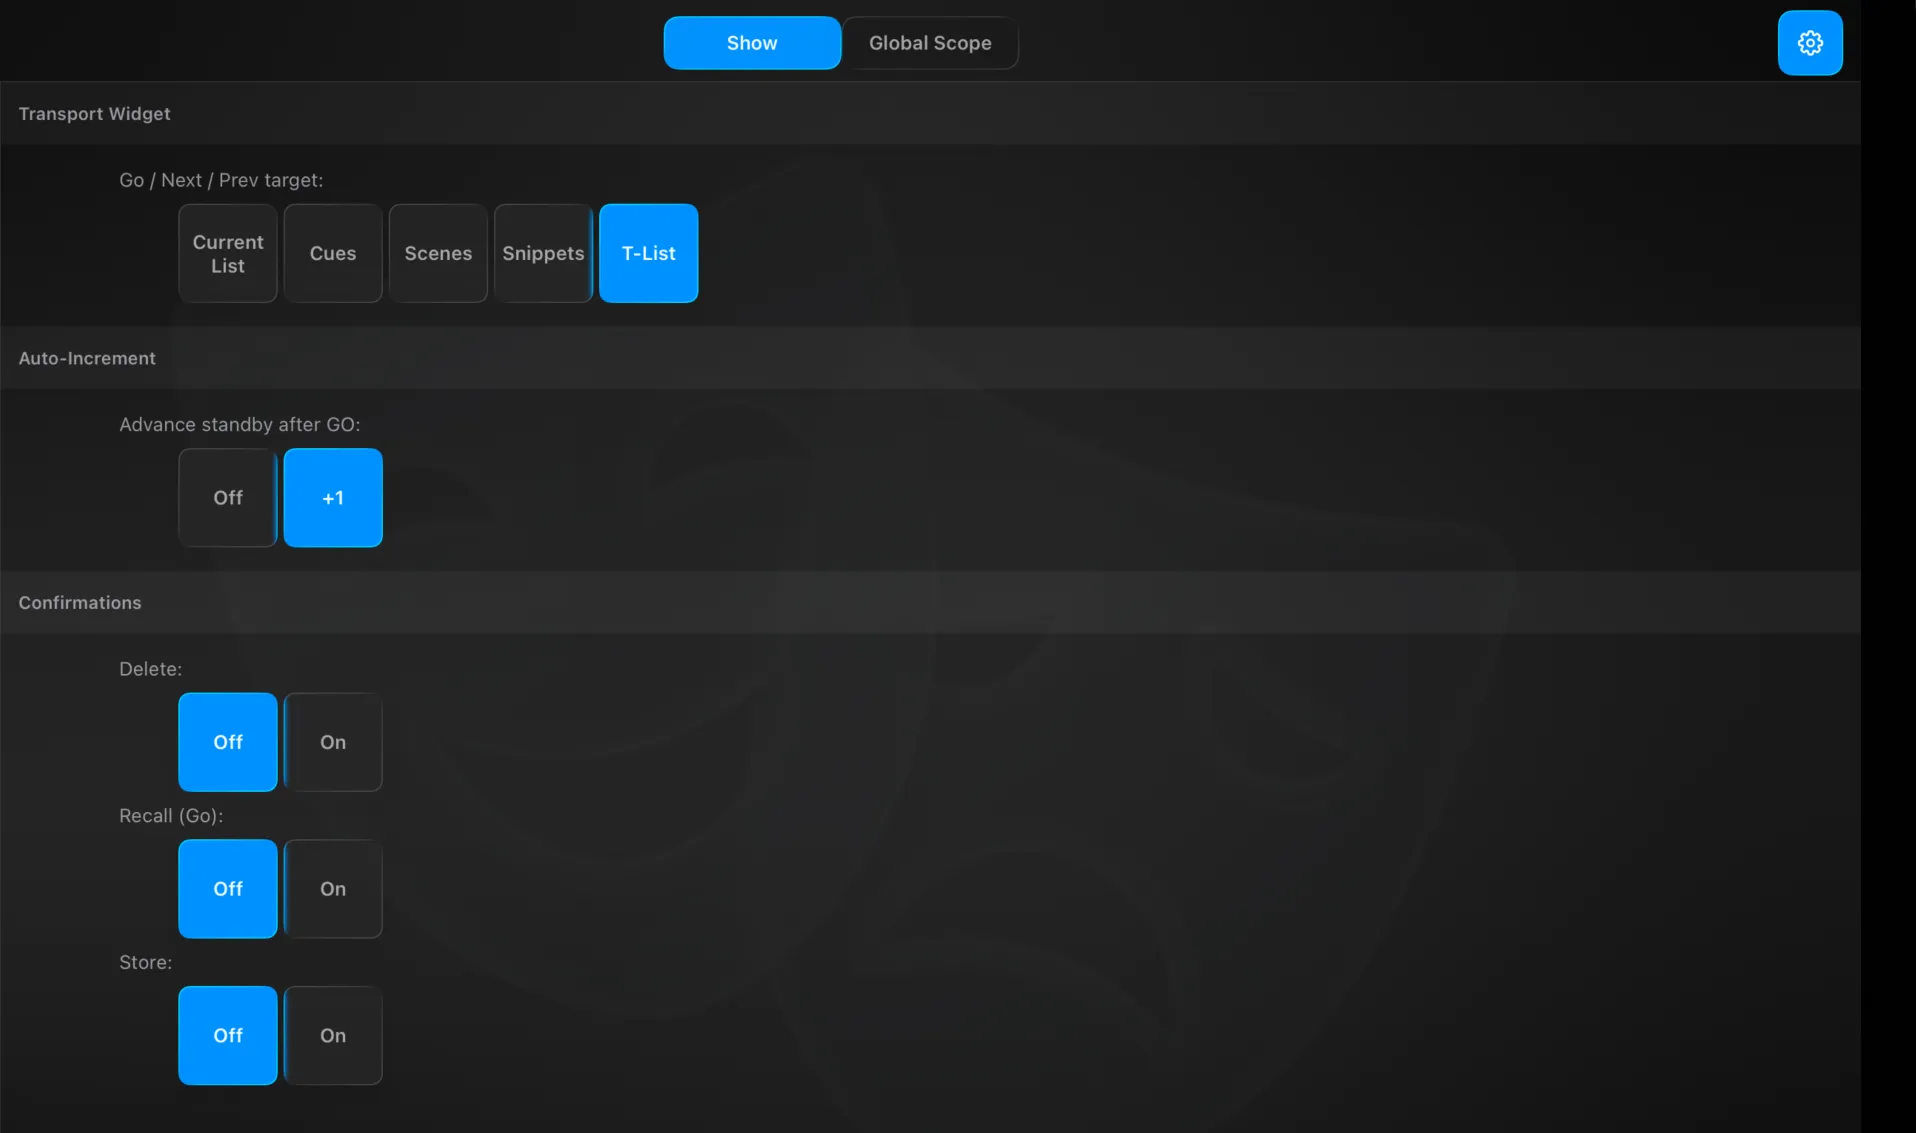
The gear opens Settings → Show, with two tabs:
- Show — the Transport Widget target (what the dock’s Go / Next / Prev drives: Current List, Cues, Scenes, Snippets or T-List), Auto-Increment (Advance standby after GO — Off or +1), and Confirmations for Delete, Recall (Go) and Store.
- Global Scope — Global Safes: the same inputs/DCAs × parameters grid as per-cue recall safes, but applied app-wide — any protected address is never overwritten by any cue recall. Split by scope (Routing / Spatial / Ensemble), Quick Set All / None, then Apply.
Technical Reference
The automation hierarchy: Datacue (captured directives) → Cue (a set of datacues) → Showcue (a cue plus timing: wait / auto-follow) → Showlist (the T-list running order). A project can hold several showlists.
BridgeTListManager drives it: Store recaptures the selected cue’s datacues from current live state (one per type, via AutomationDefinitions), New captures and inserts a fresh cue, and Go recalls at the GO pointer. Because the dock’s Transport widget can target the T-list too, the dock transport is hidden on this panel — Show has its own Go.
Panels
Project
The show's identity and its portable bundle — export the whole project to move it to another iPad or another console.
Project is your show’s home base. It holds the show’s identity — name, version, venue, status — and it’s the one place to carry the whole thing in and out as a portable bundle. Everything you build in Version T (routing, panner, ensemble, overview sets, the cue list) lives in the project; export it to move to another iPad, import to bring one in.
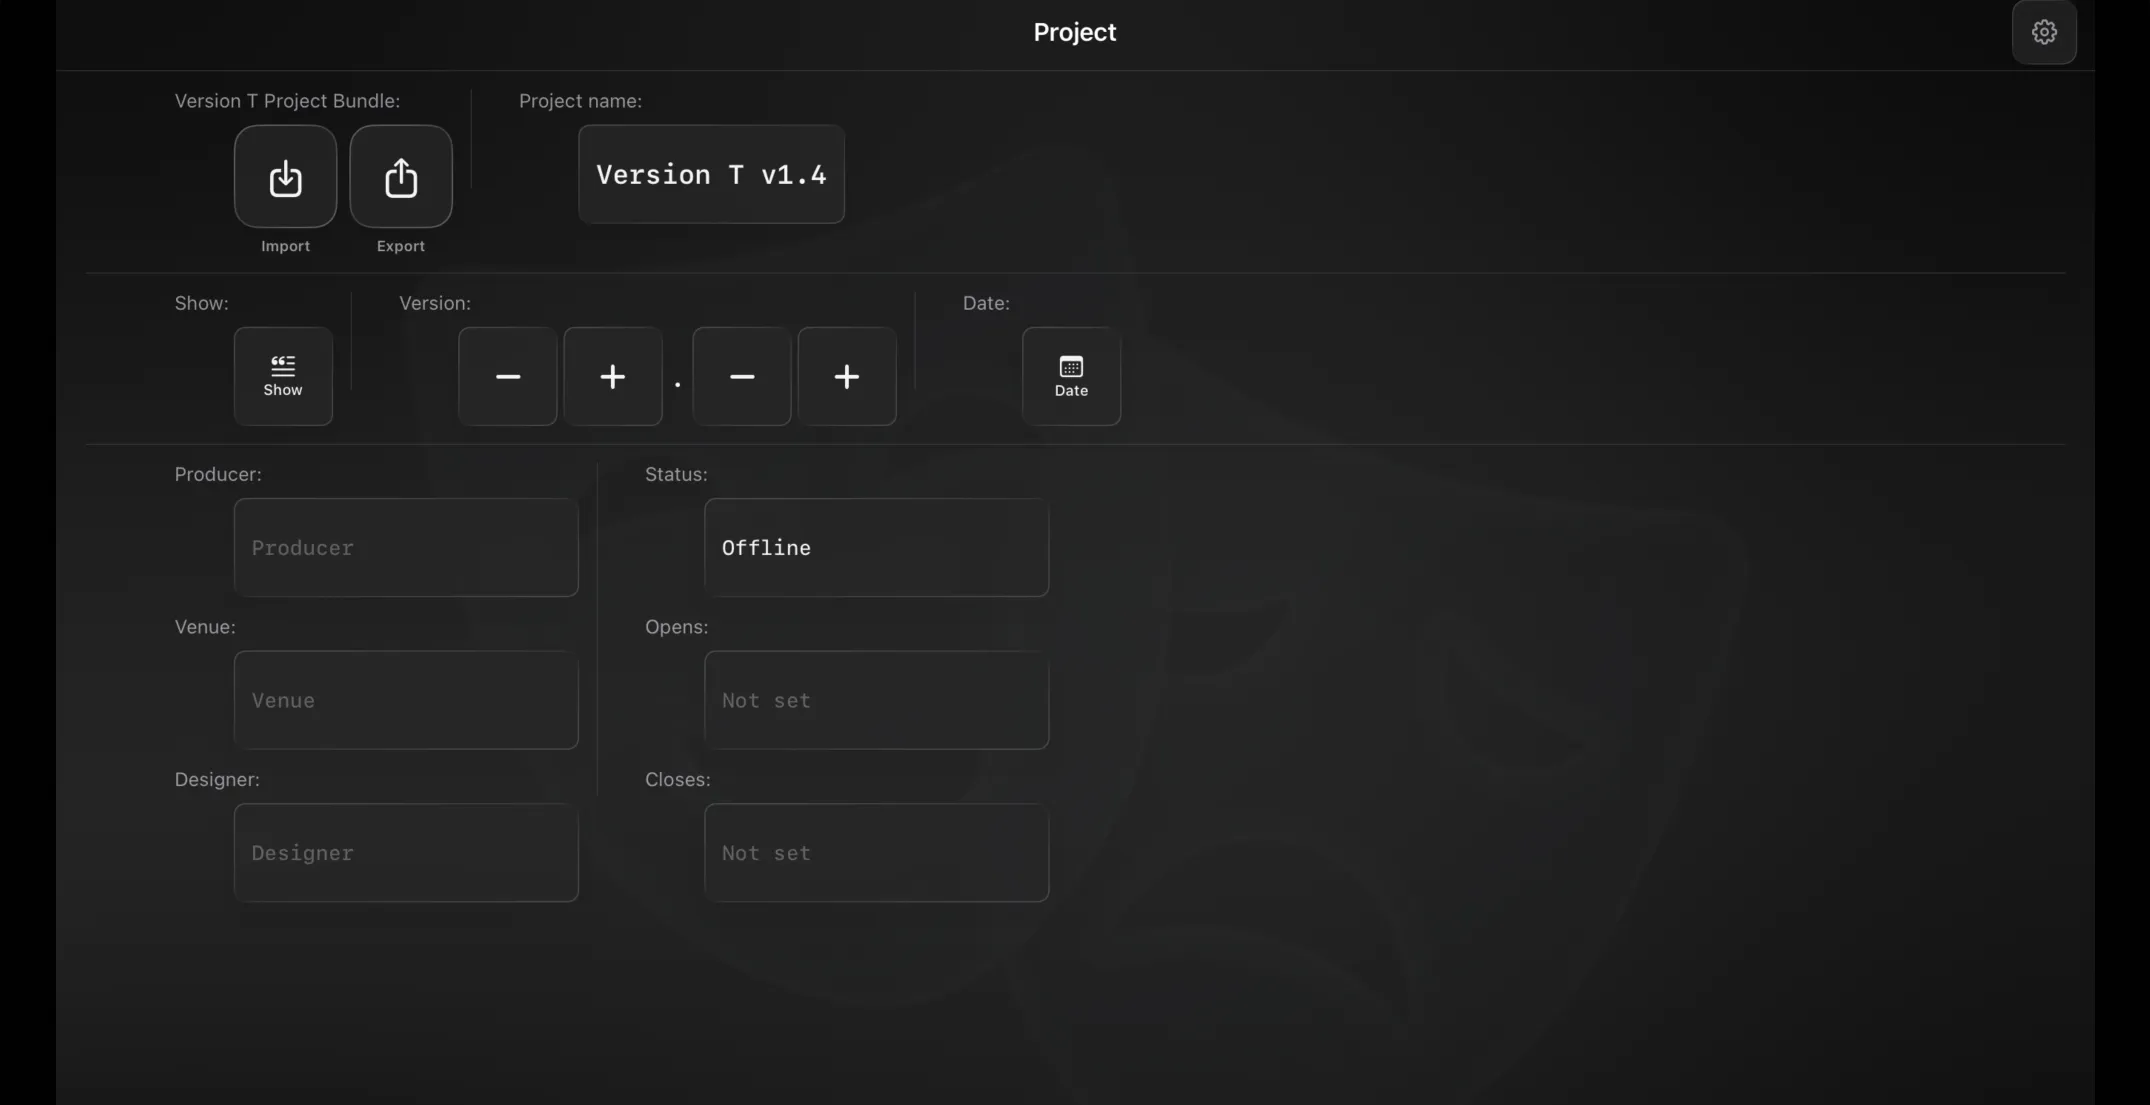
Project identity
At the top, an Import and Export pair sit beside the current project name. The name is built from the fields below and is used for export filenames.
The info grid holds:
- Show name, and a Version (major.minor) with a stepper, plus an optional append-date.
- Producer, Venue, Designer.
- Status — Offline, Soundcheck, Piano Tech, Orchestra Tech, Dress, Preview, Open or Locked.
- Opens / Closes dates.
- Notes.
These are yours to track the production; the show/version/date combine into the project name.
Import and export
- Export writes a Version T Project Bundle — a single file containing the entire project.
- Import opens a bundle and asks what to bring in: Project Info, Overview, Routing, Panner, Ensemble and Show (Show is unavailable if the bundle has none). Tick the parts you want and they merge into your current project; the sheet shows the bundle’s name and export date first.
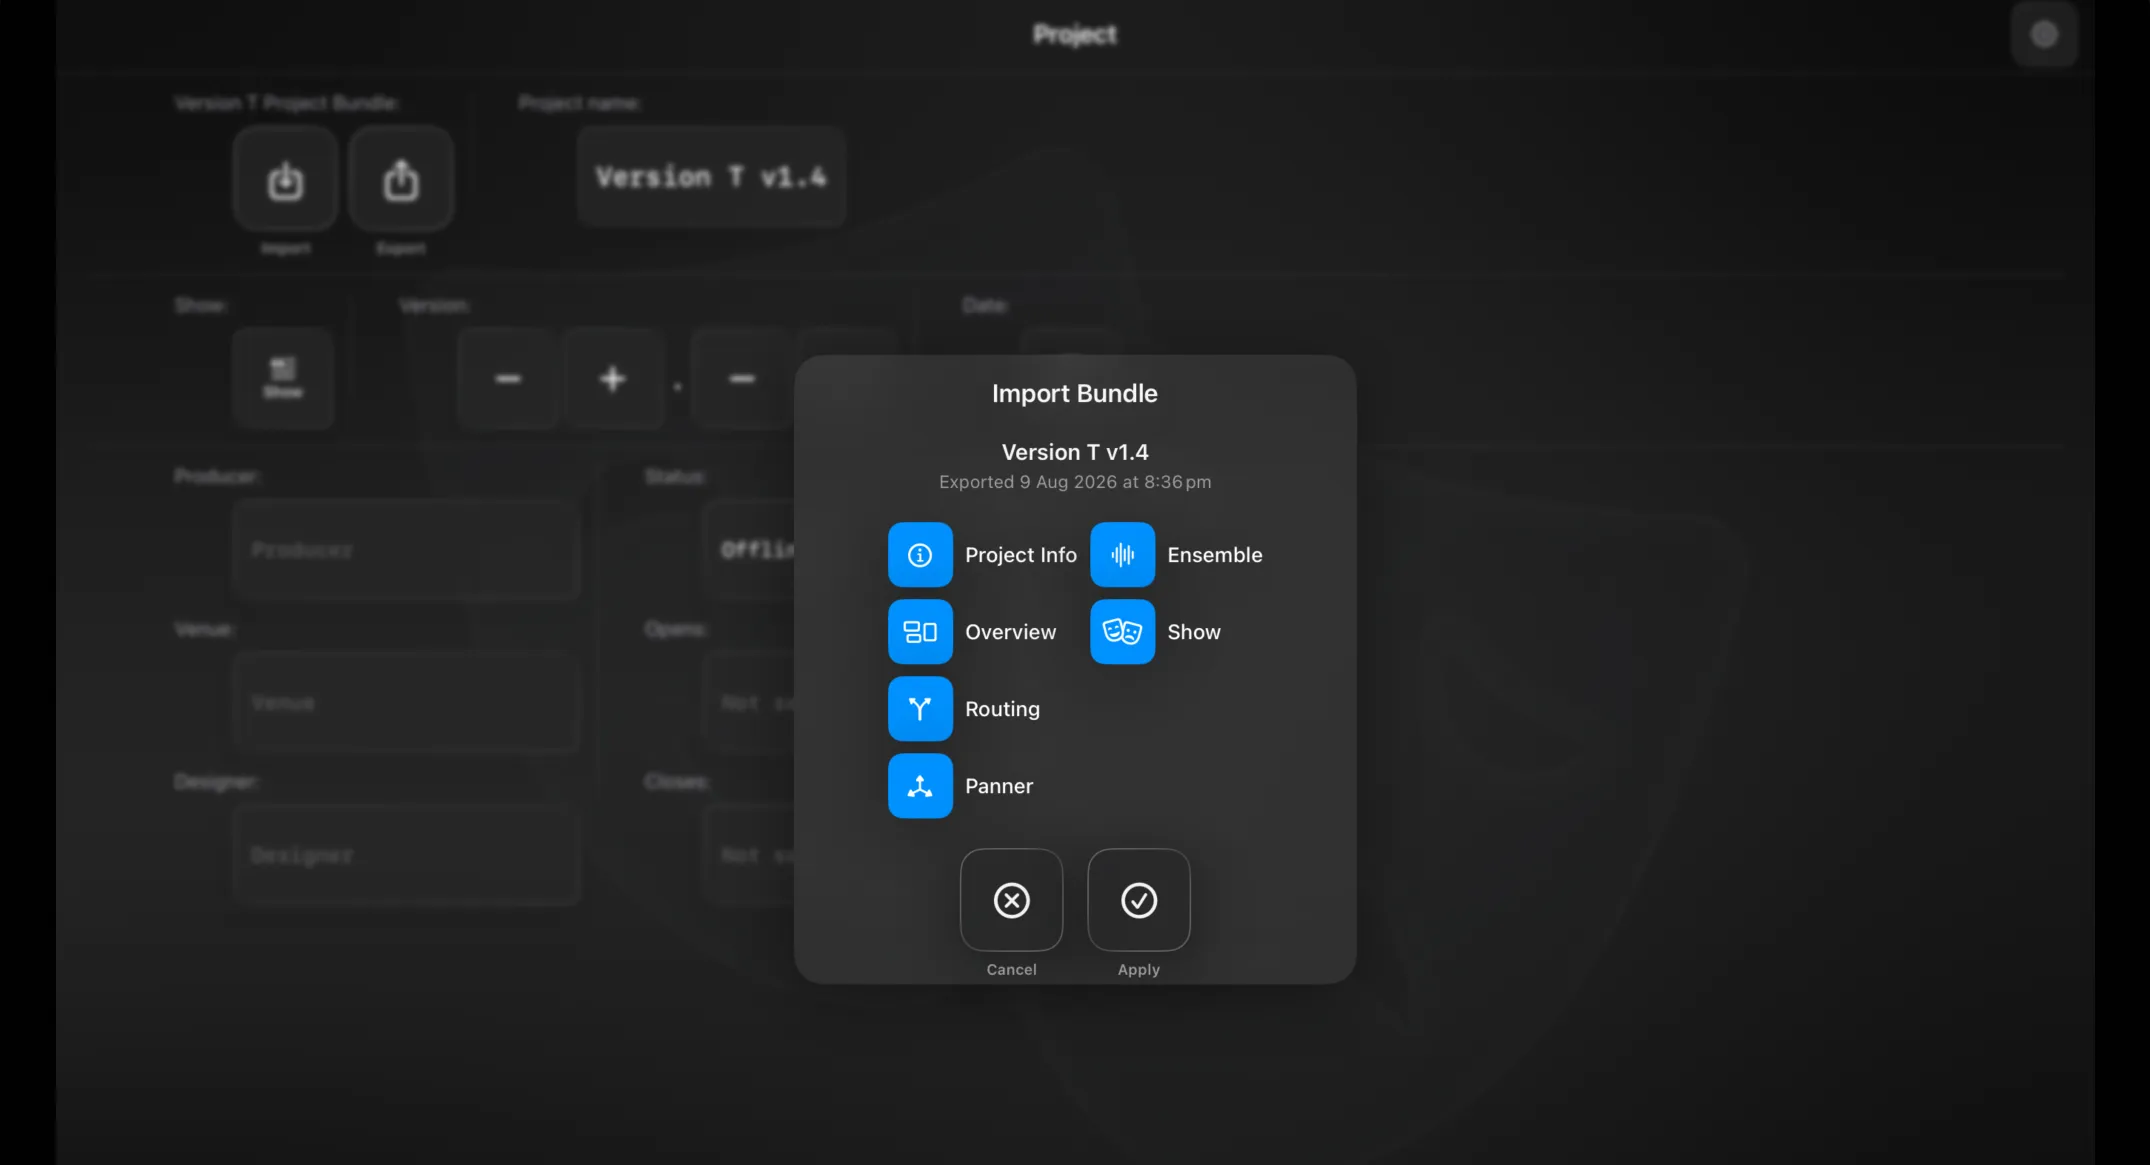
This is how a show travels — between iPads, or onto a different console. Because the show is stored as portable parameter sets, importing rebuilds it wherever you are. Your project also saves itself continuously as you work; the bundle is the portable copy you hand off or archive.
Settings
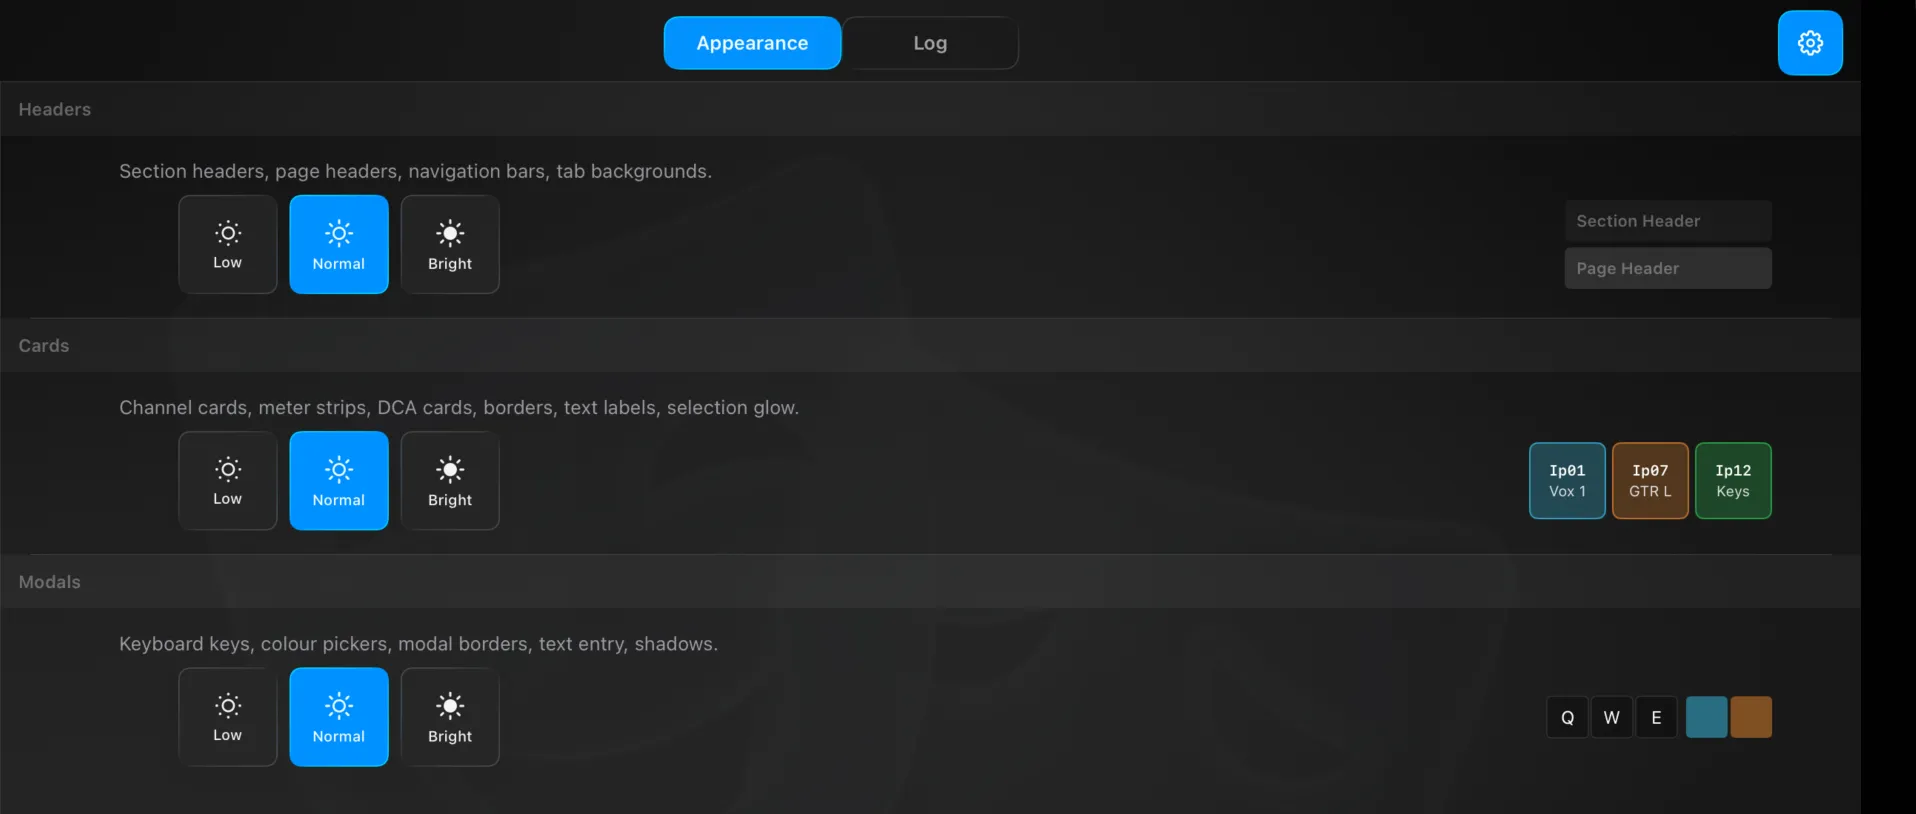
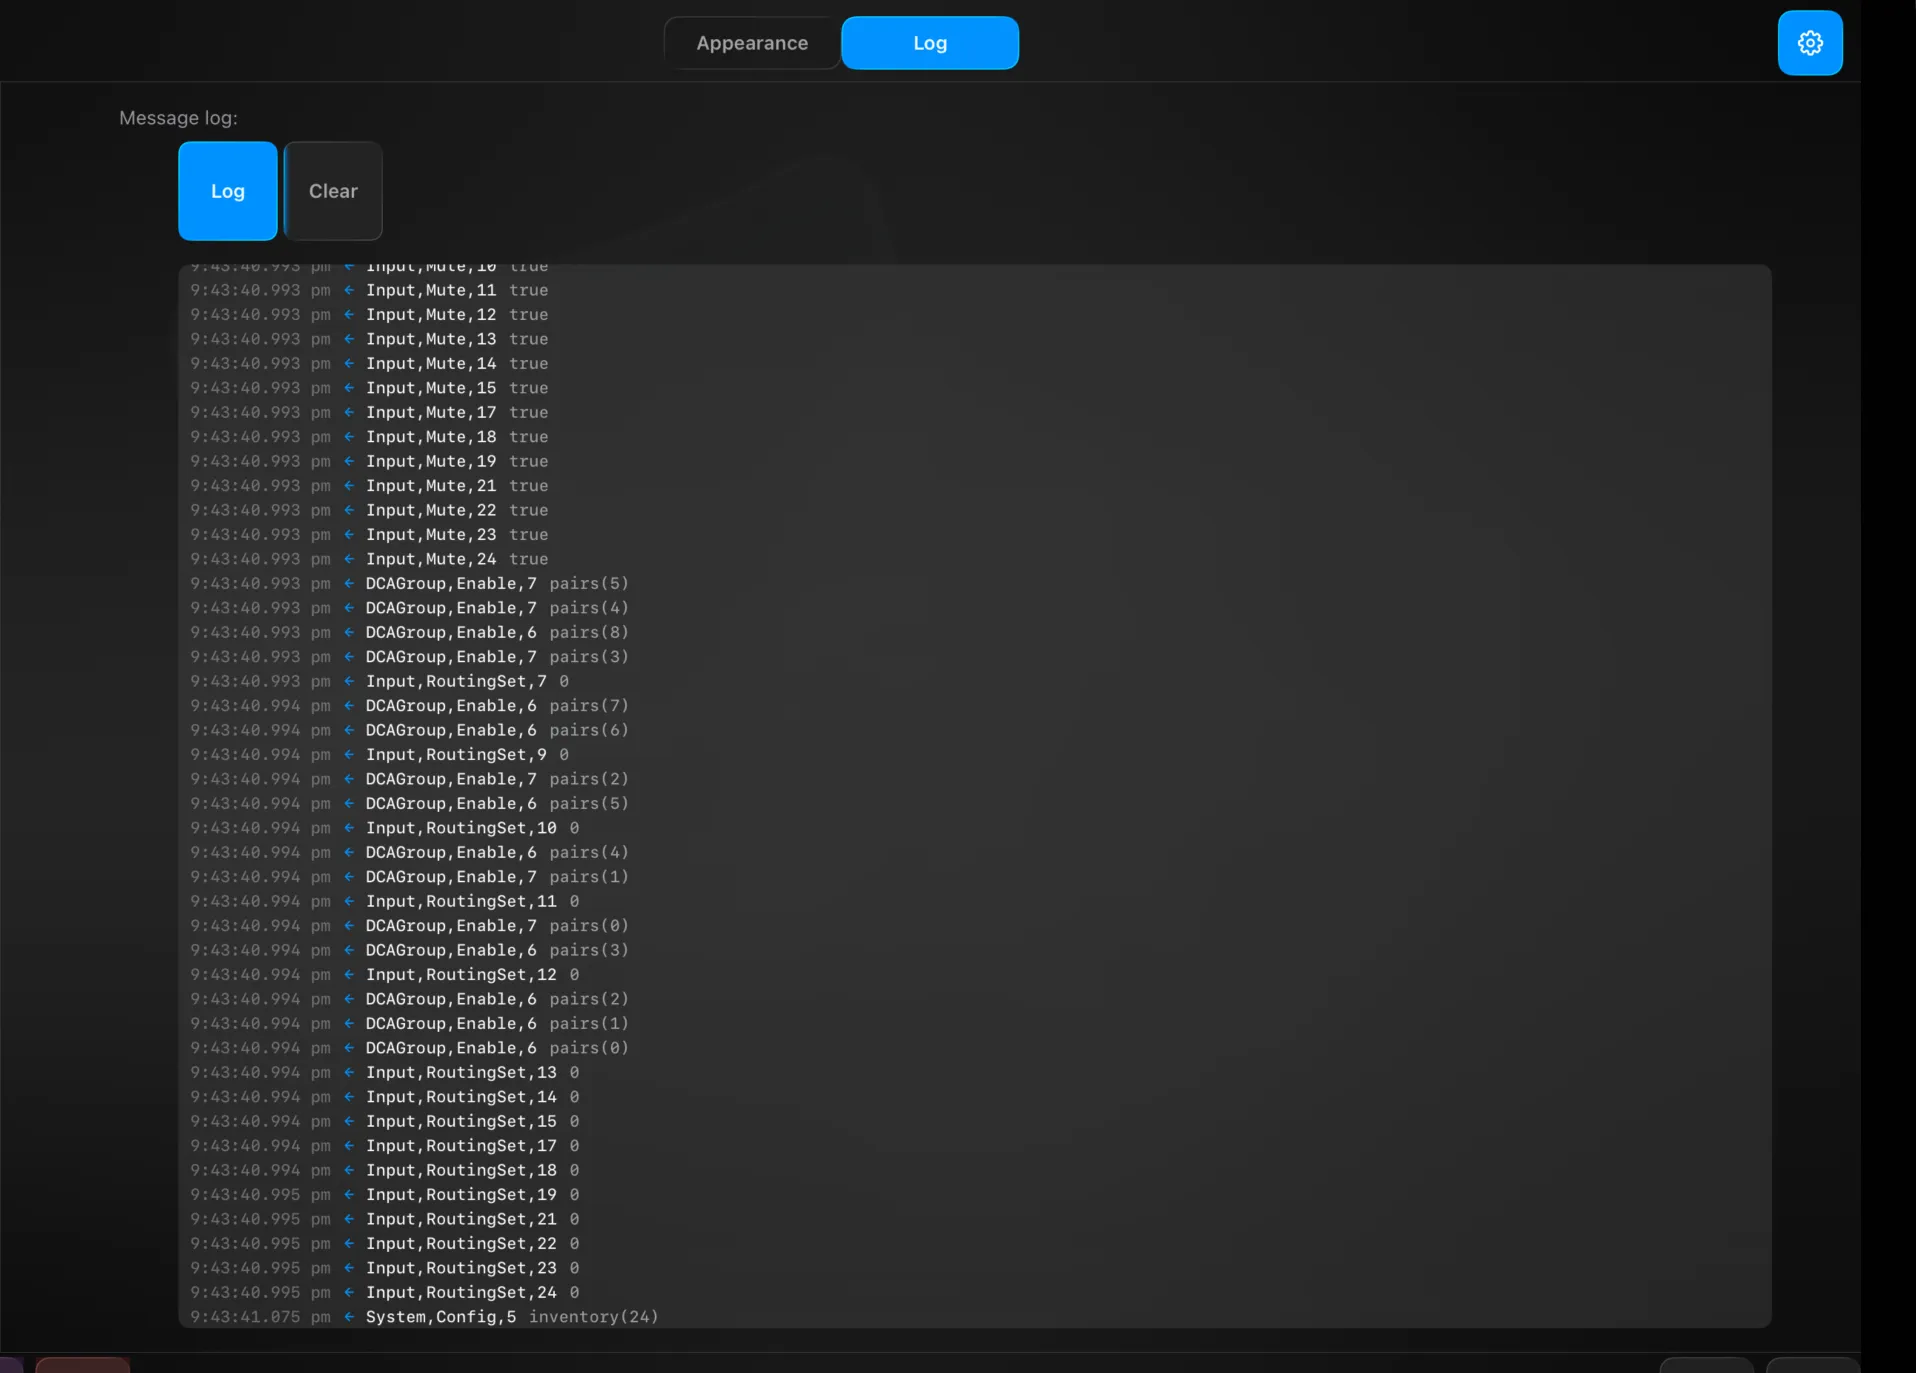
The gear here opens App settings — Appearance (UI brightness per layer: headers, cards, modals — Low / Normal / Bright, with a live preview) and Log (the console message log, with Log / Clear) — rather than a Project-specific page. See Settings.
Technical Reference
ProjectInfo (show, version, producer, venue, designer, opens/closes, status, notes) yields the project name. The bundle (com.versiont.bundle) wraps ProjectData: the routing, panner + mesh, ensemble and metering (Overview) preferences; the automation hierarchy (datacues → cues → showcues → showlists, plus macros and macro sets); the Show preferences including global safes; and the project info. Import applies only the sections you ticked.
Reference
Limits & Capacities
The hard numbers in one place — what Version T manages, what the console holds, and the ranges values move in.
The hard numbers, in one place. Two things set the ceiling: what Version T manages, and what the connected console can hold. Version T’s own limits are fixed; the console’s capacities depend on the desk and its current configuration.
What Version T manages
These are the tracked structures you set up per show. They’re the same on every console.
| Thing | Limit | Notes |
|---|
| Routing sets | 8 | Per pool; extra slots start disabled |
| Tracked input slots | 48 | Set in Routing → Inputs |
| Tracked DCA slots | 24 | Set in Routing → DCAs |
| Routing set colours | 8 | Fixed palette |
| Send mode per mix | 3 | PRE / POST / GRP |
| Showlists per project | Several | The T-list running orders |
| Showcue numbering | Decimal | Point cues (1.0, 1.5, 2.1) |
Version T also keeps naming history to speed up setup: up to 20 previous names per DCA, and a shared dictionary of up to 200 names for autocomplete.
Console capacities
The connected console sets the real channel ceiling. Mix-bus counts (groups, auxes, matrices, mains) are read from the desk at login, so the working numbers depend on the console’s own configuration — the table below is the protocol maximum for the Allen & Heath dLive family.
| Channel type | Up to |
|---|
| Input channels | 128 |
| DCAs | 24 |
| Mute groups | 8 |
| Mono groups / stereo | 62 / 31 |
| Mono auxes / stereo | 62 / 31 |
| Mono matrices / stereo | 62 / 31 |
| FX sends (mono / stereo) | 16 / 16 |
| FX returns | 16 |
| UFX sends / returns | 8 / 8 |
| Mains | 6 |
| Console scenes | 500 |
| I/O sockets | 128 |
WING and X32 / M32 families expose their own fixed topologies; Virtual32, the built-in X32/M32 emulator, presents roughly 30,000 parameters.
Value ranges
| Value | Range |
|---|
| Fader level | −90 dB to +10 dB (−∞ at the bottom of the throw) |
| Pan | −100.0 (L) to +100.0 (R), 0.0 = centre |
| Colour | 0xRRGGBB (24-bit RGB) |
Network
| |
|---|
| dLive discovery / control | UDP 51320 (find), TCP/UDP 51321, UDP 51324 |
| BroadwayOSC (external control) | UDP 8765 |
| Max message size (AH-NET) | 65535 bytes |
Requirements
Version T needs iPadOS 26 or later and an A12 chip or newer (2018 iPads on). M1 or better is recommended for large channel counts and heavy metering. The iPad and console must share the same control network — Wi-Fi, or wired via a USB-C-to-Ethernet adapter (wired recommended for shows).
Reference
Automation Data Model
What a show is underneath the Show panel — the structure that lets one cue list recall onto any console.
This is what a show is underneath the Show panel — the structure that lets one cue list recall onto any connected console. Everything here is stored in the project and travels in the bundle. You never edit these objects directly; the Show panel builds them for you. This page is the reference for how they fit together.
The hierarchy
A show is four layers, each a collection of the one below:
Showlist  (the T-list — the running order)
  └─ Showcue   (a cue placed in the list, with timing)
       └─ Cue        (what to change)
            └─ Datacue     (one category of change)
                 └─ Directive  (one address = one value)
Directive — the atom: a single Broadway address set to a single value (input 4 mute = off). Datacue — one category’s worth of directives that fire together (all the routing changes, or all the DCA names). Cue — a set of datacues that make up one recallable moment. Showcue — a cue placed in the running order, wrapped with timing and sequencing. Showlist — the ordered list of showcues; a project can hold several.
Each layer is stored by reference (a UUID pointing at the next), so the same cue can appear in more than one showlist, and editing it once updates it everywhere.
Datacues — what a cue captures
A datacue holds its directives plus a link to a datacue type, and carries its own name, comment, enabled and locked flags. The categories the Show panel captures:
| Datacue | Tag | Captures |
|---|
| Routing | RTG | Each tracked input’s routing set |
| DCA | DCA | DCA names, colours and membership |
| Mute | MUT | Tracked input mutes |
| Fader | LVL | Levels |
| Spatial | SPA | Panner positions |
| Alt Source | ALT | Alternate sources |
| Scene Recall | SCN | A console scene recall |
A datacue type is the capture recipe behind each category — a named, scoped set of directive definitions (which addresses to read, across which index range) that Version T walks at capture time to build the directives. Because the index ranges (tracked inputs, tracked DCAs, panned inputs) are kept current from your preferences, a capture always covers exactly what you’re tracking now.
Portable versus deferred
Most directives store a finished value — a mute is true or false, a level is a number. Two categories are deferred: they store intent and are resolved to console addresses only at recall, against the current setup.
- Routing stores, per input, which routing set index it should be on (or −1 for none). At recall, the routing manager turns that into the actual crosspoint writes for whatever console is connected.
- Spatial stores, per panned input, a mesh index and an (x, y) position in the unit square — not console pan values. At recall, the panner resolves it to the connected console’s panning.
- DCA membership stores the input pairs per DCA; the DCA manager decomposes them into individual crosspoint toggles at recall.
This is why the same show recalls on any console: the portable parts describe what in Version T’s own terms, and the connection rebuilds the how each time.
A scene recall is not portable
The Scene Recall datacue ([.cues, .go]) fires a scene on the mixer itself by number. It’s a pass-through to that specific console and is venue-specific — it won’t travel to a different desk. Use it when a cue needs to trigger something only the console’s own scene memory holds.
Showcues — timing and sequencing
A showcue wraps one cue and adds:
- A cue number stored as a decimal, so you can insert point cues between whole ones — 1.0, 1.5, 2.1.
- Wait time and an auto-follow mode (
Manual, Next, or Time) for how the list advances.
- Recall scope — the safety layer, below.
- Name, comment, enabled and locked flags, plus created / modified stamps.
Recall safety lives on the showcue
Each showcue carries its own protection, at two grains:
- Category scope (
recallSafe) — a list of whole categories to skip on recall (an empty list means recall everything).
- Address-level safes (
cueSafes) — a set of specific Broadway addresses this cue must never overwrite, the same shape as the app-wide Global Safes.
Global Safes are held once for the whole session; a showcue’s cueSafes add per-cue protection on top. The only difference between them is reach — one cue versus every cue. See Show for setting both from the grid.
Where it’s stored
The whole hierarchy lives in the project’s unified store and is written into the Version T Project Bundle on export — datacues, cues, showcues and showlists together with the routing, panner, ensemble and metering preferences that give the deferred parts their meaning. Import brings back a show that rebuilds itself onto wherever you are.
Reference
Macro Command Language
The full grammar for a macro step — every channel, parameter and value you can type.
Every macro step holds one line of plain-language commands. Version T compiles that line the moment you enter it, so by showtime there’s nothing left to interpret — the step just fires. This page is the full grammar: every channel, parameter and value you can type. For building and firing macros, see Macros.
Matching is case-insensitive throughout — Input 1 Mute On and input 1 mute on are the same. Put several commands on one line by separating them with a semicolon (;).
The shape of a command
A console command names a channel, then narrows down to the one parameter you want to set, and ends with the value:
<channel> <number> [<section>] [<sub-parameter>] <value>
Numbers are 1-based — input 1 is the first channel, exactly as it’s labelled on the console. The address always carries one more name than it has numbers; that trailing name is the parameter being set.
A few worked examples:
| Command | Sets |
|---|
input 1 mute on | Channel 1 mute on |
input 1 level -10 | Channel 1 fader to −10 dB |
input 1 level -inf | Channel 1 fader to −∞ |
aux 3 level 0 | Aux 3 fader to 0 dB |
dca 2 mute on | DCA 2 mute on |
input 1 send 3 level -5 | Channel 1’s send to aux 3 at −5 dB |
input 1 pan 50 | Channel 1 pan to 50 |
input 1 phantom on | Channel 1 phantom power on |
input 1 eq enable off | Channel 1 EQ bypass |
input 1 comp threshold -20 | Channel 1 compressor threshold |
input 1 send 3 pre on | Channel 1 send 3 set pre-fader |
matrix 1 level -20 | Matrix 1 fader to −20 dB |
main level 0 | Main stereo fader to 0 dB |
tracked input 1 mute on | Tracked input slot 1 mute on |
tip 1 mute off | Same, using the short alias |
routing set 3 recall 1 | Recall routing set 3 |
Channels
Type the channel token, then its number. Aliases are interchangeable.
| Token | Aliases | Channel |
|---|
input | ch, ip | Mono input |
inputstereo | | Stereo input |
group | grp | Mono group |
groupstereo | | Stereo group |
aux | | Mono aux mix |
auxstereo | | Stereo aux mix |
bus | | Mono bus (WING) |
busstereo | | Stereo bus (WING) |
mix | | Mono mix (generic) |
mixstereo | | Stereo mix |
matrix | mtx | Mono matrix |
matrixstereo | | Stereo matrix |
output | | Mono output |
outputstereo | | Stereo output |
dca | | DCA fader group |
mutegroup | | Mute group |
fxsend | fx | Mono FX send |
fxsendstereo | | Stereo FX send |
fxreturn | fxr | Mono FX return |
fxreturnstereo | | Stereo FX return |
mainstereo | main | Main LR |
mainmono | | Main mono |
maincentre | | Main centre |
mainsub | | Main sub / LFE |
monstereo | mon | PAFL / monitor bus |
headamp | | Physical headamp |
tracked input | tip | Tracked input slot |
tracked dca | tdca | Tracked DCA slot |
routing set | | Routing set |
Parameters
After the channel and number, name what you’re setting. The most common:
| Token | Aliases | Sets |
|---|
level | fader, vol, volume | Fader position (dB) |
mute | | Mute on / off |
pan | | Pan position |
trim | | Trim / gain |
solo | | Solo state |
phantom | | Phantom power |
phase | | Phase / polarity |
source | | Input source |
send | | Send level to a bus (a crosspoint) |
delay | | Delay time |
Reaching into processing
To set something inside a processing block, name the block, then the sub-parameter. Blocks: eq, comp, gate, highpass, insert, preamp, dynamics, limiter, deesser, geq.
Sub-parameters address the specific control: enable, bypass, freq, gain, q, threshold, ratio, attack, release, knee, range, hold, makeup, type, mode, slope, width, pre, post, wet, dry, depth, rate, feedback, size, weight.
So input 1 comp threshold -20 reads channel → comp block → threshold → value.
Values
The last word is the value. Version T reads it flexibly:
| You type | Becomes |
|---|
on, true, yes | On (1) |
off, false, no | Off (0) |
-inf, -infinity | −∞ |
inf, infinity | +∞ |
any number (-10, 0.5, 127) | That number |
Special commands
Three commands don’t set a console parameter:
wait <milliseconds> — pause before the next step.
wait 500          Pause half a second
wait 1000         Pause one second
recall <cue> — fire a showcue by number.
recall 3 Fire cue 3
osc <host:port> <path> [args…] — send an OSC message to an external device, such as a Go to QLab.
osc 10.0.0.5:53000 /go
osc 10.0.0.5:53000 /cue/1/start
osc 192.168.1.50:8000 /fader 0.75
Two-word tokens
Some tokens are two words. Version T joins them automatically, or you can type them as one word — and several have a short alias:
| Natural | One word | Short |
|---|
tracked input | trackedinput | tip |
tracked dca | trackeddca | tdca |
routing set | routingset | |
mute group | mutegroup | |
main stereo | mainstereo | main |
fx send | fxsend | fx |
fx return | fxreturn | fxr |
Several commands on one line
Chain steps with ;. Each segment compiles on its own, and all of them must compile for the step to go green:
input 1 mute on; wait 500; recall 6
How compiling works
- Tap the hammer on a step to compile it.
- Success turns the text your accent colour and swaps the hammer for a pencil.
- A line that won’t compile stays a draft (hammer) and won’t fire.
- Editing the text clears the compiled state — recompile to confirm.
- For Toggle and Momentary steps, both the primary and the OFF/release command must compile.
Compiled steps are saved compiled, so a project loads ready to fire with no re-parsing.
Reference
BroadwayOSC
Version T's open control protocol — read and drive console parameters live from any external program over the network.
Download the full spec (PDF)
Download Markdown
BroadwayOSC is Version T’s open control protocol. Any external program — a show-control system, a QLab-style cue engine, a custom script — can reach the connected console over the network and read or drive its parameters live, using the same model Version T uses internally. Whatever an operator does on the console flows back out to every listening client without polling.
It’s a superset of standard Open Sound Control (OSC 1.0 / 1.1): plain float, integer and string messages work exactly as they do in any OSC tool, and BroadwayOSC adds a richer type system, index-range addressing and a readable console namespace on top. This page is a working summary; the full specification is the BroadwayOSC document in the project.
Connecting
BroadwayOSC runs over UDP, default port 8765. There’s no handshake — send any BroadwayOSC message and you’re registered as a client from that moment. Send /Unsubscribe/* to remove yourself cleanly when you disconnect.
What a message means
Every message is one of four intents, decided by the path prefix and whether a value is attached:
- SET — a path with a value. The parameter updates immediately.
/Input/1/Level ,f 0.75
- GET — a path with no value. The current value comes back, and you’re auto-subscribed to future changes for that address.
/Input/1/Level
- SUBSCRIBE —
/Subscribe/Input/1/Level registers for ongoing updates without changing anything.
- UNSUBSCRIBE —
/Unsubscribe/Input/1/Level stops one address; /Unsubscribe/* removes the client entirely.
An explicit /Set/… or /Get/… prefix is accepted if your client prefers it, but isn’t required.
/ChannelType/index/Parameter
/ChannelType/index/ProcessingBlock/Parameter
/ChannelType/index/ChannelType/index/Parameter
Tokens are case-insensitive — /input/1/level equals /Input/1/Level. Processing blocks (Comp, Gate, Hpf, Lpf, Preamp, Eq) take no index of their own. A crosspoint — a send from a channel to a bus — carries both indices, e.g. /Input/1/Aux/3/Level.
| Address | Reaches |
|---|
/Input/1/Level | Input 1 fader |
/Input/1/Mute | Input 1 mute |
/Aux/3/Level | Aux 3 fader |
/Input/1/Aux/3/Level | Input 1’s send to aux 3 |
/Dca/1/Level | DCA 1 fader |
/MainStereo/1/Level | Main LR fader |
/Input/1/Comp/Threshold | Input 1 compressor threshold |
/Input/1/Hpf/Freq | Input 1 high-pass frequency |
/Input/1/Preamp/Trim | Input 1 preamp trim |
Addressing many channels at once
The index field isn’t limited to a single number:
| Form | Example | Means |
|---|
| Single | 3 | Channel 3 |
| Range | 1-32 | Channels 1 through 32 |
| Set | 1,4,5-8 | Channels 1, 4, 5, 6, 7, 8 |
| Wildcard | * | Every channel of that type |
Two ranges in one address produce every combination — /Input/1-32/Aux/1-16/Level is 512 crosspoints. On SET the same value is written to every expanded address; on GET/SUBSCRIBE each one is handled individually.
Channel types
Inputs: Input, InputStereo, AuxInput, AuxInputStereo, FxReturn, FxReturnStereo.
Buses: Aux, AuxStereo, Group, GroupStereo, Bus, BusStereo, Matrix, MatrixStereo, FxSend, FxSendStereo, Output, OutputStereo, MainStereo, MainCentre, MainSub, MainSum, MainSurround, Mon.
Groups: Dca, MuteGroup.
Parameters
Float values are in engineering units — Hz, ms, dB — and Version T converts to and from each console’s wire format for you.
| Parameter | Type | Notes |
|---|
Level | float | Fader (dB), −∞ to +10.0 |
Pan | float | −100.0 L … 0.0 centre … +100.0 R |
LevelDCA | float | DCA-adjusted level — read-only |
Mute | T/F | |
Solo | T/F | Read-only |
Name | string | Read-only |
Color | RGB | 0xRRGGBB — read-only |
Processing blocks each carry their own controls, addressed under the block: Preamp (Trim, Phase, Phantom), Hpf / Lpf (Freq, Enable, Slope), Gate, Comp (with sidechain and parallel sub-blocks), Eq (per-band Freq/Gain/Q/Type), Geq (mix buses), Delay, Insert, and DCA assignment (/Input/n/Dca/m/Enable). See the full spec for every field.
Scenes and cues
| Address | Type | Does |
|---|
/Cues/1/Go | impulse | Fire the standby scene |
/Cues/1/StandbyCue | int | Set the standby scene index |
/Cues/1/ActiveCueID | int | Active scene — read-only |
/Cues/1/Show | string | Active show name — read-only |
/Cues/1/CueList | GET | The full scene list |
Value types
BroadwayOSC carries the standard OSC tags — i int32, f float32, s string, b blob, T/F boolean, N null, I impulse (used for actions like Go), d float64, h int64, and arrays […] — and adds three of its own: u (uint16), R (RGB colour, 0x00RRGGBB), and P (a pair — int16 token plus int16 index). Collections use OSC 1.1 arrays: [TTF] for routing enables, [fff] for levels, [iii] for pre/post flags, [PP] for a channel pair list.
How clients stay in sync
Each client keeps its own subscription set; pushes only go to addresses in that set. Build the set by GETting an address (auto-subscribe) or with /Subscribe/. If you GET an address the server doesn’t yet hold, it fetches the value from the console, stores it, and pushes it to you as soon as it arrives — no re-request. From then on, every console move on that address is forwarded to you live. Clients are identified by ip:port.
Coexisting with ADM-OSC
BroadwayOSC (/ChannelType/n/…) and ADM-OSC (/adm/obj/n/…) use non-overlapping namespaces and can share the same UDP port, so spatial-object control and console control can run side by side.